

My biggest annoyance on my face is my under-eye area. I’m always puffy and always super dark under there…I can recall in elementary school someone saying I looked like a raccoon because of my eyes (ouch!).
As I’ve gotten older I’ve definitely picked up some tricks to help with this problem. And while I cannot say that these tricks erase them 100% they at least hide them much better and make me feel suitable for public! 😉
Here is my everyday under-eye routine…hopefully it’ll help you if this is a problem area for you too! Now, I’ve included my shades, but every face is different. The steps and types of products will be the same, but the exact shade may vary.

You’ll need:
–A depuffing eye serum (I love Clinique’s All About Eyes! It REALLY helps! Look for something with caffeine in it.)
–A corrector. This essentially neutralizes the colour under your eye. It’s important to neutralize those blueish purple tones/redness etc first instead of just packing on concealer! You’ll be able to use less concealer this way and get a more believable bright natural effect. The general rule of thumb is that peach (or pink) will neutralize. The deeper your skin, the deeper the peach you use. Very fair or pale skin will prefer light pinks. (I’m using Revlon’s Age Defying click pen in #4)
–A concealer. I’m obsessed with Maybellines FitMe concealer. I use #20 Sand. It’s very golden and works perfect for me. Pick something near your skin tone or a shade lighter. Don’t go too light though, that will have the opposite effect and bring bad attention to your under-eye area.
–A brightener. This is optional. If you’re super dark under-eyes like me, this is necessary. Totally up to you. This will help add that pop to your under-eye and cheek bone area and will “distract” and lighten everything up! (I use Flower’s Brightening Concealer in BC2)
–Highlighter. This may be part of your usual routine for eyeshadow already. If not add this step in for an extra pop of light!

1. Yikes! My under-eyes in all their glory! Ha!
2. Apply your peachy (or pinky) corrector

3. After each step of applying more product, use your ring finger (it’s the weakest finger, so it’s more gentle), and gently pat (don’t rub) in the product.
4. Apply concealer in a triangular shape under your eye. You want to bring it a little lower than where your darkness stops.
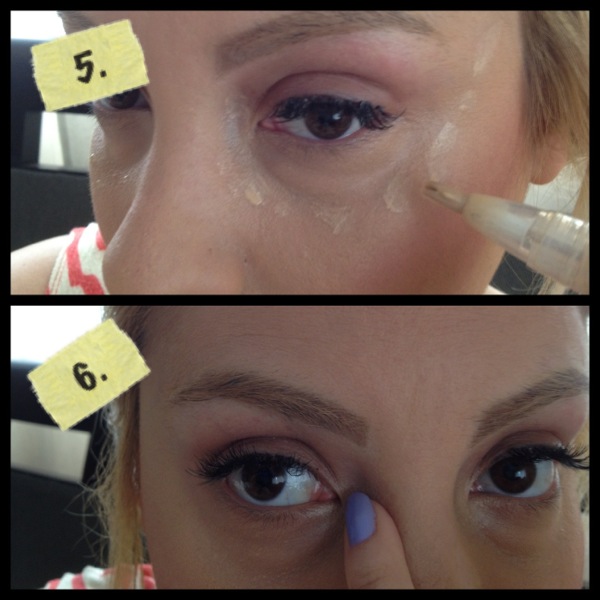
5. Dab brightener along the “seam” of where your under-eye area ends and bring up your cheek bone to your temples.
6. Dab a highlight (anything vanilla colored and shimmery will do!) in the inner socket of your eye.

7. There you have it! So much better, right?
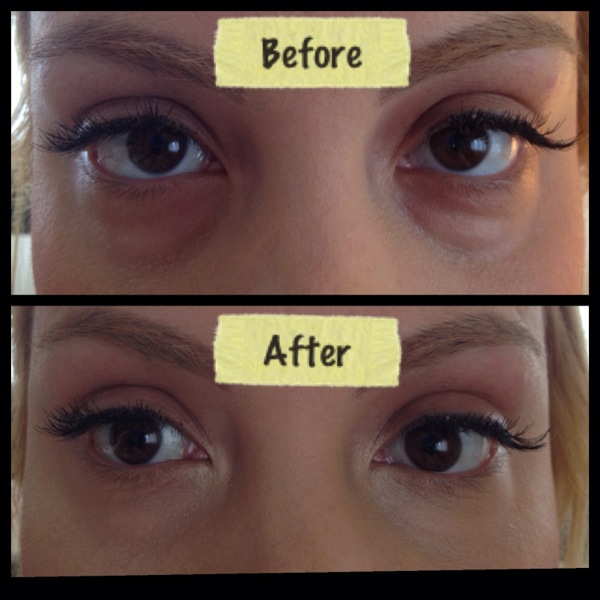
There is the side by side before and after. Hope this helps! Give it a shot and let me know!
Cheers to Correcting, Concealing, and Brightening!

March 7, 2013

