I am so smitten with the look I did for a photoshoot this week with Nicole Cook (umm, by the way she is an AMAZING highschool senior –fashion– photographer in NorCal). Luckily I had the sense to take pics of the look as it developed so I could make this tutorial for you! The funny thing is that it doesn’t actually use any silver shadows in it…the hue is a result of the blending of the liner and shadows. Which I actually prefer because silvers often translate very blue on camera. This way you get the effect in a truer way. If you’re not a fan of silvery shadow, then sub the black pencil for an espresso one and blend out with dark brown shadow instead of black for a more chocolatey neutral look. I worked from my Naked Basics palette and also a few shades from Makeup Geek (creme brulee, shimma shimma, and homecoming).

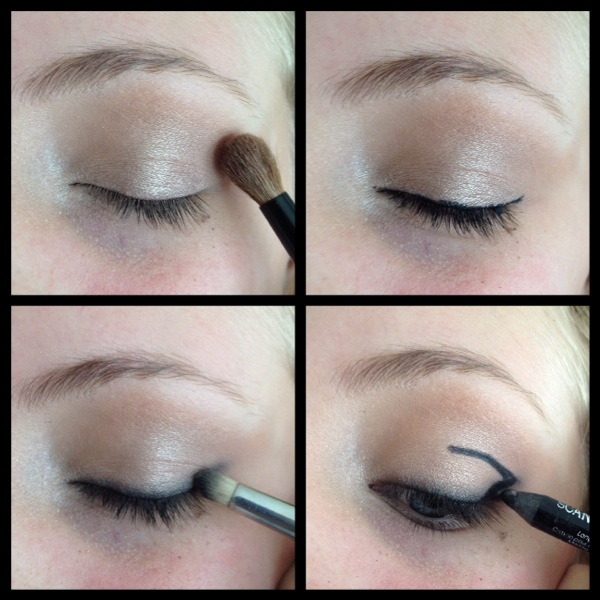
1. Prime your lids and dust on a neutral champagne or vanilla shadow all over your lid, the shimmery base will help when it comes time to blend.
2. Line your eyes, doesnt need to be precise.
3. Use a pencil brush (or your finger even) to blend and soften the liner.
4. Draw a V with your pencil to outline where your smokey cat eye will go. Make sure you open your eye first to determine how high up you want the line in your crease.

5. Use your pencil brush to blend and smudge the V more into the center of your eye, you essentially are focusing on the outer third portion of your eye. Dip your brush into black shadow as necessary to build the depth you are comfortable with. See how messy its getting? Trust the process and don’t get scared! I like to do eyes first and skin second when doing looks like this.
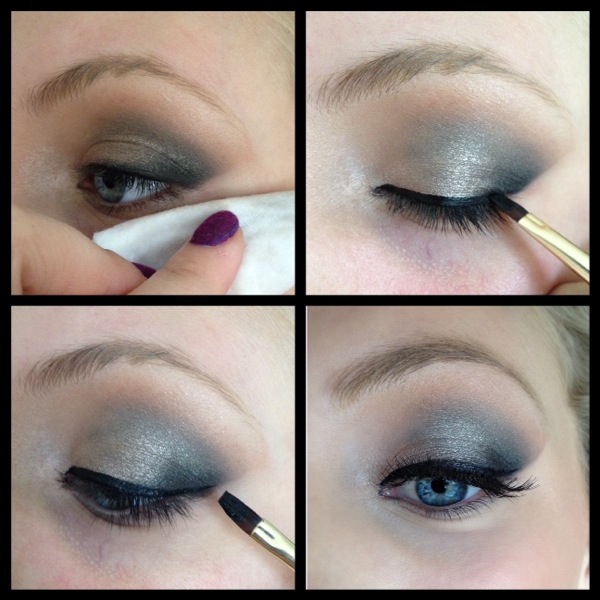
6. Pat a shimmery taupe shadow all over your lid, smoothing out the seams of where the black shadow stops.
7. Dust a soft brown in your crease, bronzer works fab!
8. Highlight under your brow and in your inner socket.

9. Now for the clean up! This step is what adds the sharp angled edge to the look. Take a cotton pad with remover or makeup wipe and fold it so you have a straight edge. Swipe the edge in an upward angled motion.
10. Line your eyes. I love the sharpness of a gel or liquid for this look.
11. Add the flick of liner at the end for your cat eye. The awesome part about this look is that the sharp edge we created is your guideline, so its goof-proof!
12. Load up with mascara…bonus points and more drama if you toss in some lashes too! I used medium length individuals.

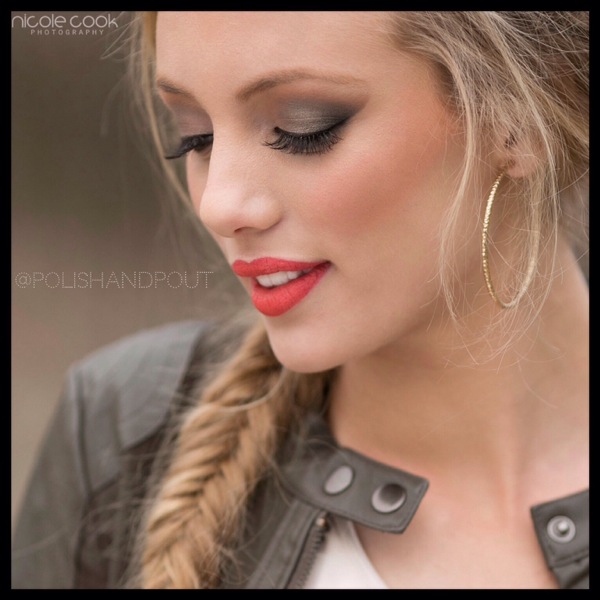
And there you have it! Isn’t our model Lexy so lovely?!

We were going for drama so we paired her look with a bold punchy lip (Rimmel Kate Moss #12)…but a nude lip is a great option for this look!
Cheers to Seniors, Silver, and Smokey Eyes,

January 29, 2014
