

Last year we did a few fun super simple Halloween DIY costumes and it was SO MUCH fun we just had to do more this year too!
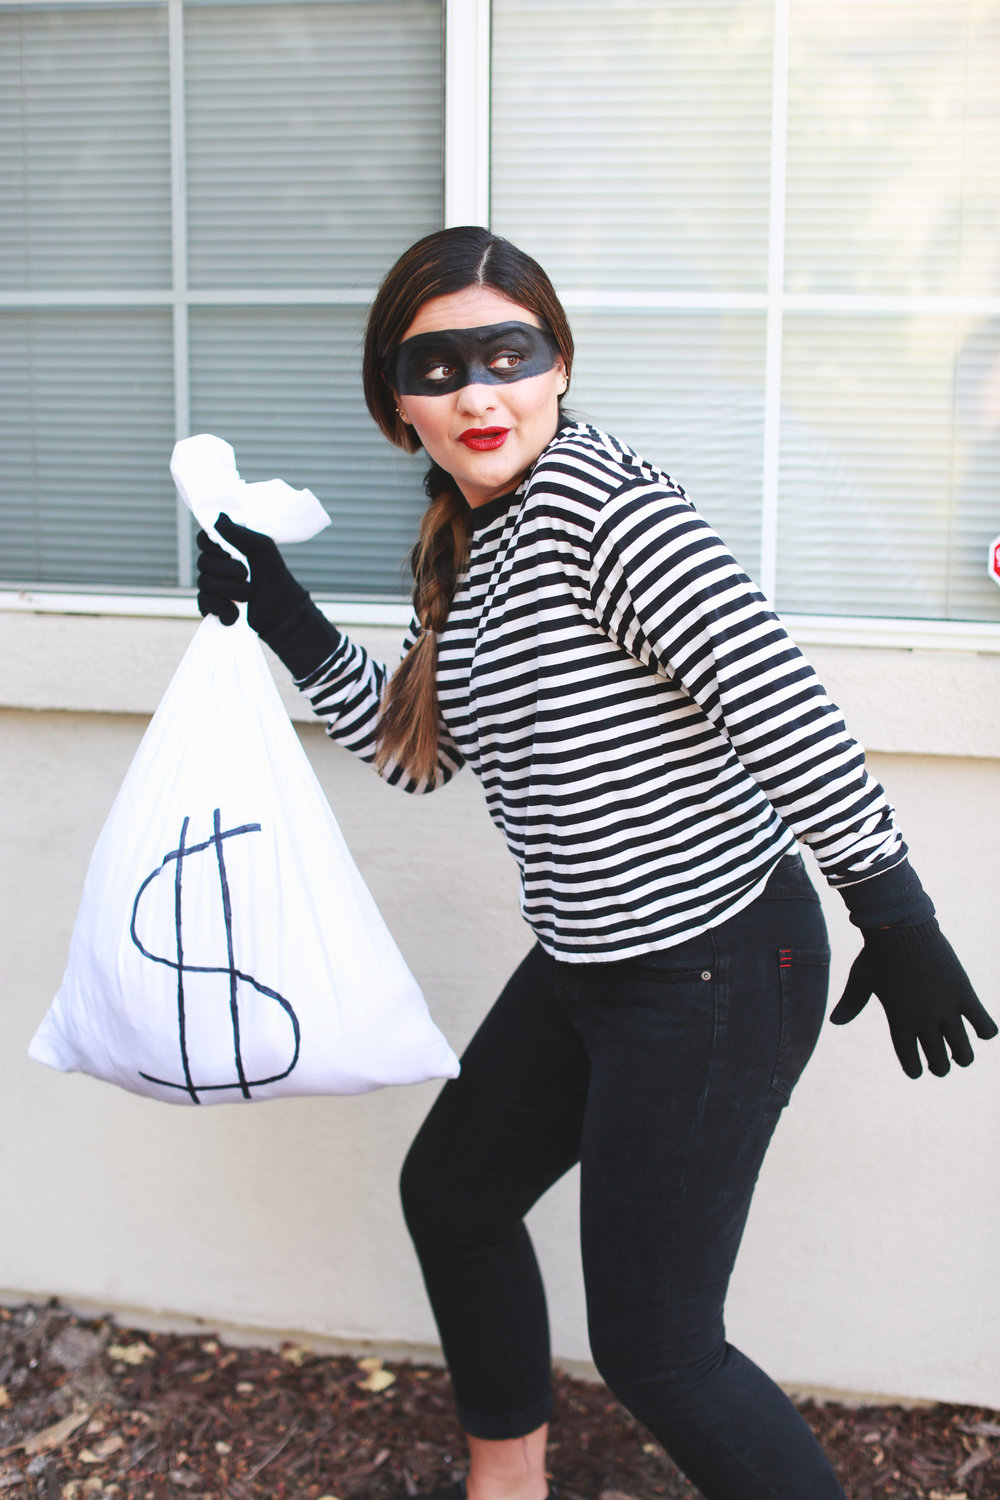
First up, an old timey bank robber!
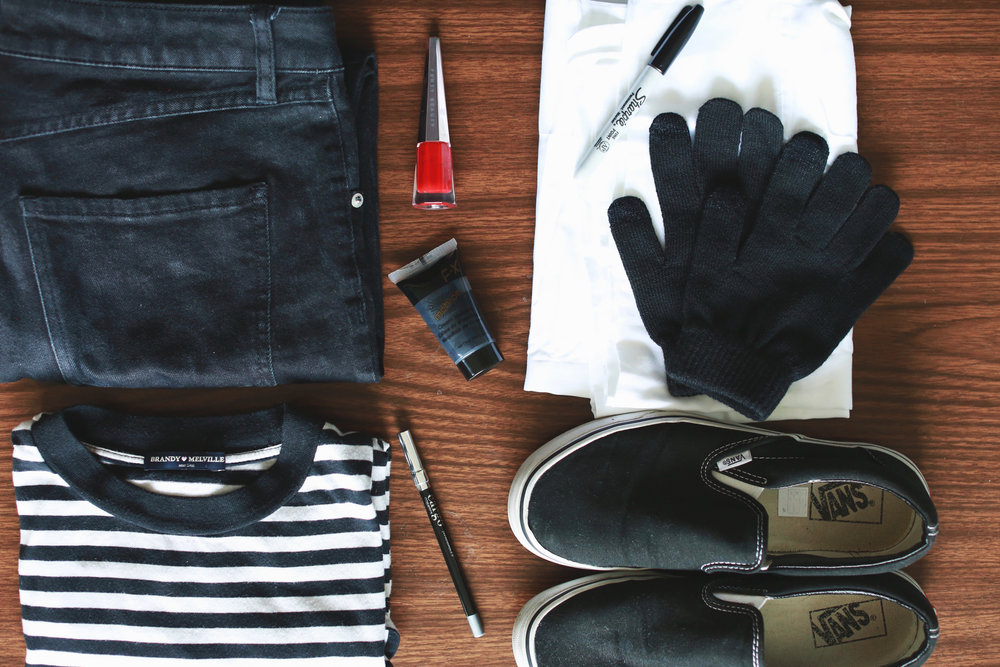
Here’s what you’ll need: For your outfit opt for black pants and shoes, a black and white striped top (go for all black if you don’t own stripes), black gloves.

You’ll also need a bag for all your stolen loot! An old white or cream pillow case will do the trick! Use a black sharpie to draw a big dollar sign $ on it…because otherwise how will you remember what’s inside?! 😉
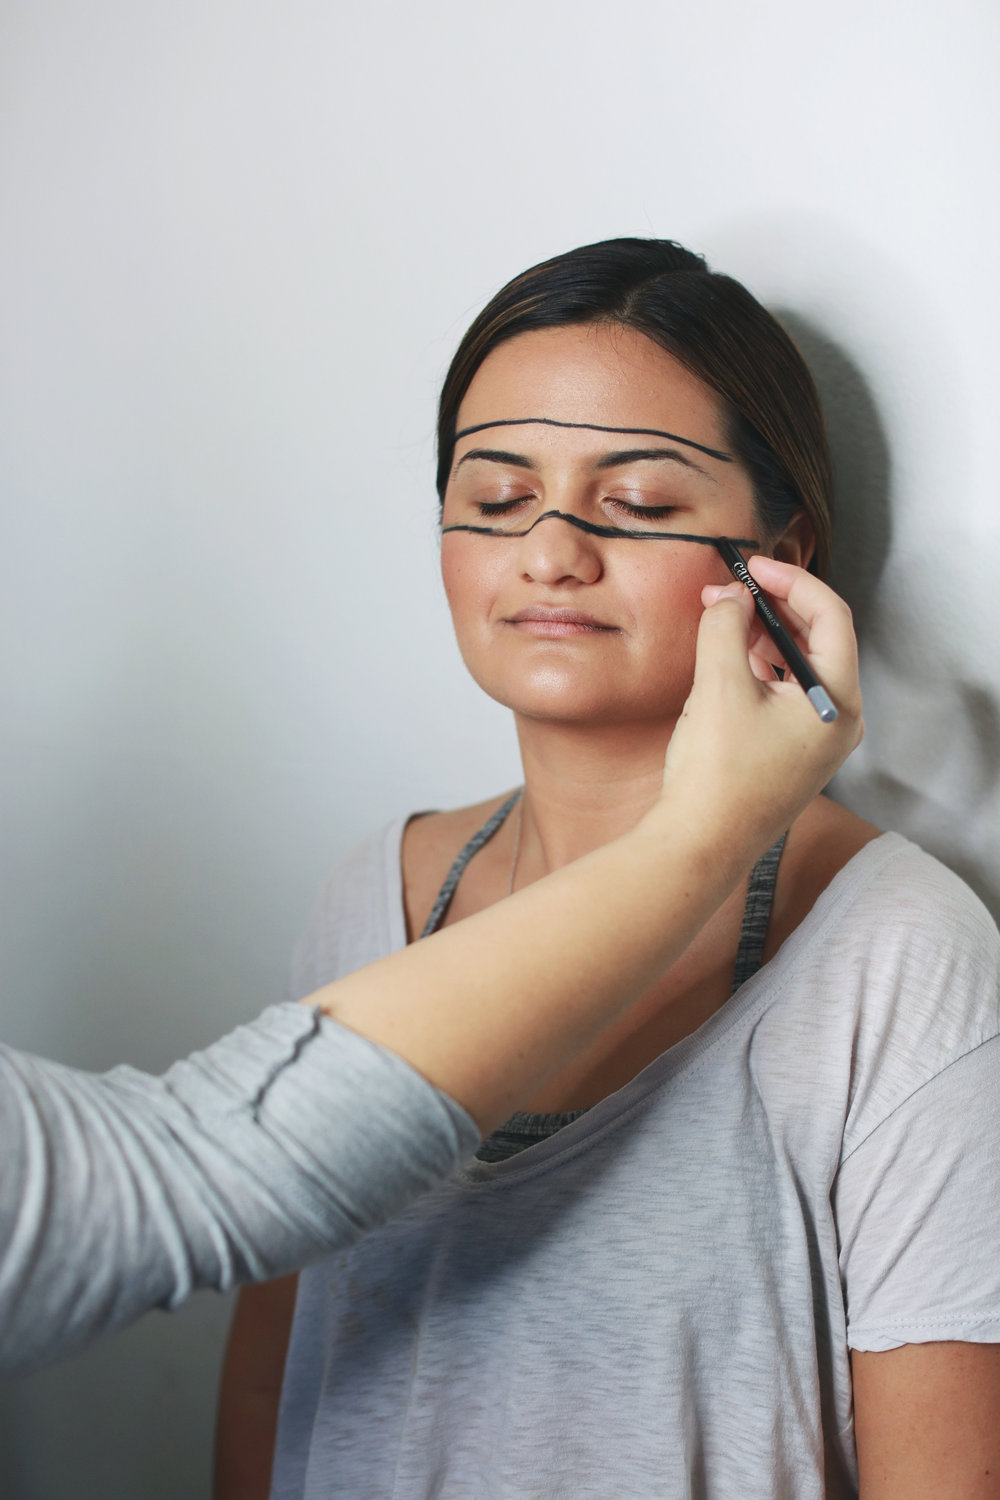
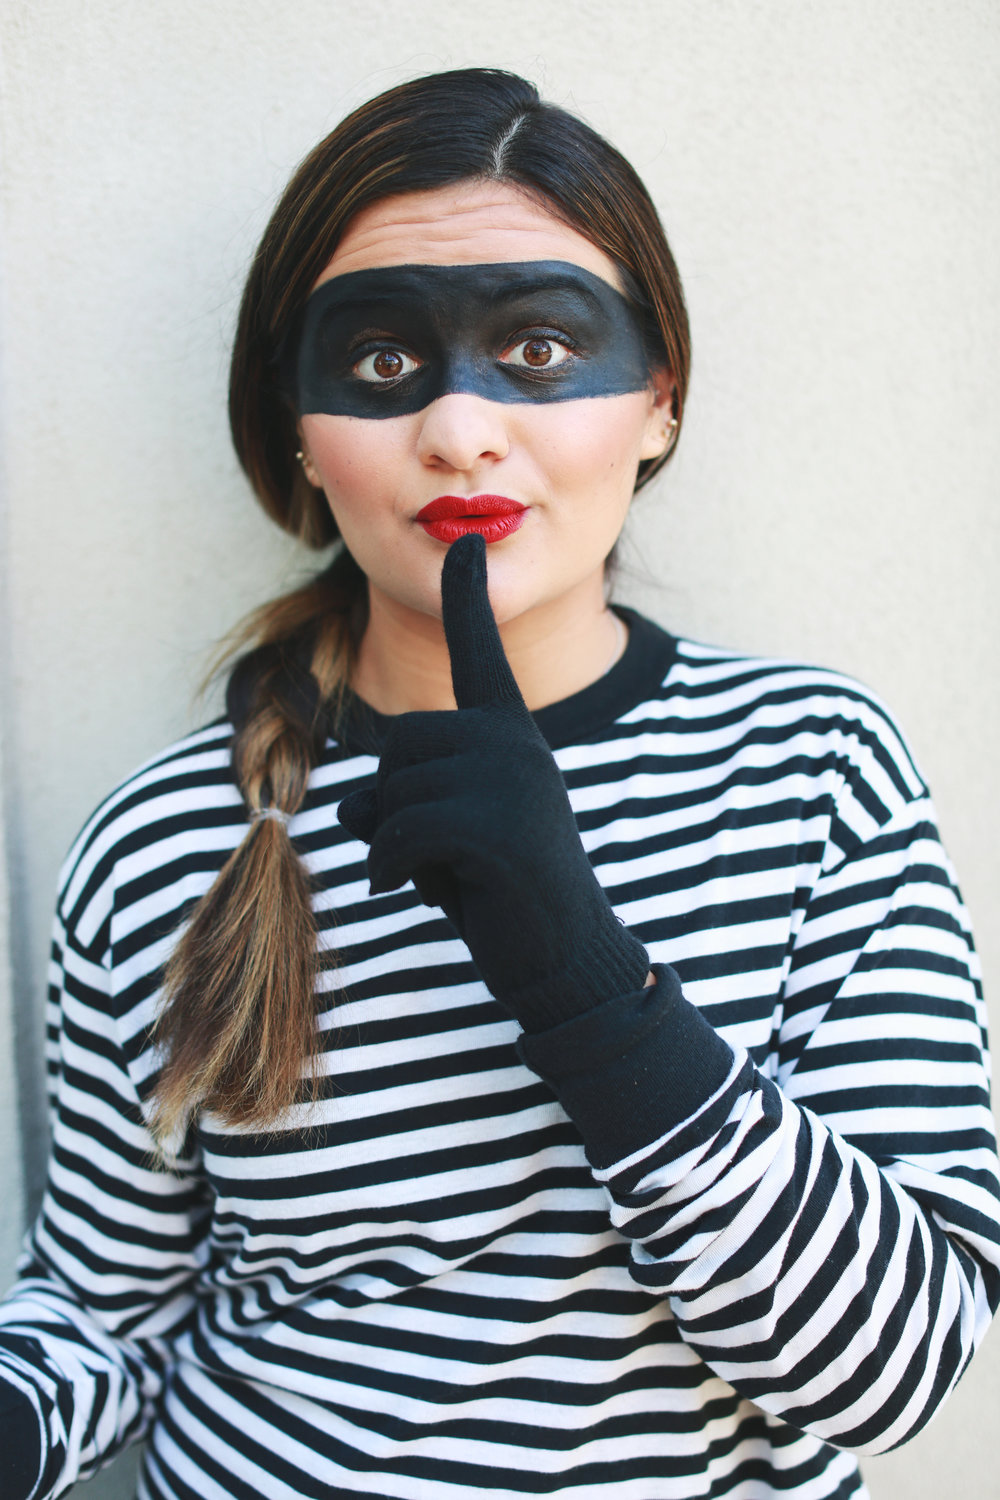
Ok now for your makeup. Start out from whatever point you’re most comfortable. Maybe that means a bare face or maybe that means your current routine, it’s whatever you want! On Izzy, we used foundation, powder, blush, bronzer, and highlight. So her basic complexion was on point before we drew the mask! Ok now grab a black eyeliner and sketch your eye mask outline.

Now fill in the mask! We used Mehron black cream makeup, you can snag it on Amazon for a few dollars! Not able to get ahold of black makeup? Fill in mask with your eyeliner or layer on black eyeshadow to fill in the mask.
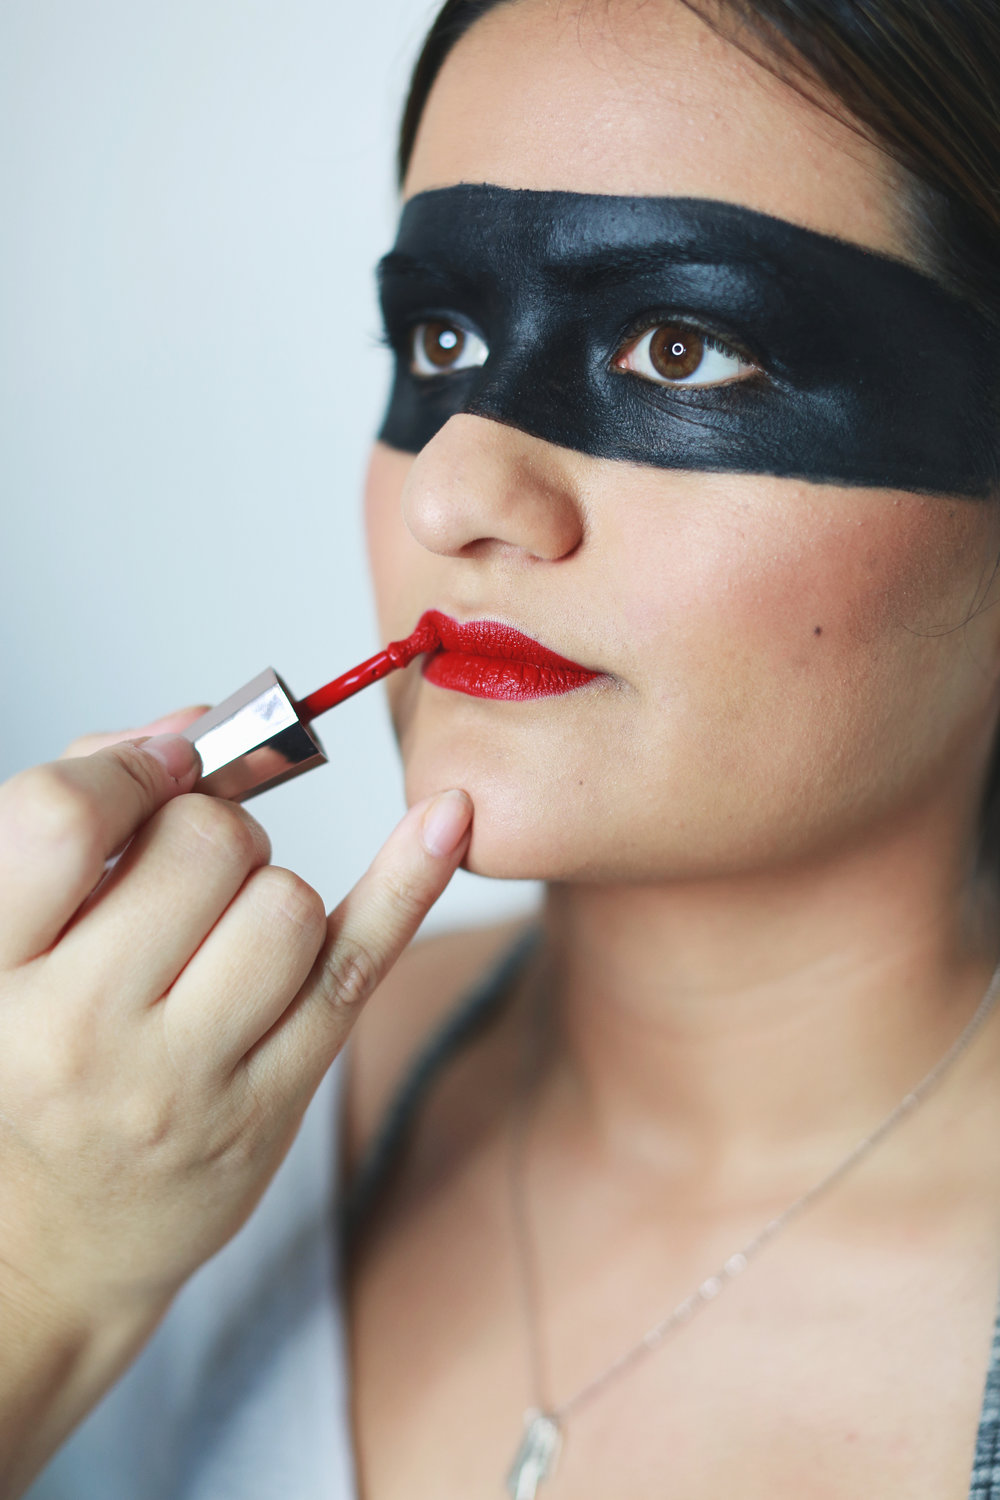
Now the fun pop of color! You really can wear anything lip you want but I just love the contrast of this bold red with the black and white outfit! Bank robbers like to be glam too! This is Fenty’s Stunna Lip Paint in red and it’s so creamy, smooth, vibrant, and ultra long wearing!
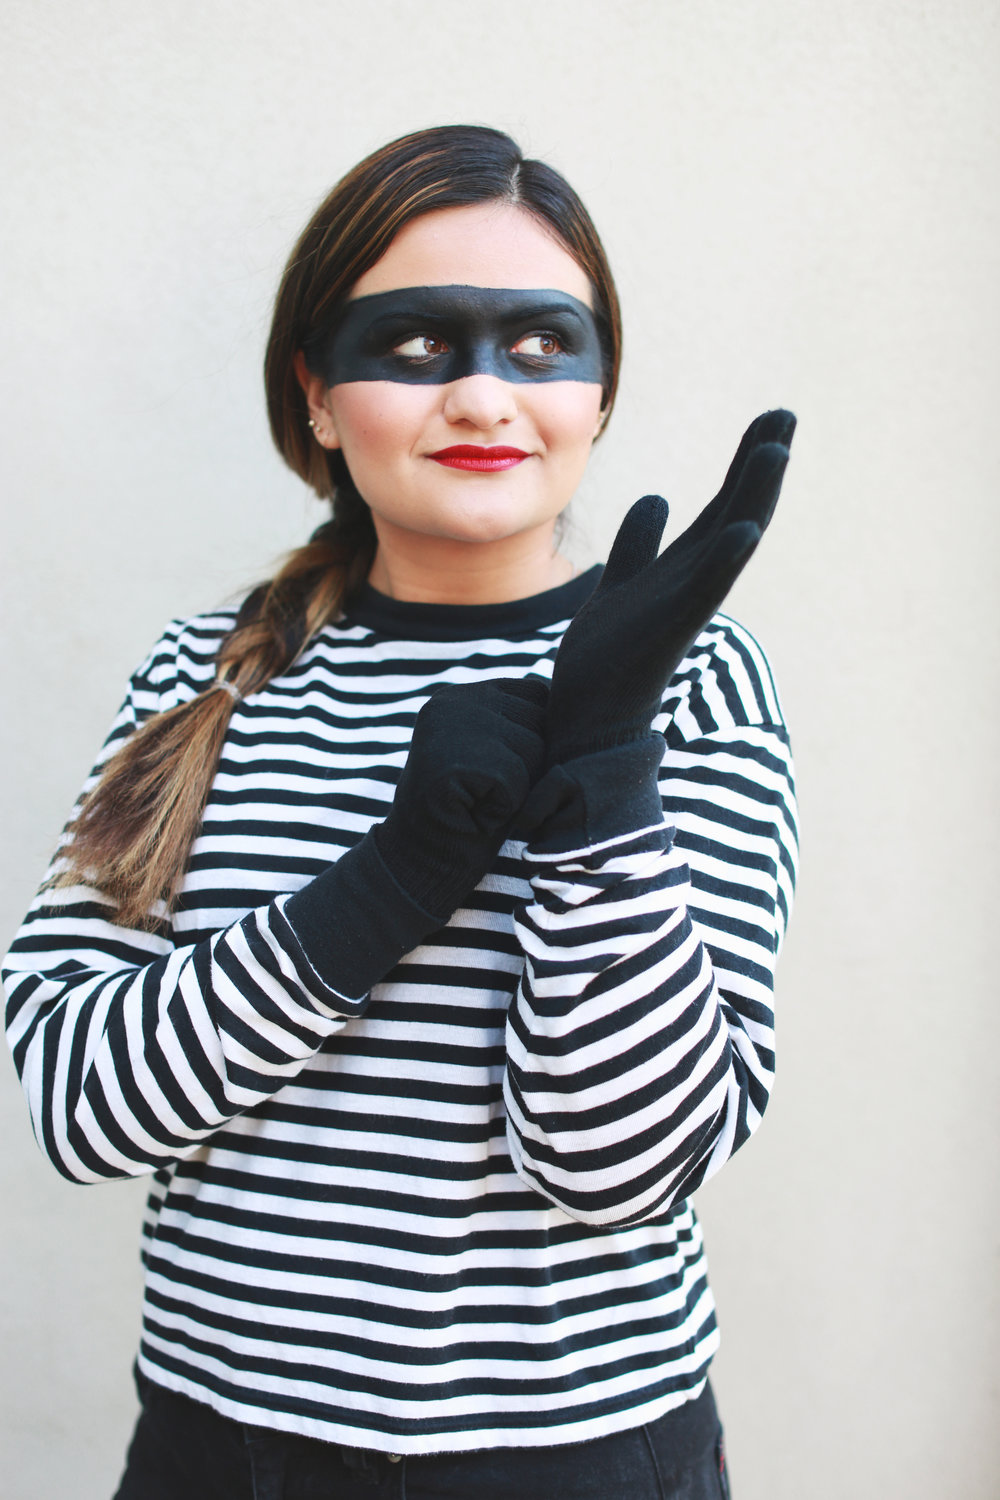
Now you’re ready to pull off your master plan!!!
Special thank you to Indulge Beauty Studio for these awesome photos of the lovely Izzy!
Give this a go and be sure to tag @polishandpout in your look on IG so we can see it!! Happy {almost} Halloween!!
October 15, 2018

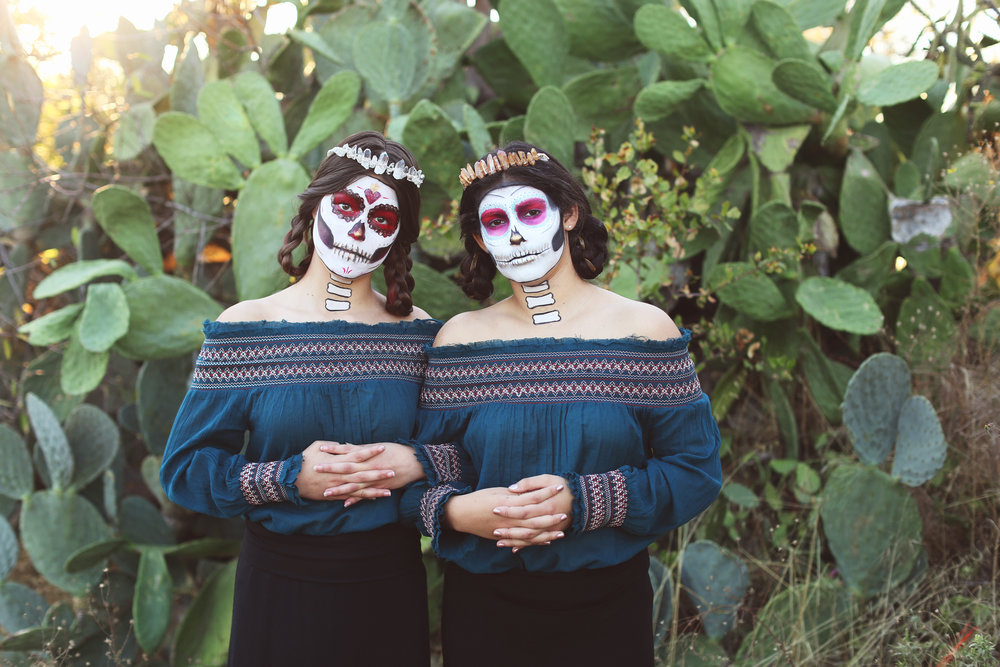
Last year we did a Día de Muertos photoshoot in conjunction with the headpieces from Idolatry and loved it so much we decided to do it again this year!
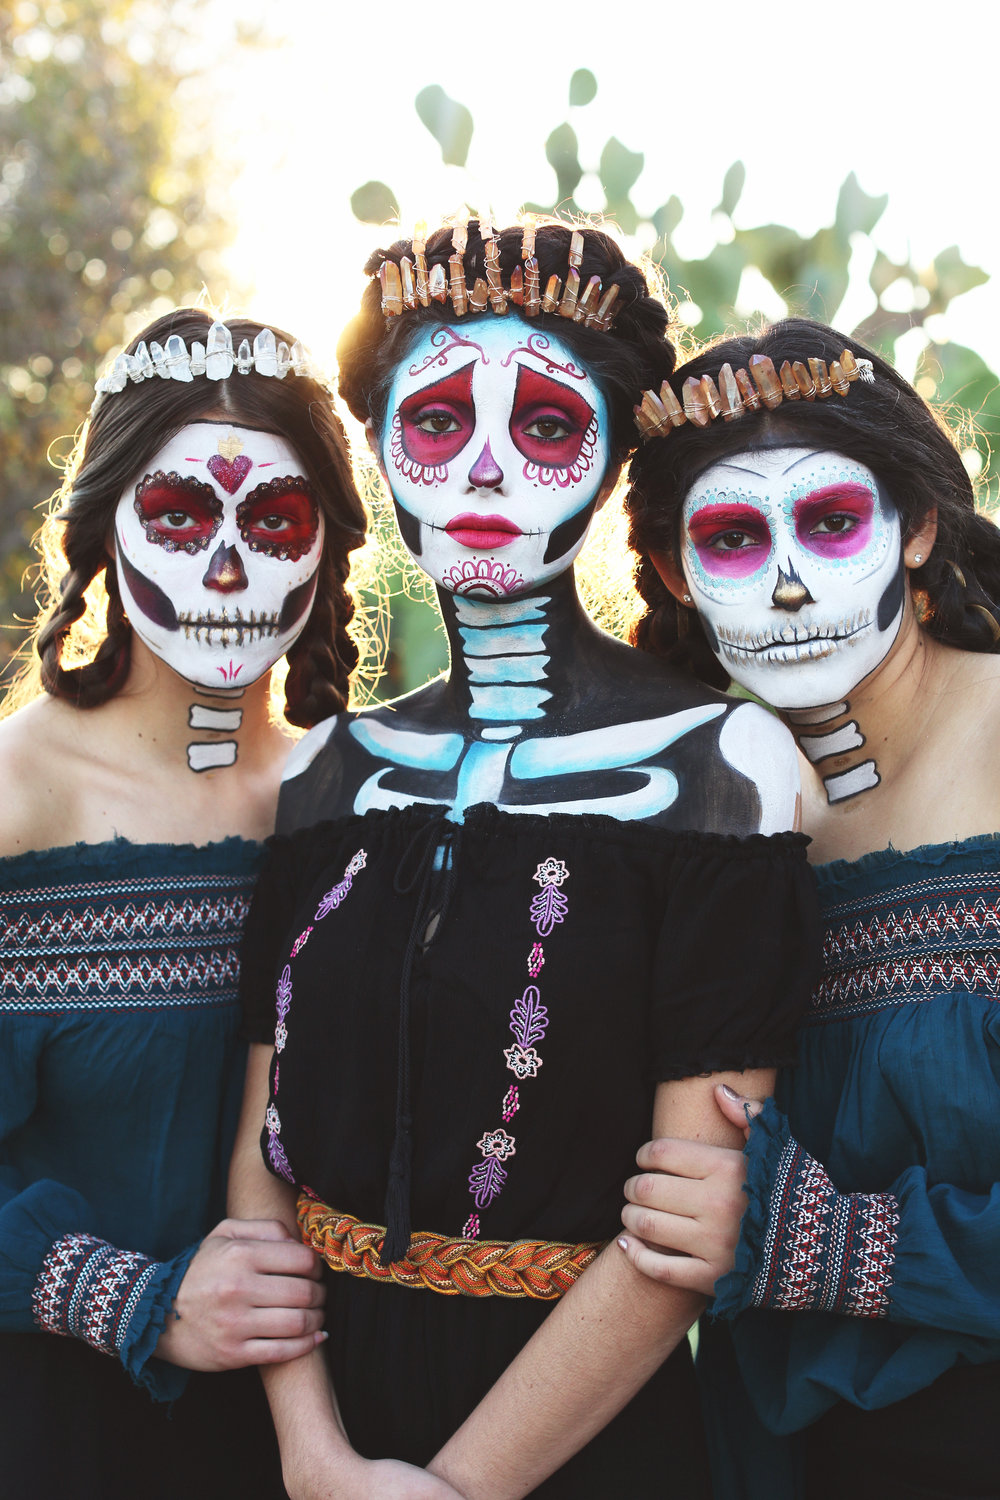
How gorgeous are our 3 Mexican models?!

We leveled up this year by having P&P Artist Gina Scheiber bring her amazing fx skills! We were in awe the whole time at the detail and vision she brought to the shoot.
The Day of the Dead is such a special Mesoamerican celebration with roots in both indigenous traditions and Catholicism.

The imagery of skeletons and skulls walks hand in hand with this holiday.

The painting of a calavera on the face or on sugar is a lovely way to acknowledge mortality, remember your ancestors, and celebrate life.

Our friend Valerie Tejeda at Heart Your Heritage made this awesome video about it—take a peek and learn some more about the holiday!
Special thanks to Indulge Beauty Studio for these amazing photos!
October 27, 2017
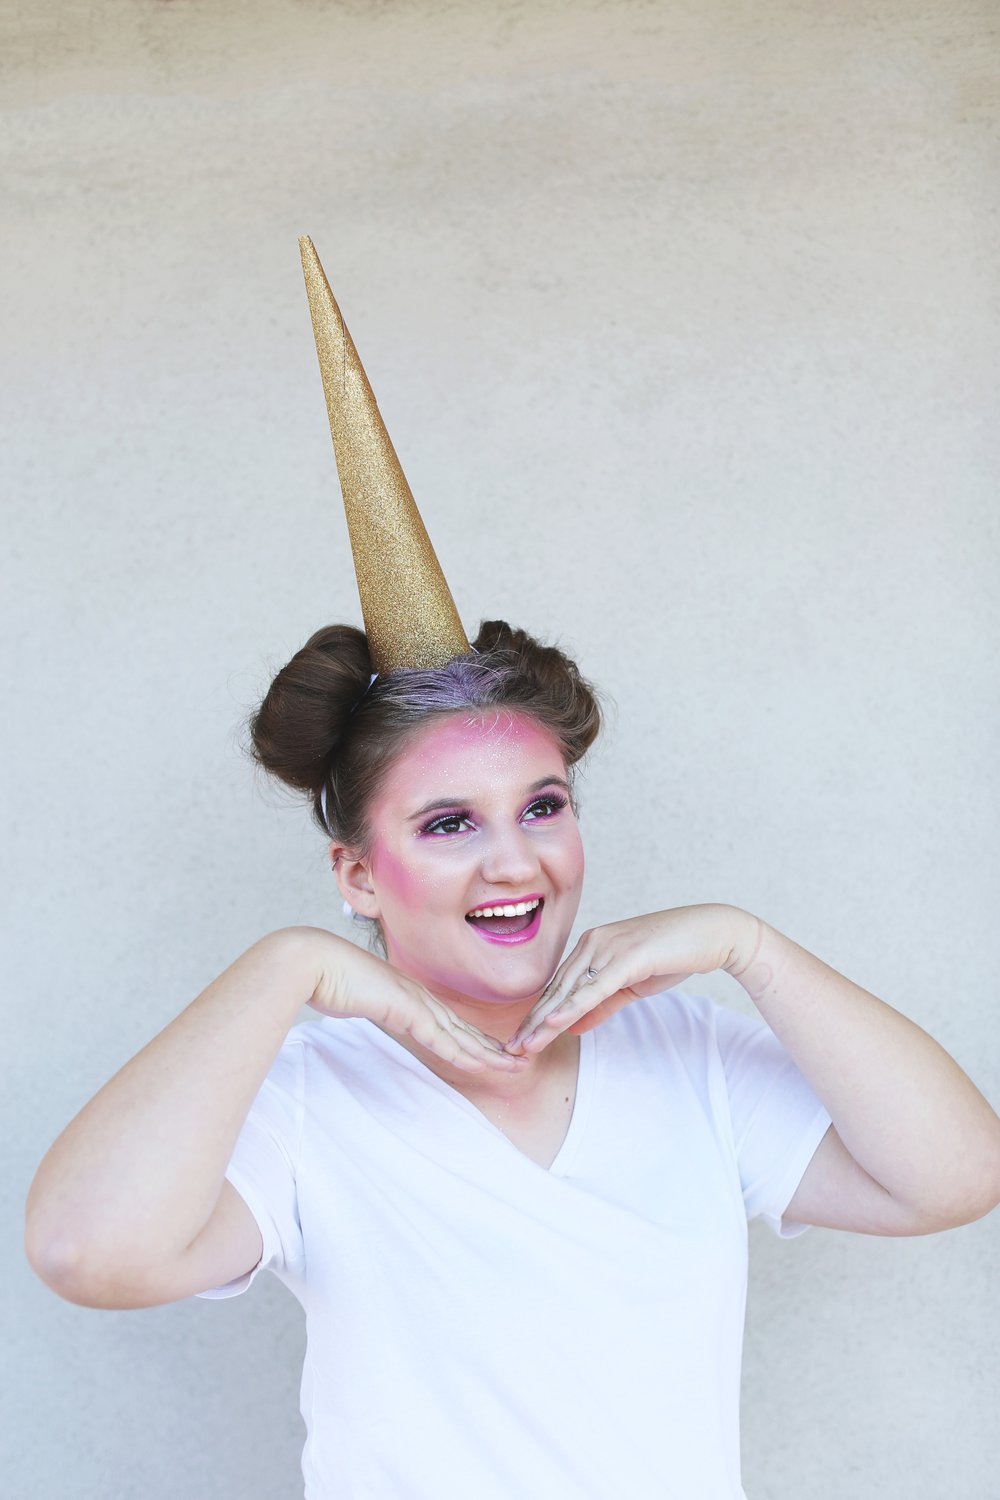
2017 was the year of the unicorn for sure…they’ve been everywhere from T-shirt’s, to coffee mugs, and even our Frappuccino’s! So it should come as no surprise that it also happens to be an excellent do it yourself costume idea!
Chances are you have most of these things lying around your house or can snag the things you’re missing for a few bucks!
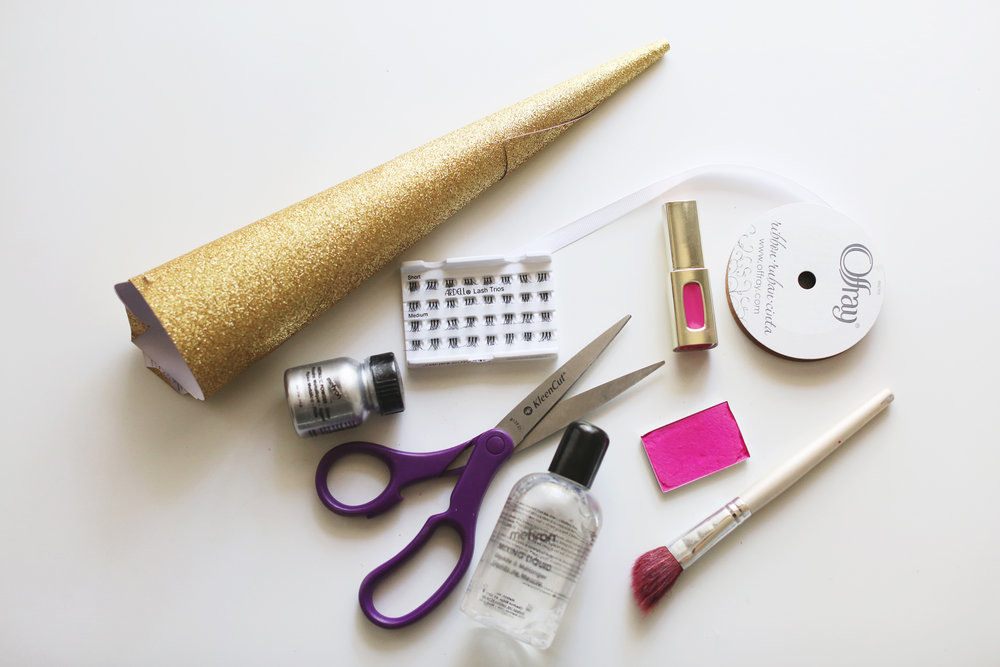
Ok so first things first you need to make a horn! A piece of paper will do the trick…a glittery or metallic piece of scrapbooking paper is even better! Simply roll it into an ice cream cone shape and secure it with hot glue!
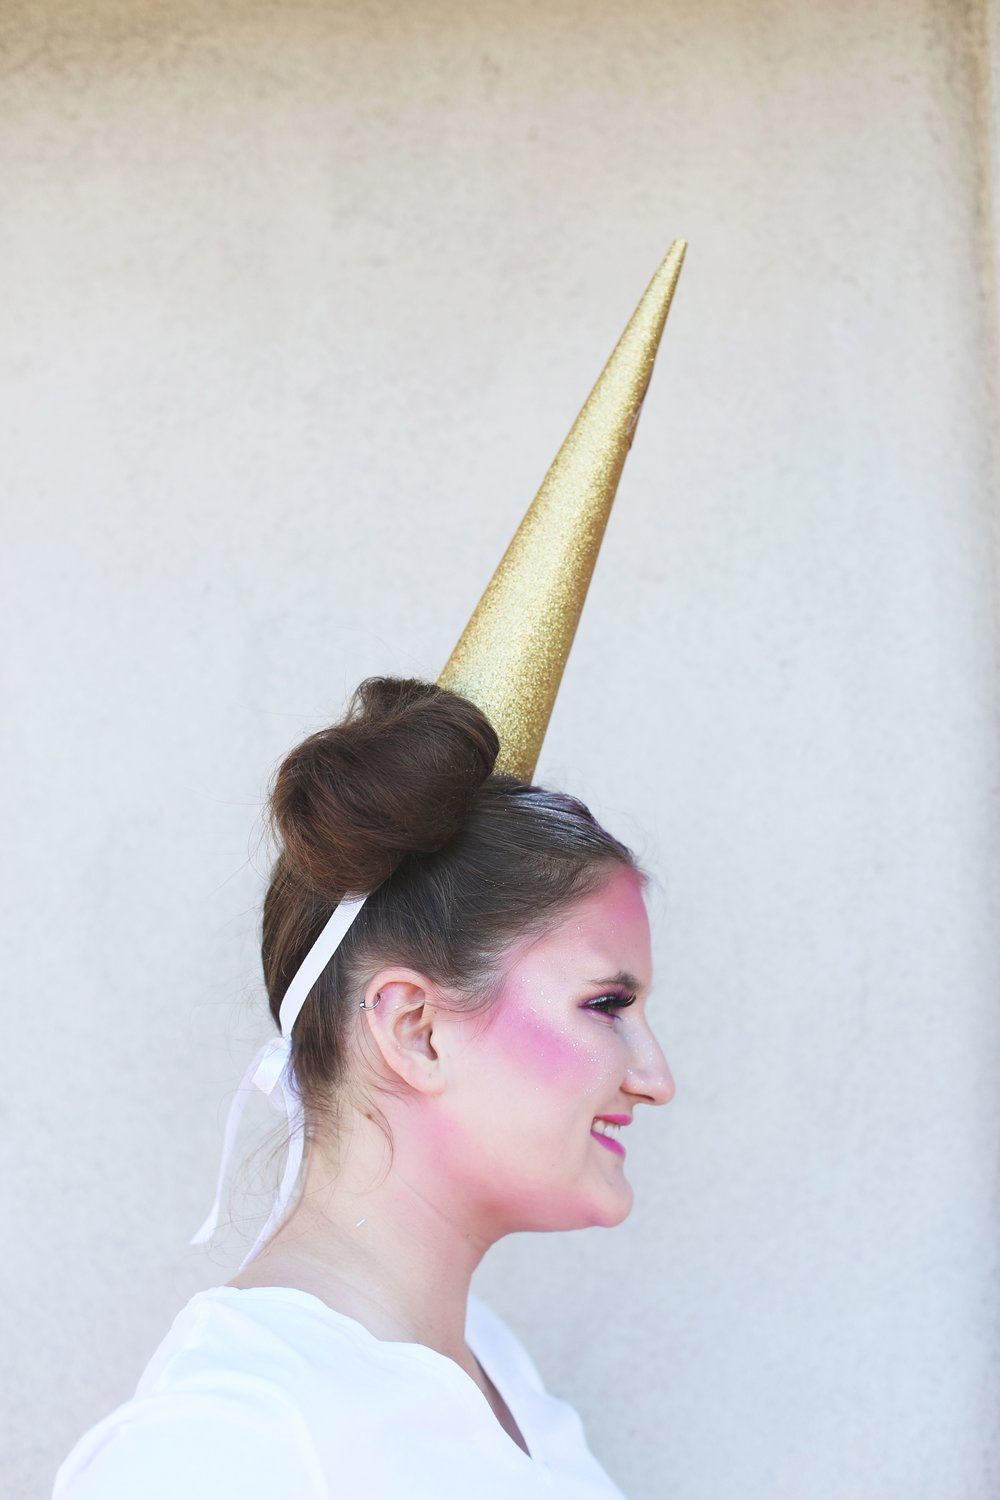
Punch two holes through each side of the end of the cone and put ribbon through it so you u can tie it around your head like a headband! The best hairstyle for this look will be pigtails or better yet twist your pigtails into double buns!
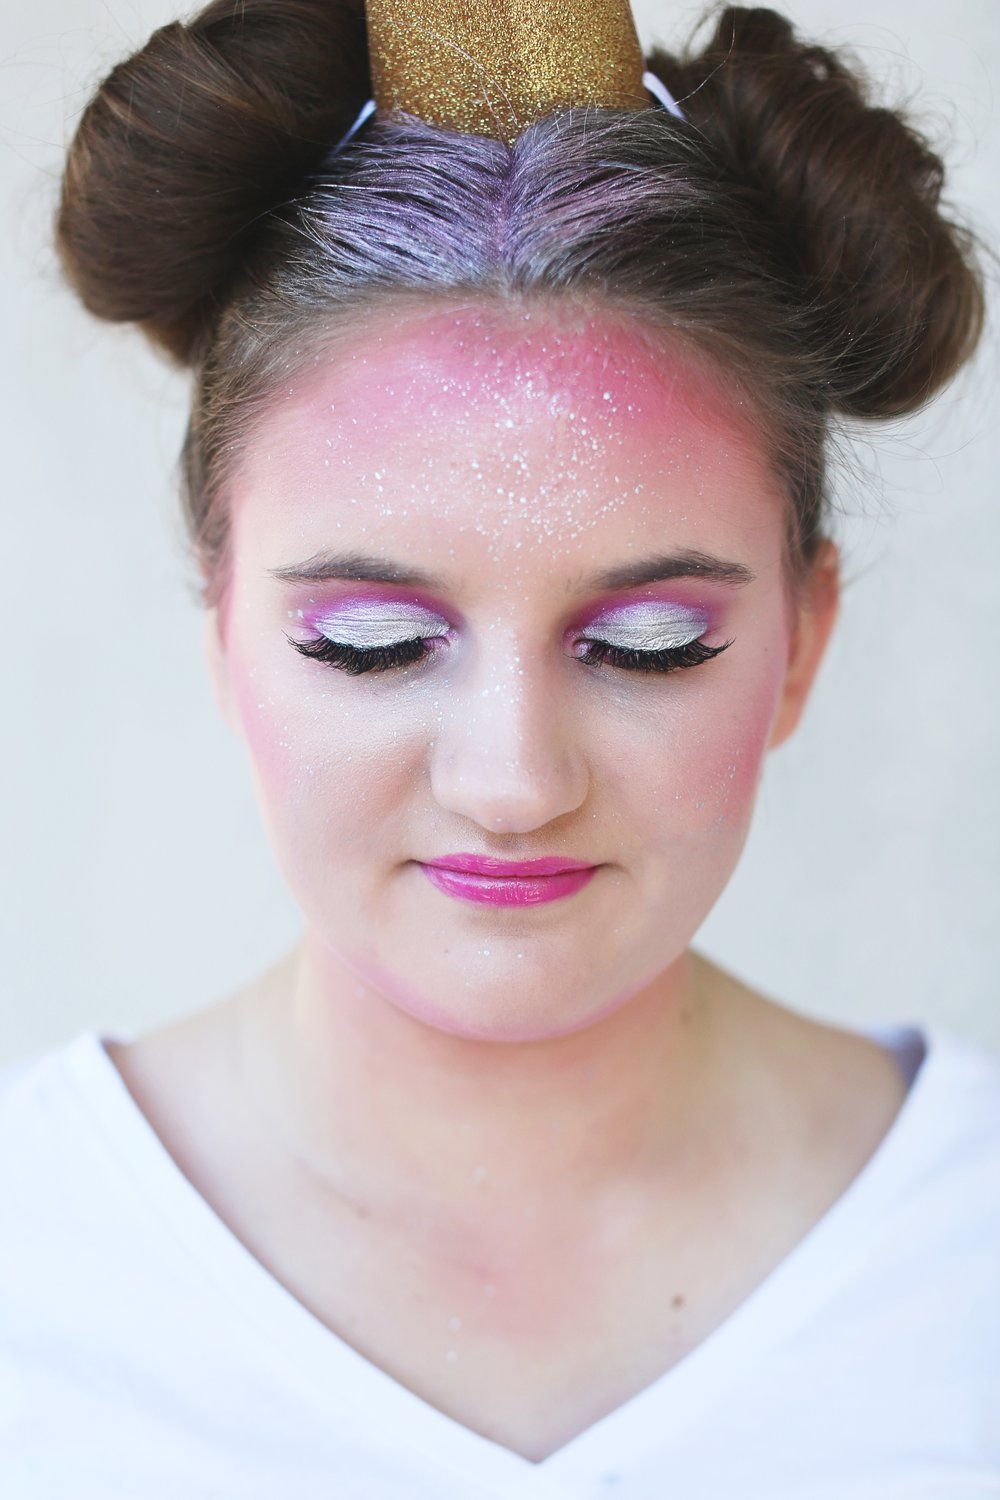
For makeup, the brighter the better! Use a bright pink blush and apply it everywhere you’d normally contour, bronze, or blush your face. This will add dimension and color in a fun way!

Added bonus points to use glitter or metallic eyeshadow on your eyes and down your hair part. I used my favorite metallic powder and mixing liquid from Mehron! And for the paint flecks on the forehead, dilute your shadow with setting spray and flick it onto your forehead.
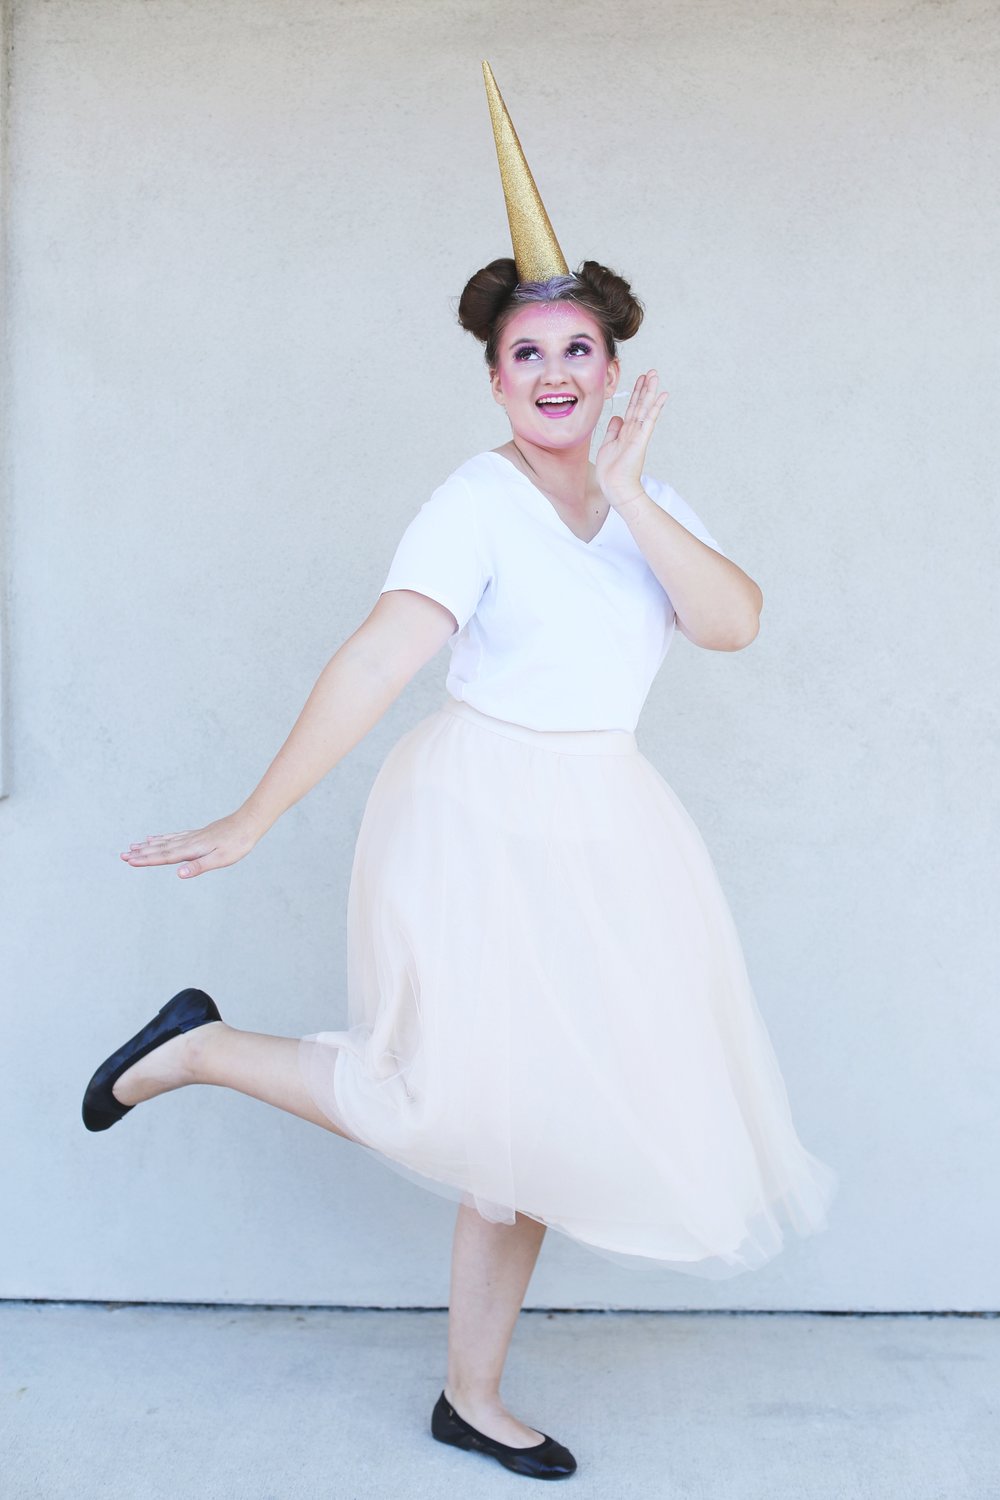
Toss on your twirliest fluffiest dress or tulle skirt! And there you have it…your unicorn dreams have come true!
Thank you to Indulge Beauty Studio for capturing these photos of the lovely Katelyn!
October 17, 2017
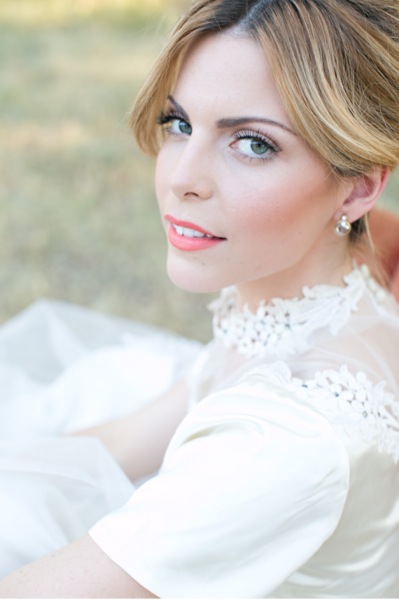
The air is brisk, the leaves are changing, and there’s even been a bit of rain—It’s finally feeling like Fall here in NorCal! Fall means coats, scarves, boots, and {{my favorite}} deeper lipstick! Seriously how lovely is Aine McMullen from Cast Images?! P&P Stylist Ashley and I loved crafting this fall inspired look for a photoshoot with Nicole Cook! Aine is the epitome of fall beauty trend in this shot…
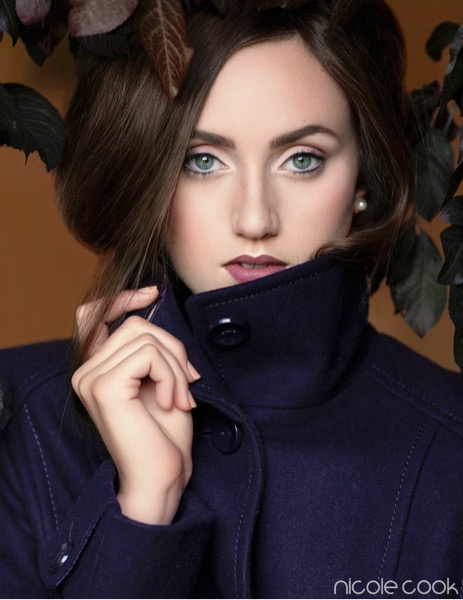
This fall, the 90’s throwback trend is still alive and well. We went for a more matte look with a deeper lip and tousled hair. Here is a breakdwon of the products used so you can recreate the look yourself!

For the skin, I reached for Face Atelier’s Ultra Foundation in shade No.2 Ivory. I love this foundation because it provides ample coverage without caking up, is buildable, looks like skin, feels so lightweight, and comes in every shade imagineable! The unique formula boasts a built in primer and works for all skin types.

For the eyes, I couldn’t resist reaching for my Mehron EYE Powder palette. This thing seriously comes with me to every job. So blendable and pigmented…and the shades are everything you’ll need to craft everything from a barely there natural to a super dramatic look. For Aine, I gave her a classically contoured eye with a little twist…Love the hint of mauve in Aine’s outer edge to tie in the lip shade!
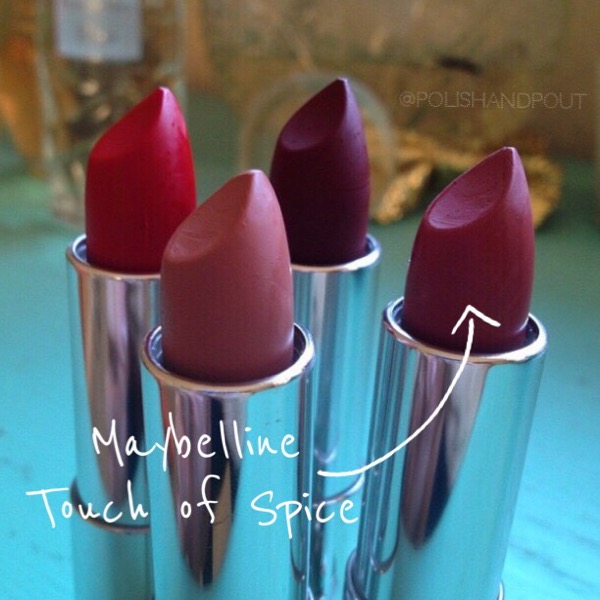
Ahh this lip!!! When Maybelline launched their matte shades, this one quickly became my favorite: Touch of Spice. Long wearing, velvety finish, super affordable…and that perfect hint of grunge that’s so hot right now!
So Cheers to Mauves, Mattes, and Maybelline,

December 10, 2015
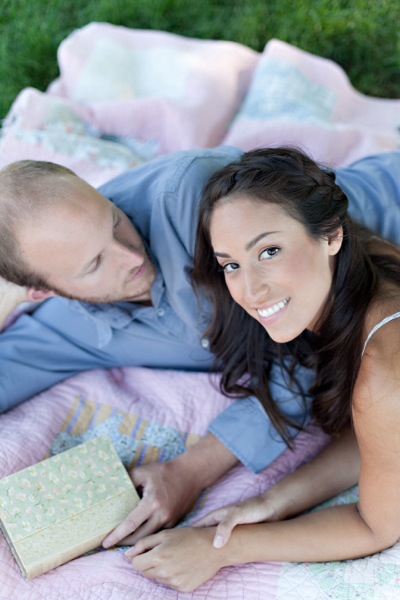
Note: the pictures of these lovely ladies below are NOT examples of looking old or doing things wrong…in fact they are evidence of the opposite! Plus, let’s be honest, the pictures break up my long winded soap box! Thank you Lydia Photographyfor the amazing shots from our previous photoshoots!
Dear Friend,
You asked for my honest opinion, “Am I looking old? Honestly Jess, tell me. I can take it. I know you’ll tell me the truth!,” you said. So here it is. And listen, regardless of my answer, you should ultimately do what you love…how you feel is what is most important, so if you do something in this list and you love it then be my guest! It’s your right to look haggard err umm I mean everyone is entitled to their wrong opinion—uh What I mean is, more power to ya! And yes friend I know you think I’m a little snarky, but it’s only to emphasis my point and because I would NEVER be this unfiltered with a client…but since we are friends, I know you can handle the truth.
1. Your brows are way too thin. Maybe it’s over plucking, maybe you’re just not particularly hairy, or maybe they’ve thinned with age but they are too thin. It seems counterintuitive but fuller brows actually make your eyes look more lifted! Thin brows overexpose the orbital bone and makes your eyes appear droopy. A fuller brow is an instant face lift, so grab some filler and make them fuller! Or head to an Anastasia counter for some brow rehab–Don’t worry, we can tell the press it was just for “exhaustion.”
2. Your lipstick is too brown or too dark…Honestly women are pretty religious about their lipstick. I get it. That shade is perfect right? You’ve been wearing it for years ya? Well that’s just it, you’ve been wearing it so long you don’t know any other way to view your lips. That doesn’t make it the best shade for you. Dark lips age, period. Sometimes that’s ok if we are going for a vampy look. But for everyday, you should go with something a little more rosy with more life in it! It will brighten your complexion and your smile.

3. You’re still wearing the same mattifying or oily skin formula foundation from years ago. You’d be surprised at how many women when discussing their skin type claim to be oily when what they really mean is, I was labeled as oily in my teens and I never reevaluated that as I got older. Oily skin formulas tend to combat shine, sucking out radiance…which when we were much more oily was great, we had radiance coming out the wazoo! But now, you aren’t anymore. I mean ya, you may still get shiny or even the occasional zit, but you are not the oil slick gal you used to be (thank God right?!). So using those formulas is essentially making your skin look dull and tired. And you don’t need that mega coverage anymore! Something lighter and more radiant is going to make your skin look fabulous! I know I know, it’s a total paradigm shift. It’s the right thing to do though, I promise.
4. You’re not concealing under your eyes. “But I feel like it makes me look wrinkly, or I feel like it settles in my lines.” First, let’s do some hunting to find a good formula that works best for you! Not all concealers are created equally. Second, darkness under your eyes will make you look more old and run down than a few lines ever will. The lines are there whether you care to acknowledge them or not, the darkness doesn’t have to be.
5. You’re not using good skincare. Whether it’s because you think it’s too late, or you’re in denial of it being necessary…you need to pay attention to your skin. If you’re thinking to yourself: should I start using an eye cream? The answer always is: yes you should of started years ago, regardless of how young you are. It’s never too late to give your skin what’s best for it. That’s like not watering a wilting plant…it’s not dead yet, so give it what it needs! And if you’re old enough to question if you should be using reparative creams or nutrient packed serums, then your answer is yes.
So there you have it friend, I’m only telling you this because I love you…and because you asked my advice. I mean, I think you’re fantastic and have great taste (after all, we are friends!). But you know I will always tell you truth when you ask for it, that’s why we are such good friends.
PS- if we really do know each other personally and you saw something on this list and wondered, “Is Jess talking about me??” Yes, yes I am talking about you. Coffee next week?
Cheers to Honesty, Friendship, and Aging Gracefully,

Beauty, Health, Makeup, Musings, Personal, Photoshoot, Product review, Products, Skincare, Trend, Tutorial
February 19, 2014
P&P Stylist Ashley Aspenlind shows us your not so average pony tail…taking it from girlie to glam…rockstar worthy for sure!

Start by gently teasing down the center of your head in three sections, setting with hairspray as you go. We are going for mega volume and texture.
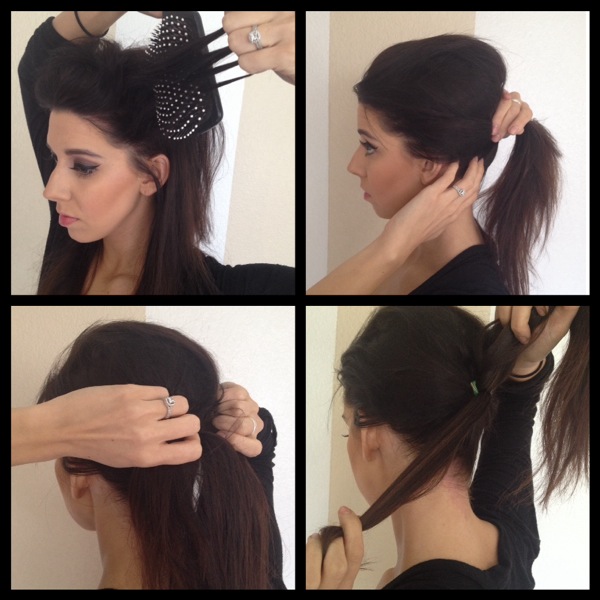
Tease the sides now in a backwards motion.
Then gather your hair into a pony tail, gently smoothing the hair back. Make sure you secure the ponytail tightly so you don’t loose the volume you created.
Grab a small section of the pony tail and smooth it.
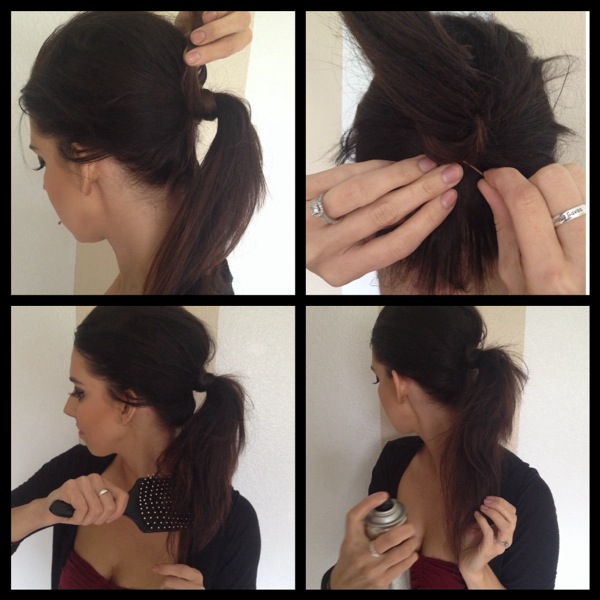
Take the separated piece and wrap it around the ponytail. Secure the end with a bobby pin. Push the bobby pin from the underside of the pony directly up and into the hair…it’s essentially hidden in the ponytail behind the hair band!
Tease the ponytail for extra drama and set with hairspray.
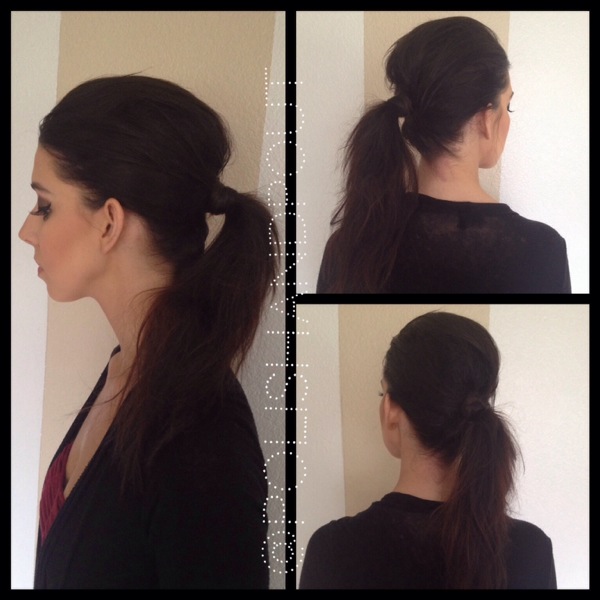
There you have it! It’s girly with an edge…and I love the mega volume!
Cheers to Being Girlie, Glam, and Anything But Average,

February 17, 2014
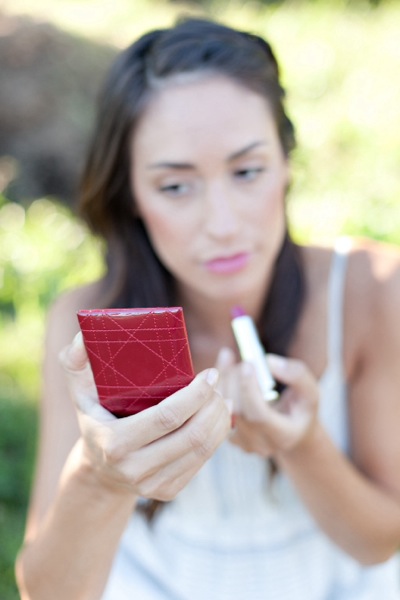
It’s not Valentine’s Day without kiss-worthy lips…and these 5 lipsticks are the perfect picks this week whether you have a date with someone special, a dear friend, or even just your favorite pj’s!

1. Kate Moss for Rimmel in number 17: the perfect classic pink! Great for a soft daytime look.
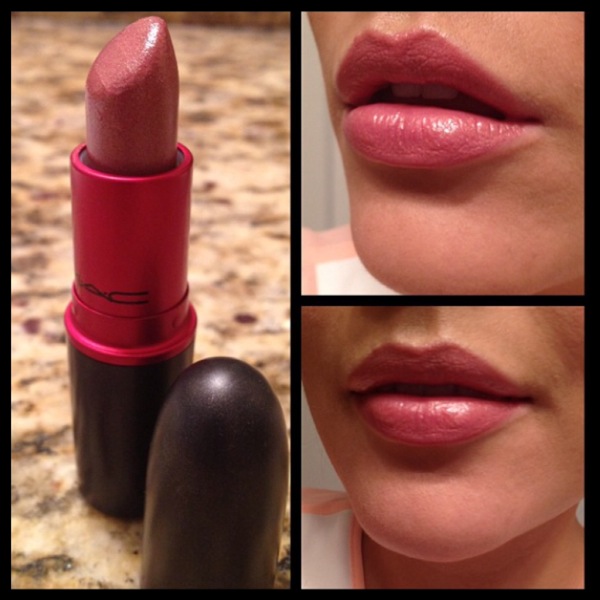
2. MAC Viva Glam V: a shimmery rosy beige, a great compliment to a smokey eye. Added bonus, the full price you pay goes to charity!
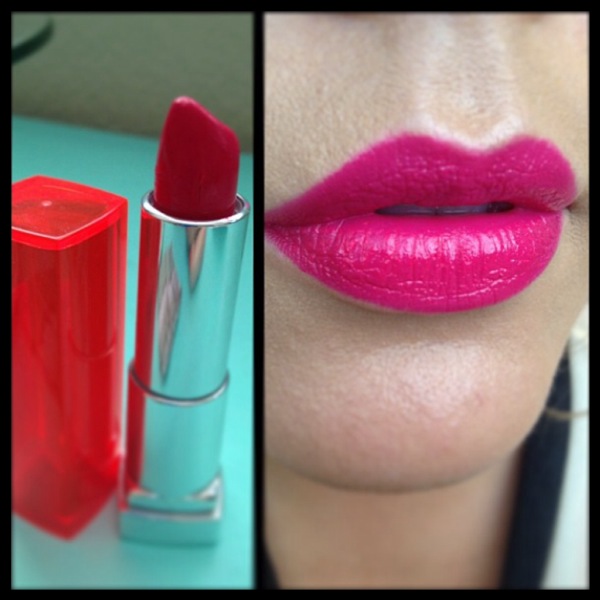
3. Vivid Rose by Maybelline: Ok, so not so much great for a date…but going out with your friends, or feeling sassy? This lippy packs a punch!
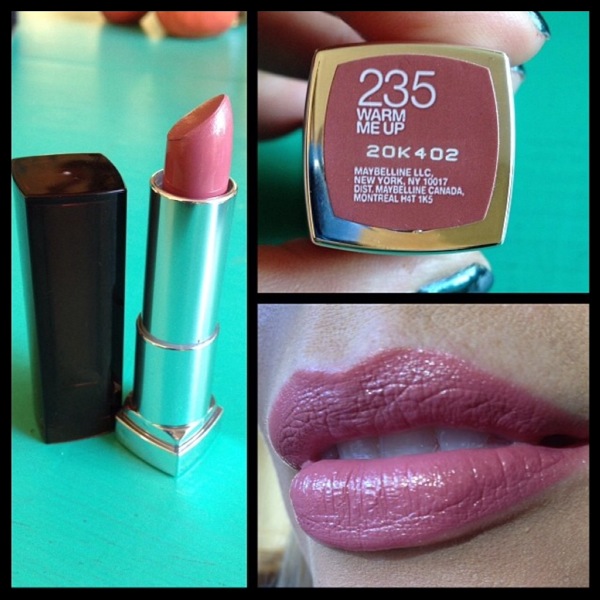
4. Warm Me Up #235 by Maybelline: the name says it all.
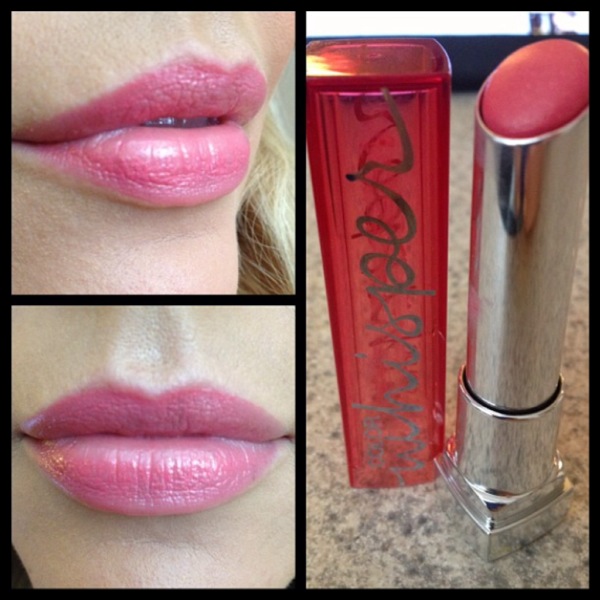
5. Color Whisper by Maybelline in Pin up Peach: a sheer hydrating wash of color for a low maintenance girlie touch.
Happy Valentine’s Day everyone!
Cheers to the Perfect Pinks for your Pout,

February 12, 2014
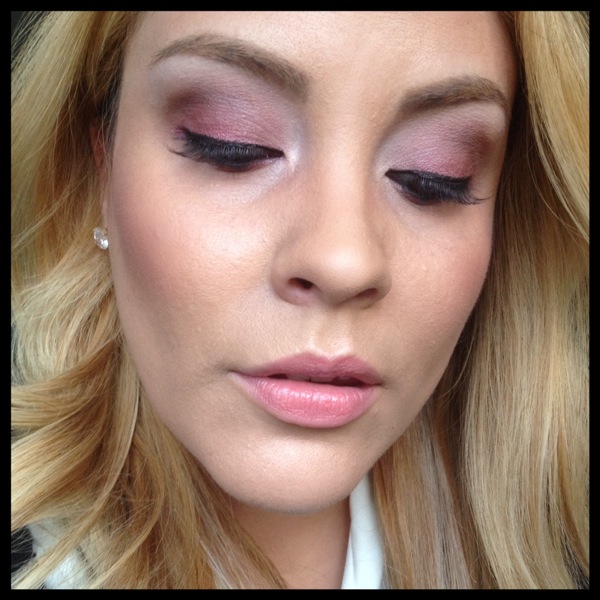
This month it seems that pinks, berries, and reds are on the brain…along with hearts and glitter. While I may not make homemade Valentine’s cards anymore, I still find a way to flex my Valentine’s Day creative muscles! Here’s a soft girlie look to try this V-day…or any day for that matter!
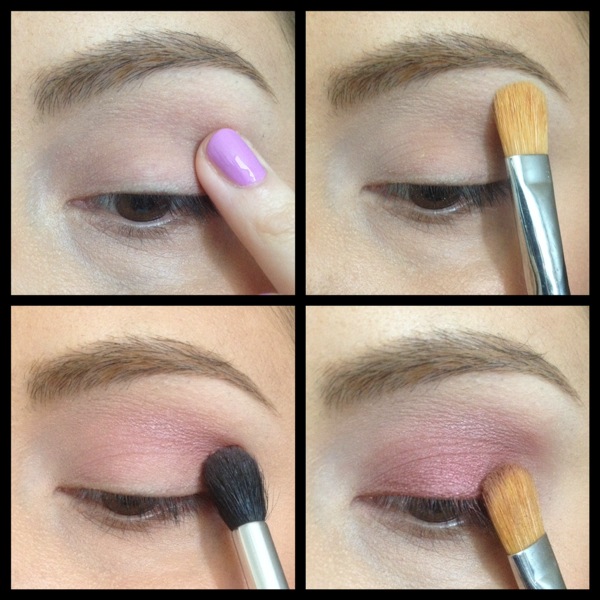
1. Prep your eyes with a good primer.
2. Sweep a matte vanilla shadow on your brow bone.
3. Using a windshield wiper motion, apply a soft pink shadow in your crease.
4. Pat a shimmery cranberry shadow all over your eyelid.
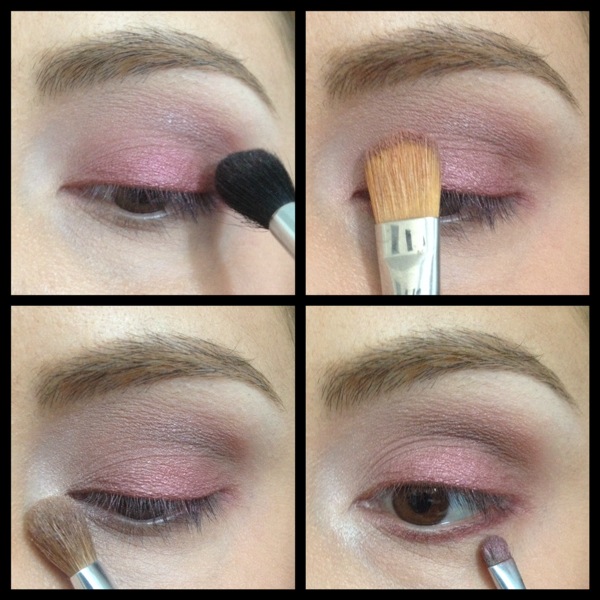
5. Blend a soft brown into your crease so everything is seamless!
6. Pat a shimmery light pink shadow on the inner third of your lid.
7. Add a pop of shimmery vanilla in your inner socket.
8. Line your lower lashline with the same frosty cranberry as before.
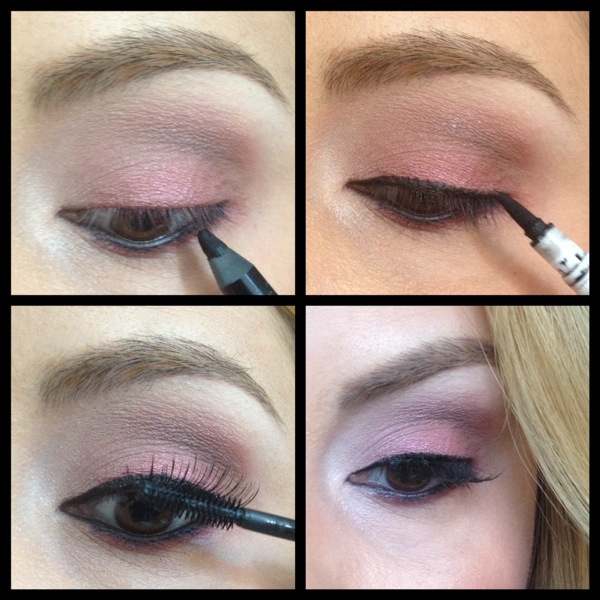
9. Use black pencil to line your waterline.
10. Line your upper lashline too, I opted for a slightly bolder liquid liner.
11. Curl your lashes and finish with mascara (bonus points if you add false lashes!).
Voilá!
Products used:
Naked Basics palette by UD
MAC shadows in Girlie (pink) and Cranberry
Rimmel Scandaleyes liner in black
Almay liquid liner

Cheers to Pink, Reds, and Valentines,

February 11, 2014
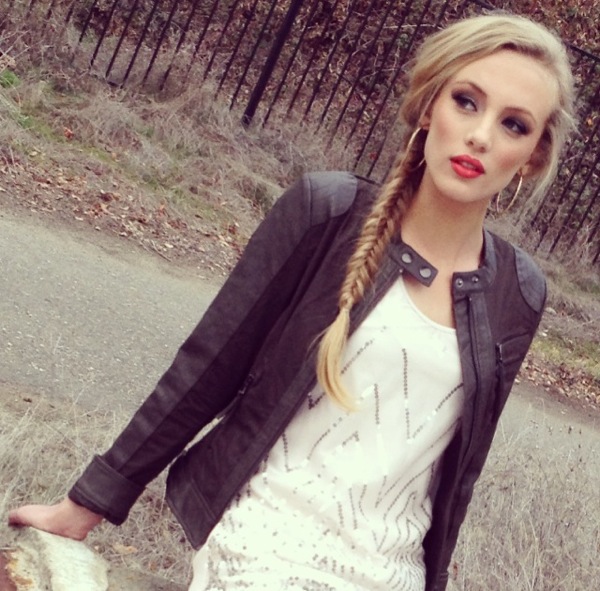
I absolutely love fishtail braids! It is my go to style when I want to look polished in a flash…I typically do them to the side and with volume so I don’t feel like I’m bald…plus I mean what’s the point of an intricate braid unless you get to enjoy seeing it too! I posted this look from a recent shoot on IG (um are you following me? Get on it! @polishandpout) and the consensus was that we needed to post a tutorial.
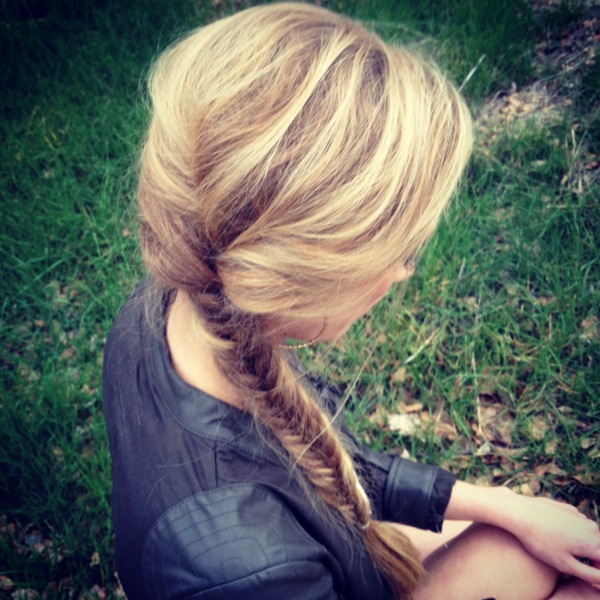
The best part about this hairstyle is that it looks incredibly complicated when it’s actually quite simple! It only involves two sections of hair. A few tips: the smaller of strands you work with while braiding, the more fine, thin boned look you’ll get. But thick pieces work great too! It’s all about preference and how much time you have. Try this look on dirty hair with a little dry shampoo. The perfect way to skip a wash (don’t worry I won’t tell!).I always tease the crown and pin back the front of the hair into some version of some up and some down for added height! After you finish the braid you can rearrange or even sometimes take out the hair pins!
So here’s the video…braids are best learned in live motion I think! It’s an oldie but a goodie! Enjoy!
Cheers to Braids, Beauty, and Dirty Hair,

February 5, 2014
I am so smitten with the look I did for a photoshoot this week with Nicole Cook (umm, by the way she is an AMAZING highschool senior –fashion– photographer in NorCal). Luckily I had the sense to take pics of the look as it developed so I could make this tutorial for you! The funny thing is that it doesn’t actually use any silver shadows in it…the hue is a result of the blending of the liner and shadows. Which I actually prefer because silvers often translate very blue on camera. This way you get the effect in a truer way. If you’re not a fan of silvery shadow, then sub the black pencil for an espresso one and blend out with dark brown shadow instead of black for a more chocolatey neutral look. I worked from my Naked Basics palette and also a few shades from Makeup Geek (creme brulee, shimma shimma, and homecoming).
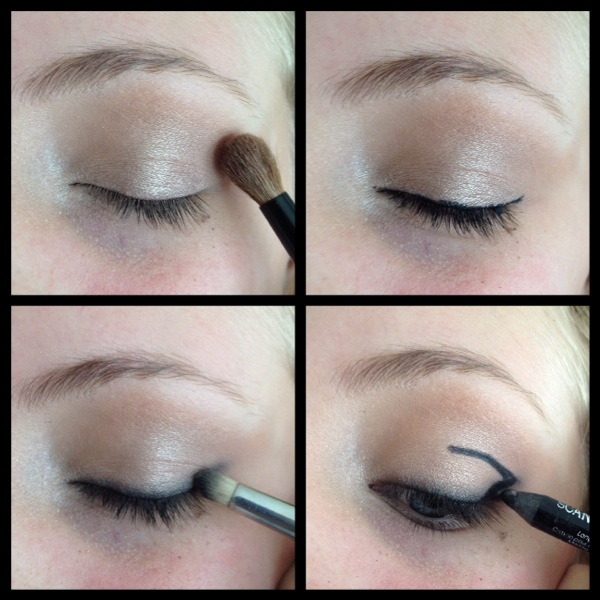
1. Prime your lids and dust on a neutral champagne or vanilla shadow all over your lid, the shimmery base will help when it comes time to blend.
2. Line your eyes, doesnt need to be precise.
3. Use a pencil brush (or your finger even) to blend and soften the liner.
4. Draw a V with your pencil to outline where your smokey cat eye will go. Make sure you open your eye first to determine how high up you want the line in your crease.

5. Use your pencil brush to blend and smudge the V more into the center of your eye, you essentially are focusing on the outer third portion of your eye. Dip your brush into black shadow as necessary to build the depth you are comfortable with. See how messy its getting? Trust the process and don’t get scared! I like to do eyes first and skin second when doing looks like this.
6. Pat a shimmery taupe shadow all over your lid, smoothing out the seams of where the black shadow stops.
7. Dust a soft brown in your crease, bronzer works fab!
8. Highlight under your brow and in your inner socket.
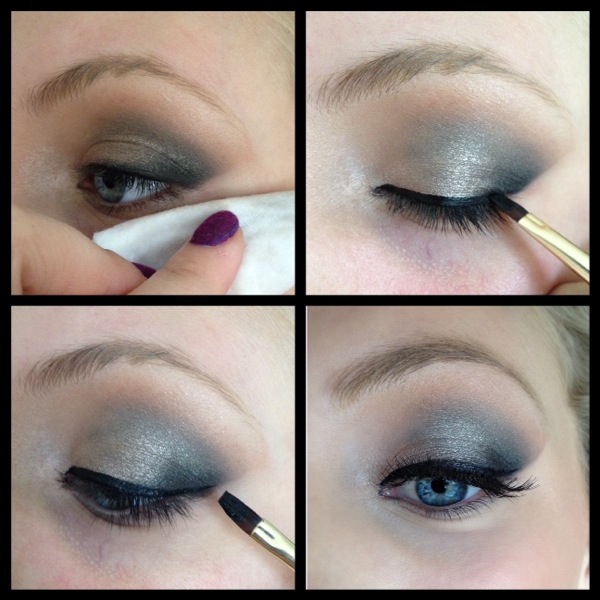
9. Now for the clean up! This step is what adds the sharp angled edge to the look. Take a cotton pad with remover or makeup wipe and fold it so you have a straight edge. Swipe the edge in an upward angled motion.
10. Line your eyes. I love the sharpness of a gel or liquid for this look.
11. Add the flick of liner at the end for your cat eye. The awesome part about this look is that the sharp edge we created is your guideline, so its goof-proof!
12. Load up with mascara…bonus points and more drama if you toss in some lashes too! I used medium length individuals.

And there you have it! Isn’t our model Lexy so lovely?!
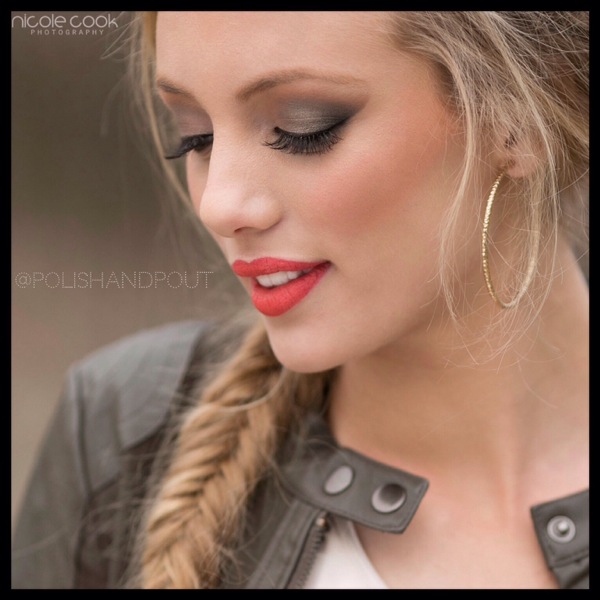
We were going for drama so we paired her look with a bold punchy lip (Rimmel Kate Moss #12)…but a nude lip is a great option for this look!
Cheers to Seniors, Silver, and Smokey Eyes,

January 29, 2014

