

Only a few more days to go until Halloween! Still don’t have an idea? Here’s one that you’re sure to have the stuff for!

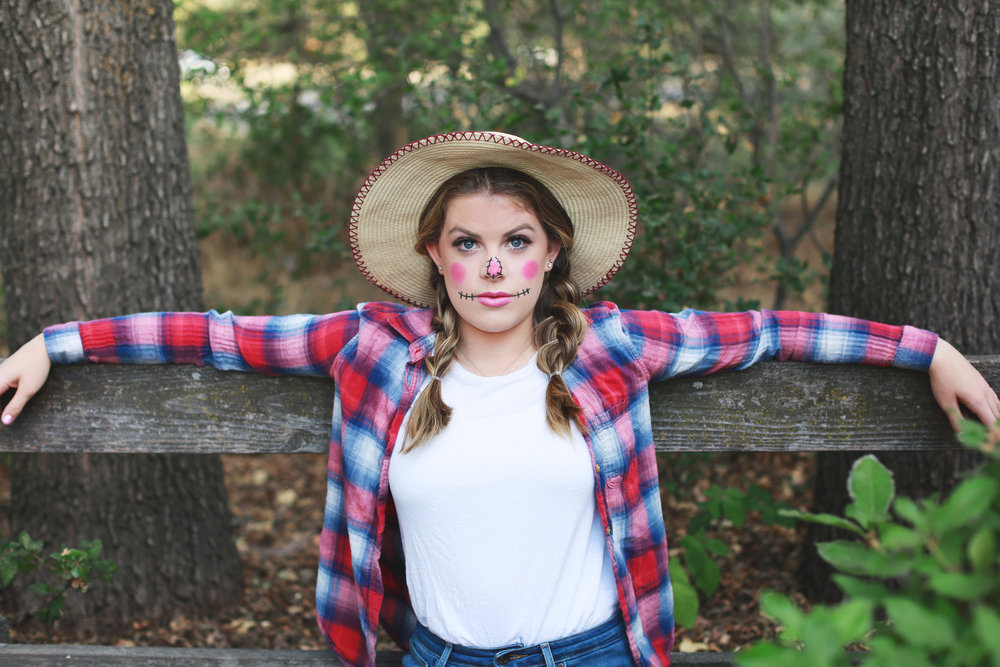
For the outfit grab jeans or overalls, a white tee, a flannel, and a straw sun hat!

For the makeup, start with your face as done as you like it. For Gracie, we opted for foundation and powder and some big fluffy doll-like lashes! Then go in with hot pink blush and make a distinct circle shape with it on each cheek! We used Tarte blush in Rad.

Make a tear drop shape with the blush on your nose too and top off the look with a bright pink lip! Try NYX Butter Gloss in Peaches and Cream or Cupcake!
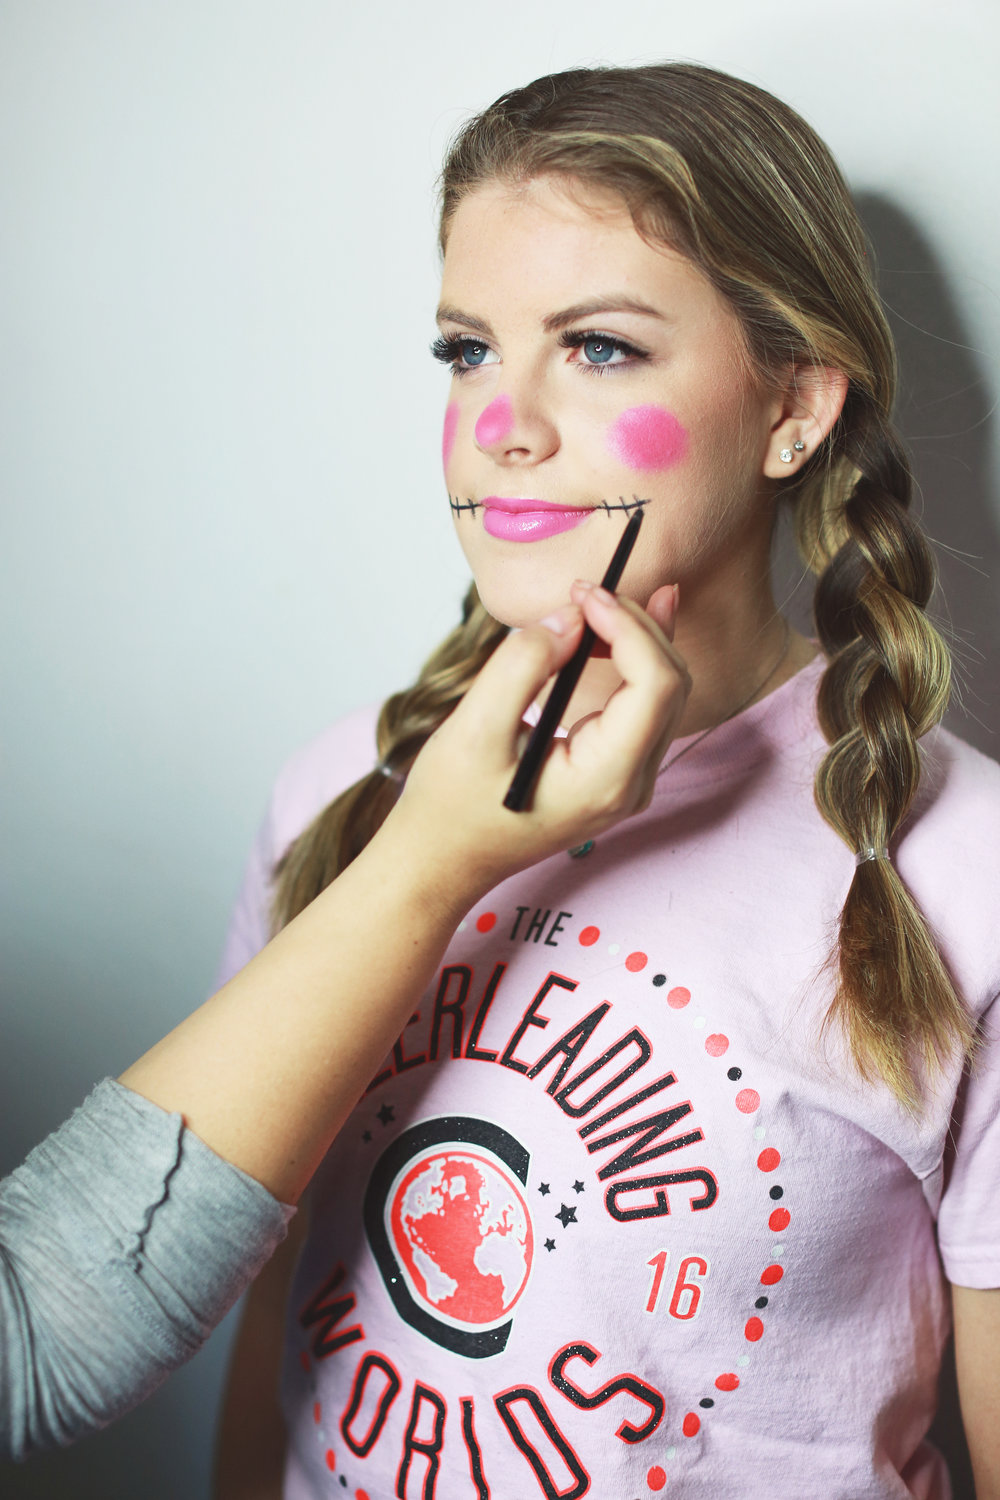
Now take a black eyeliner pencil—we opted for Urban Decay Perversion—and draw smile lines with stitches and outline the pink on your nose the same way too!

Double braids add to the country farm vibe!
There you have it! And chances are you already have all these things lying around!

Special thank you to Indulge Beauty Studio for taking pics of the gorgeous Gracie in this tutorial!

Give this a try and be sure to tag @polishandpout on IG when you do so we can see your version of this costume!! Happy {almost} Halloween!!!
October 22, 2018

Last year we did a few fun super simple Halloween DIY costumes and it was SO MUCH fun we just had to do more this year too!
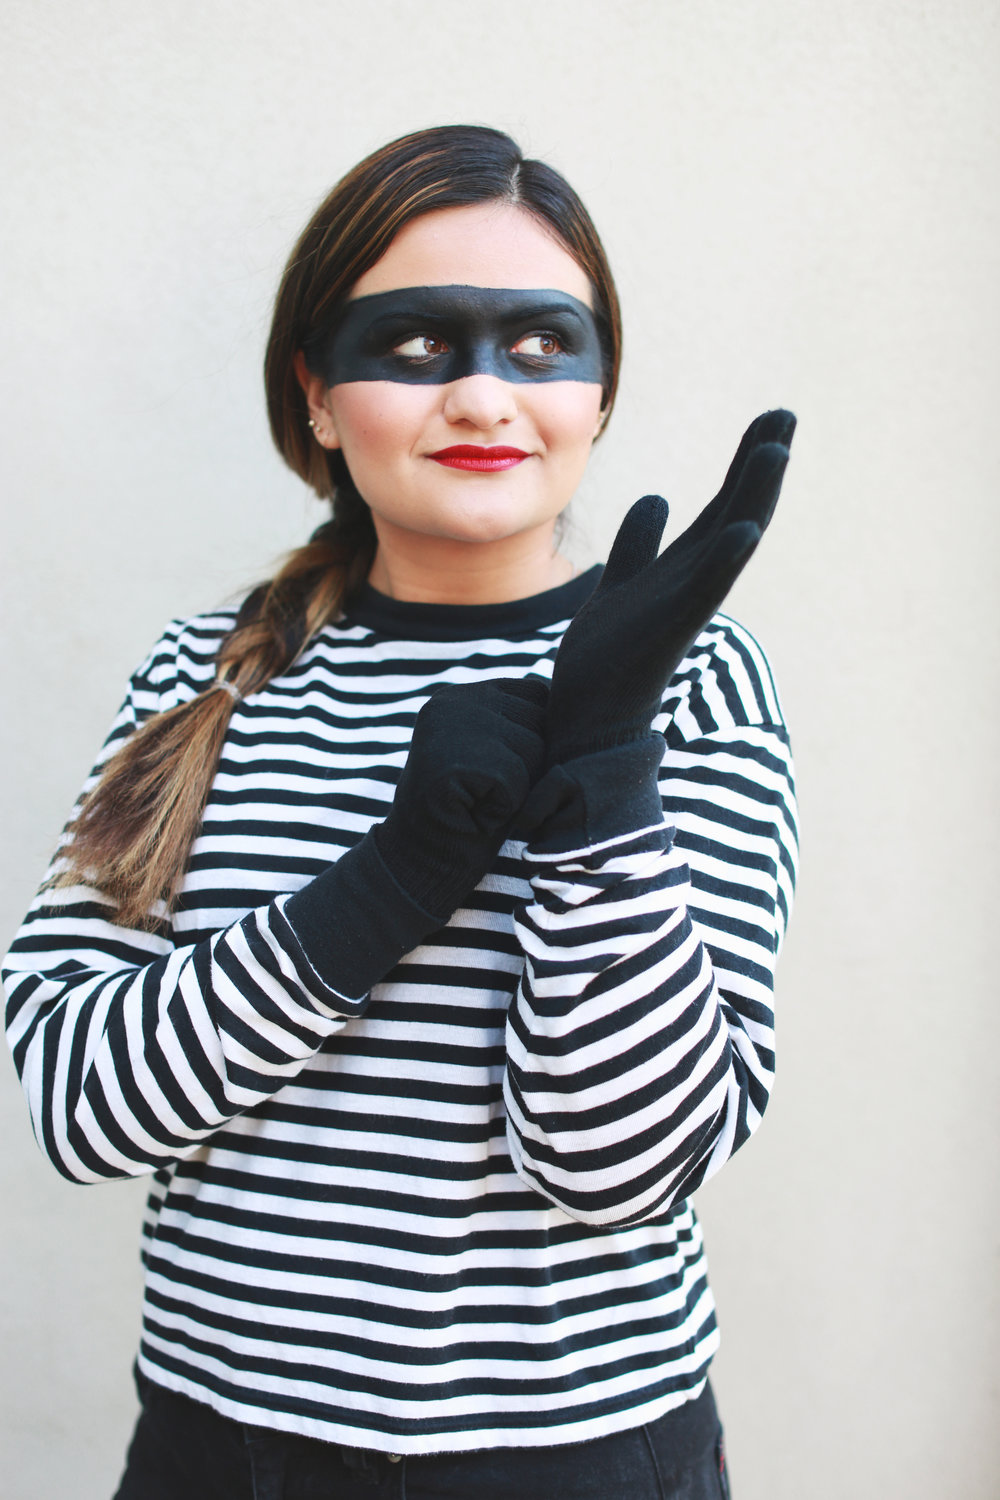
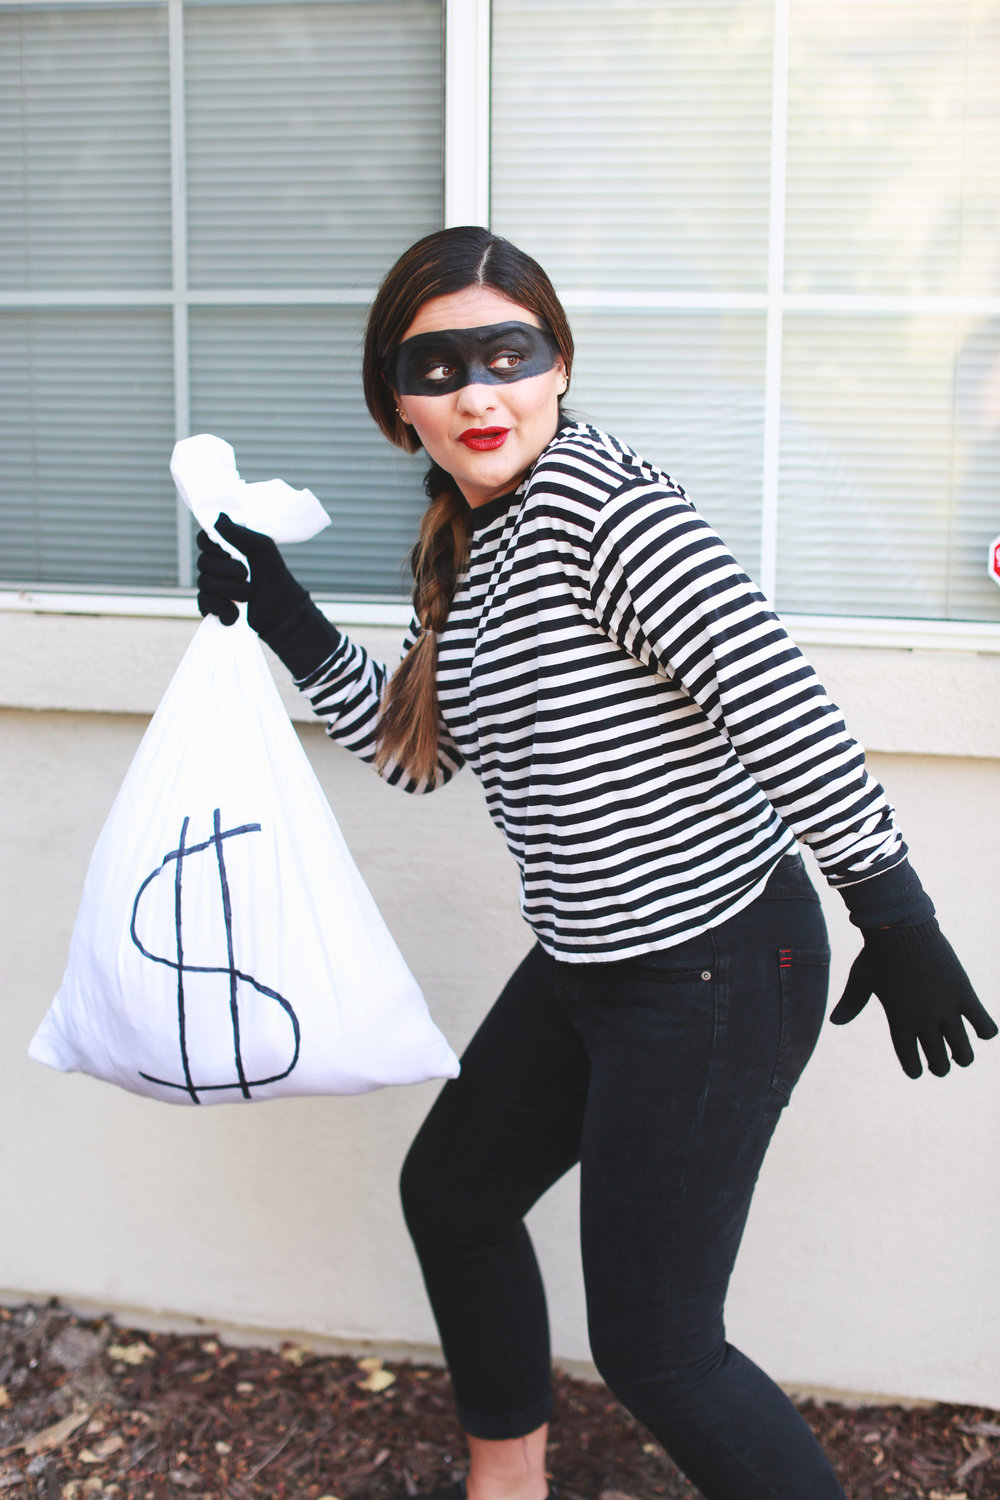
First up, an old timey bank robber!
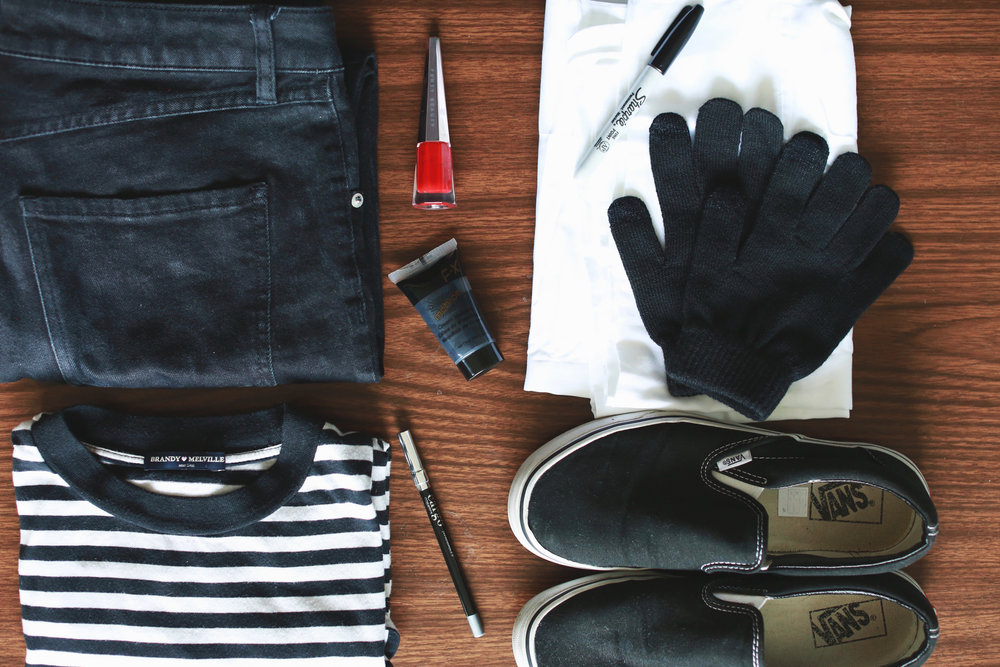
Here’s what you’ll need: For your outfit opt for black pants and shoes, a black and white striped top (go for all black if you don’t own stripes), black gloves.

You’ll also need a bag for all your stolen loot! An old white or cream pillow case will do the trick! Use a black sharpie to draw a big dollar sign $ on it…because otherwise how will you remember what’s inside?! 😉
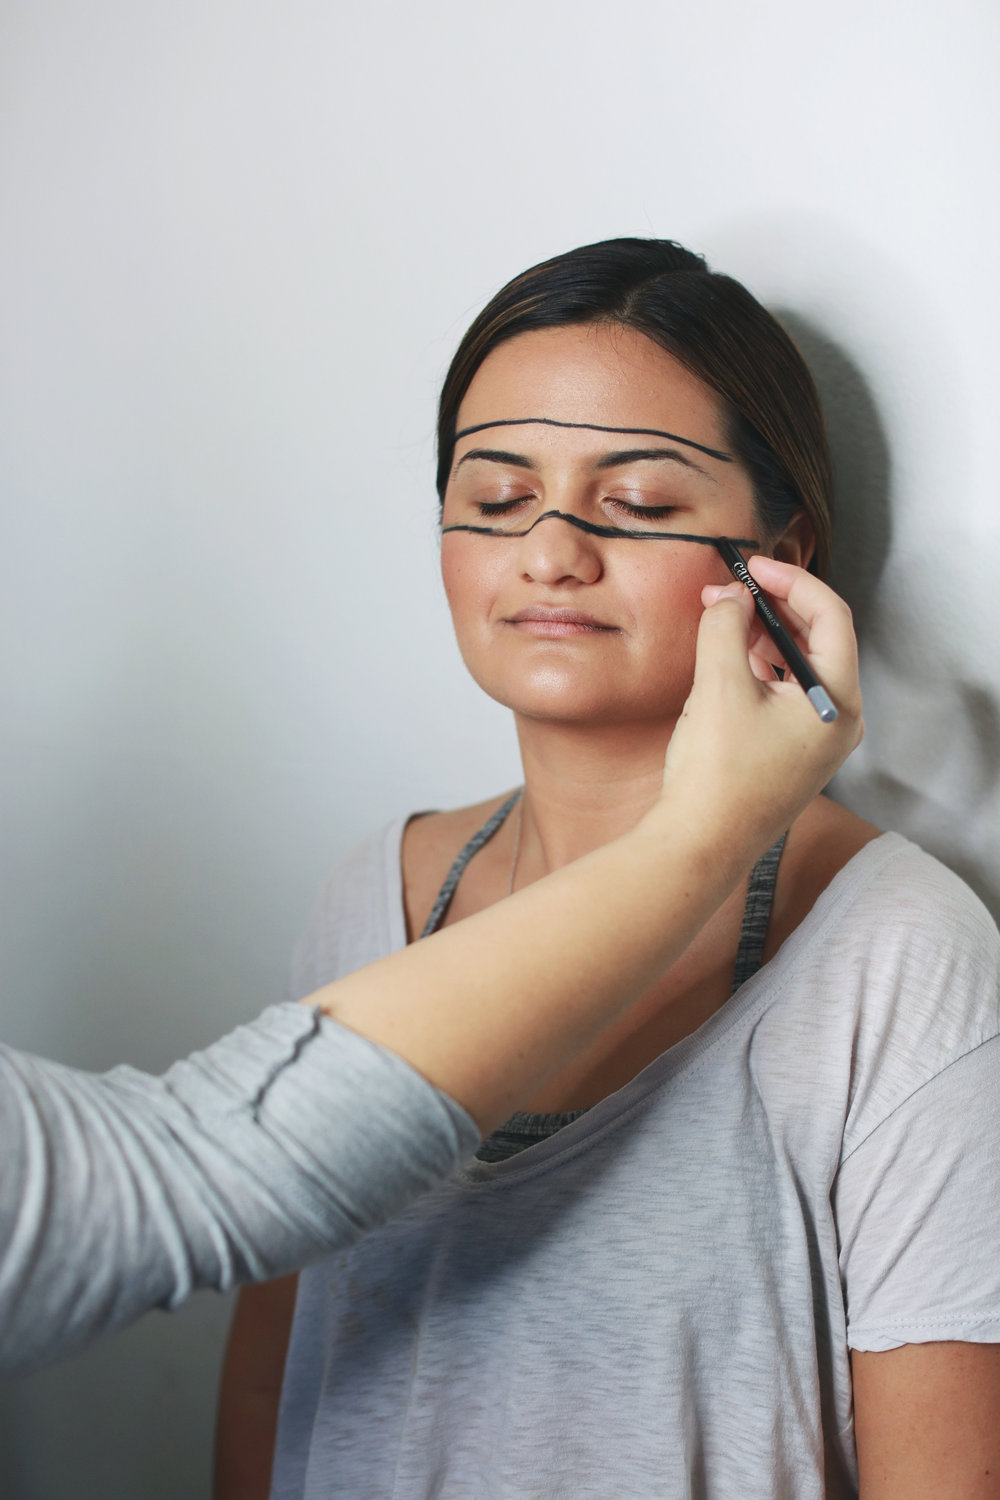
Ok now for your makeup. Start out from whatever point you’re most comfortable. Maybe that means a bare face or maybe that means your current routine, it’s whatever you want! On Izzy, we used foundation, powder, blush, bronzer, and highlight. So her basic complexion was on point before we drew the mask! Ok now grab a black eyeliner and sketch your eye mask outline.

Now fill in the mask! We used Mehron black cream makeup, you can snag it on Amazon for a few dollars! Not able to get ahold of black makeup? Fill in mask with your eyeliner or layer on black eyeshadow to fill in the mask.
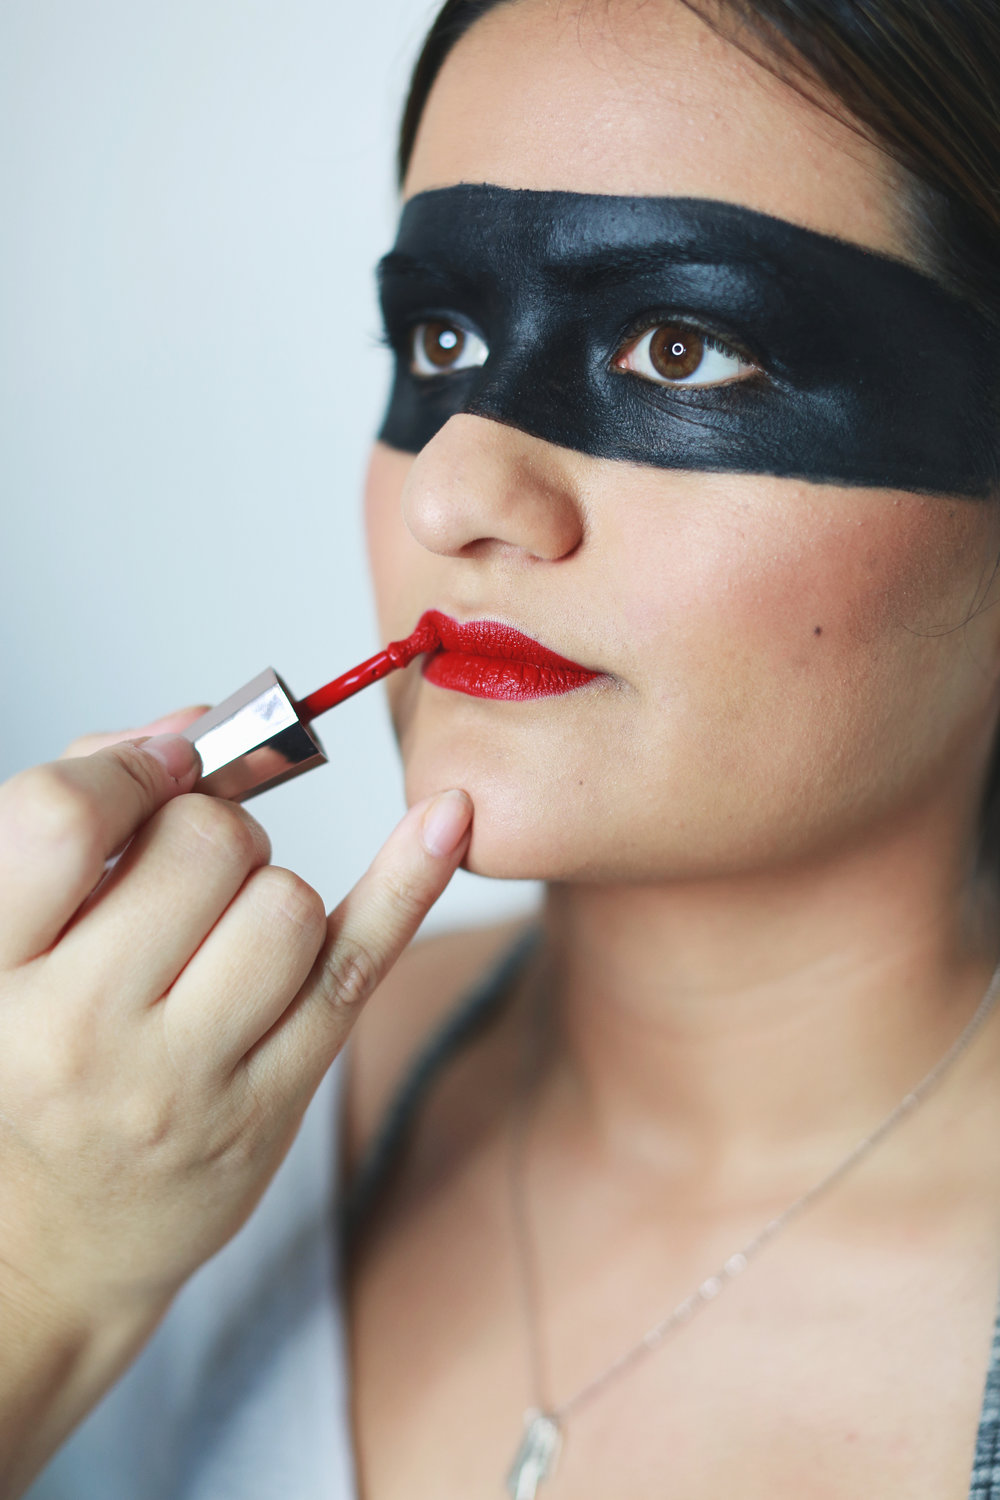
Now the fun pop of color! You really can wear anything lip you want but I just love the contrast of this bold red with the black and white outfit! Bank robbers like to be glam too! This is Fenty’s Stunna Lip Paint in red and it’s so creamy, smooth, vibrant, and ultra long wearing!
Now you’re ready to pull off your master plan!!!
Special thank you to Indulge Beauty Studio for these awesome photos of the lovely Izzy!
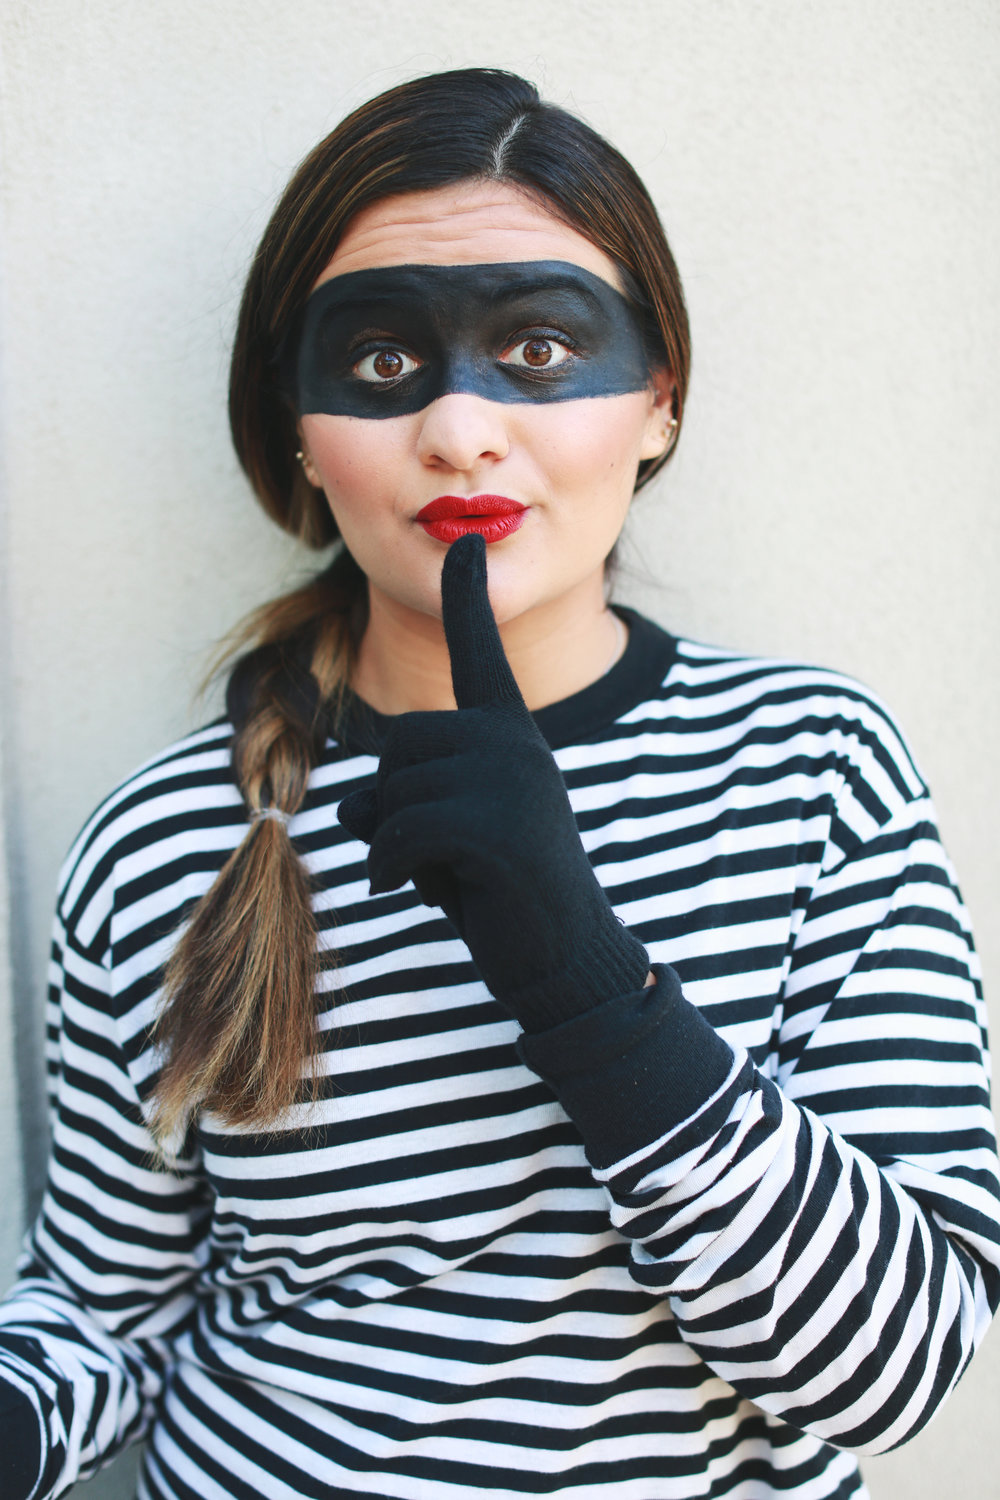
Give this a go and be sure to tag @polishandpout in your look on IG so we can see it!! Happy {almost} Halloween!!
October 15, 2018

Ok folks…we have the perfect last minute easy-peasy costume for you!

Wednesday requires 2 essential things: a white collar and double braids. Everything else is a little flexible!
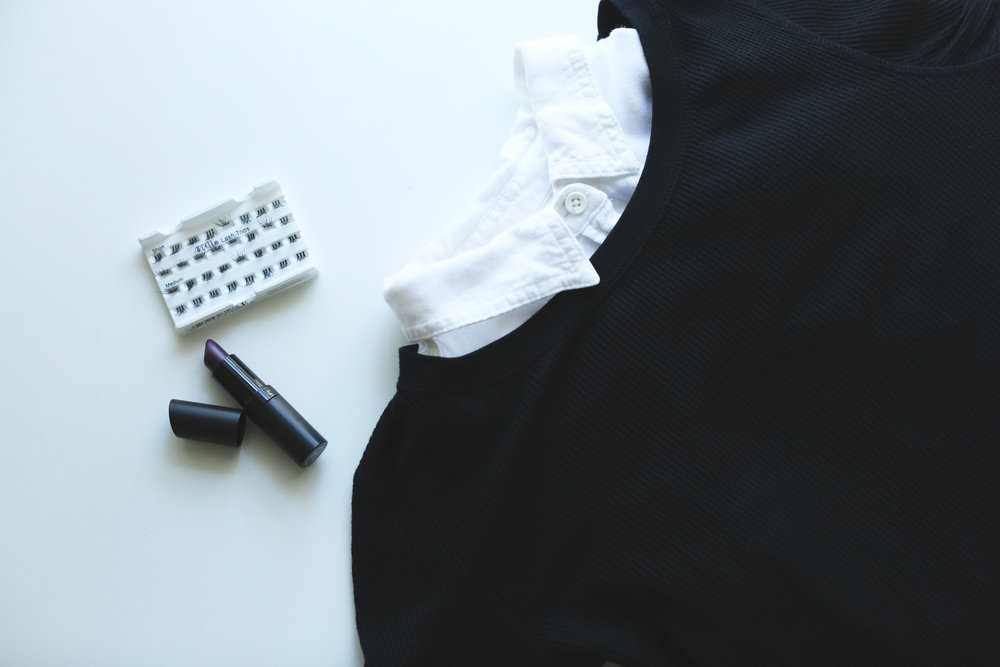
I’d like to think that black lipstick was a staple in her routine as she got older. We didn’t have the exact dress or even sweater…so what we did was put the white collar shirt under a black thermal long sleeve shirt!
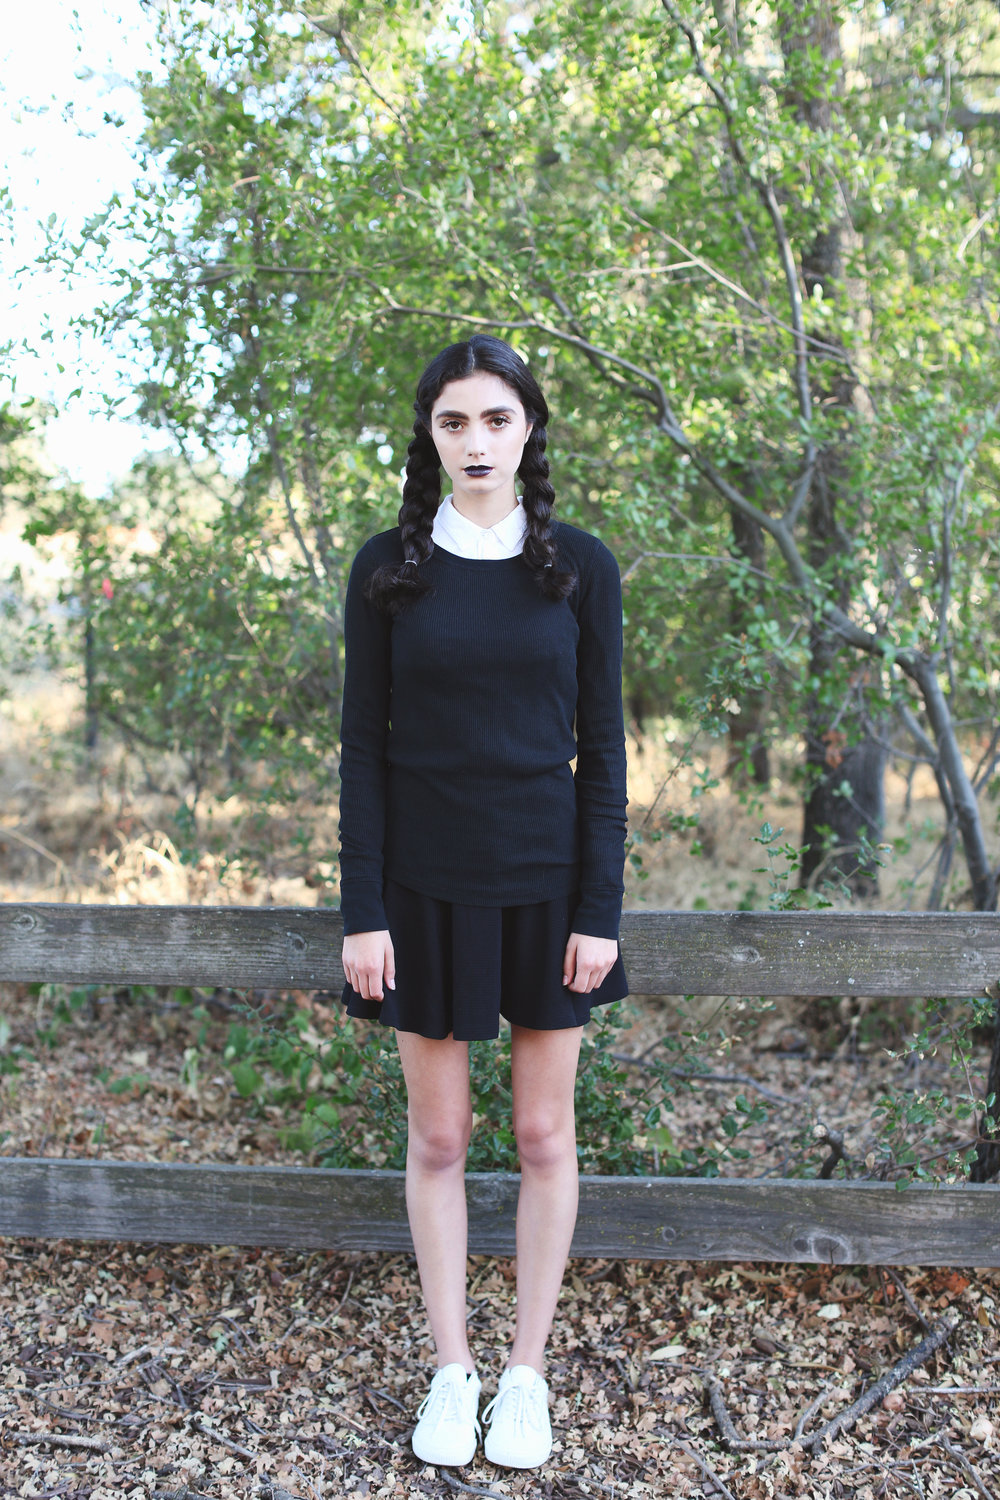
Classic three strand braided pigtails of course. Loads of lashes and strong brows for a more glam look. Paired her top with a skirt and there you go!
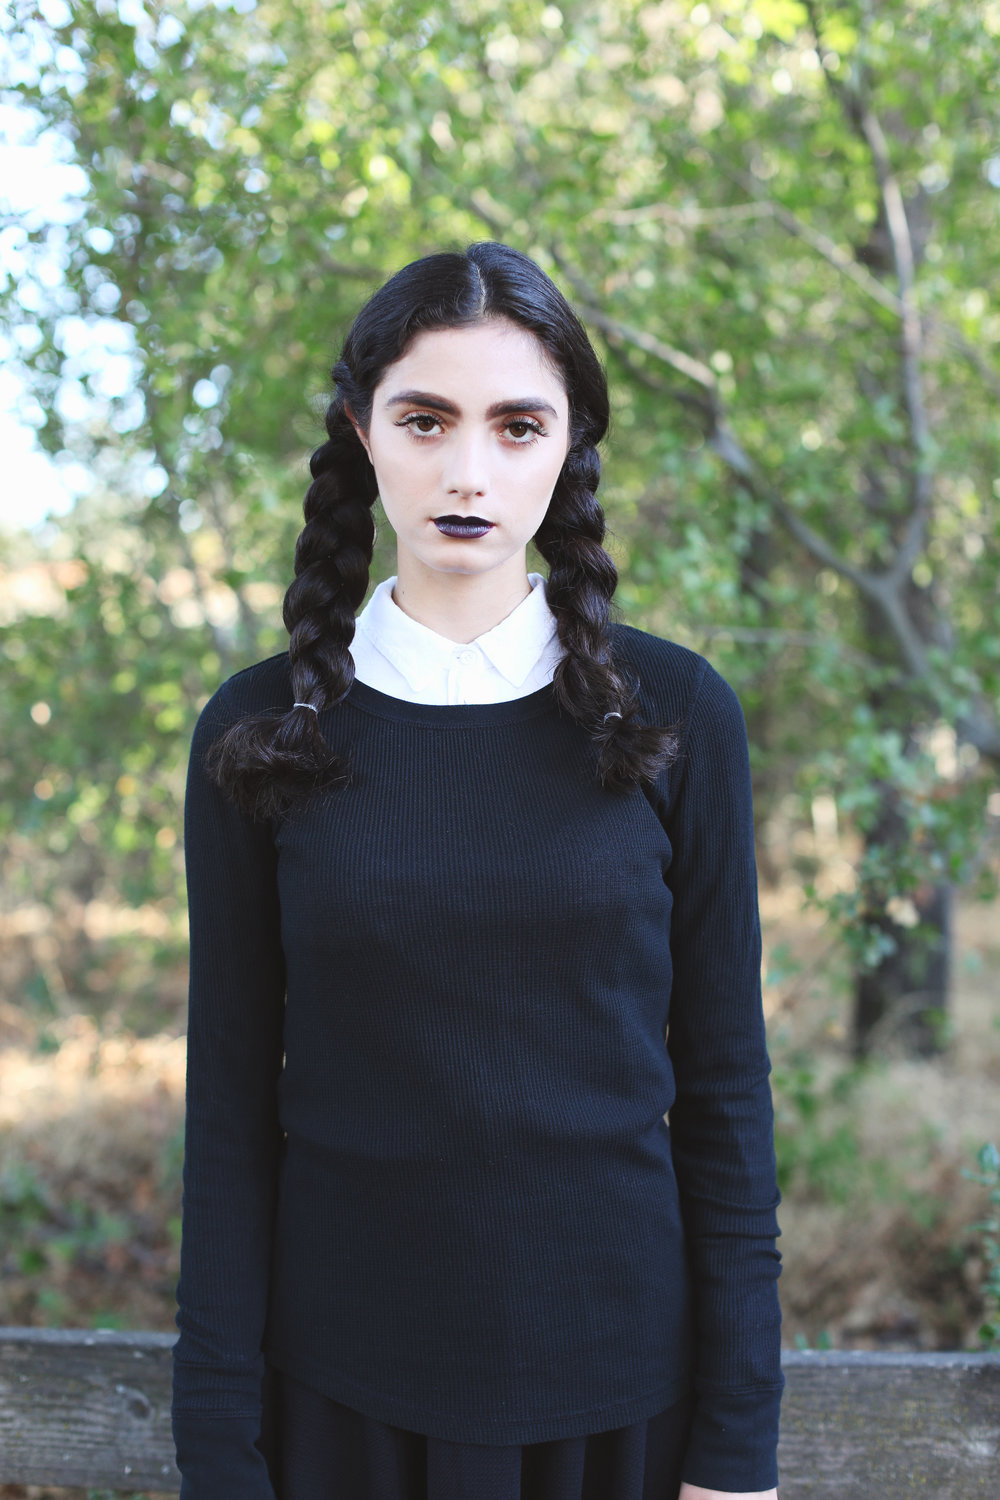
Be sure to wear your serious face like Alyssa did. Special thanks to Indulge Beauty Studio for these awesome pics!
October 31, 2017
The ultimate Halloween icon: the vampire! So many possible directions you could take this one…but I think my favorite is to go full blown dramatic on the makeup then add the fangs and blood!

So here’s a glance at each step I took to get my undead glam on…
Clean bare face of course! I used Painterly paint pot by MAC as my eye base and worked from the purple and black shadows in the Tarteist Pro palette!

Start with a wash of color over your lid, the brightest purples should go in your crease, smoke out the edges with the black and highlight your brow bone!
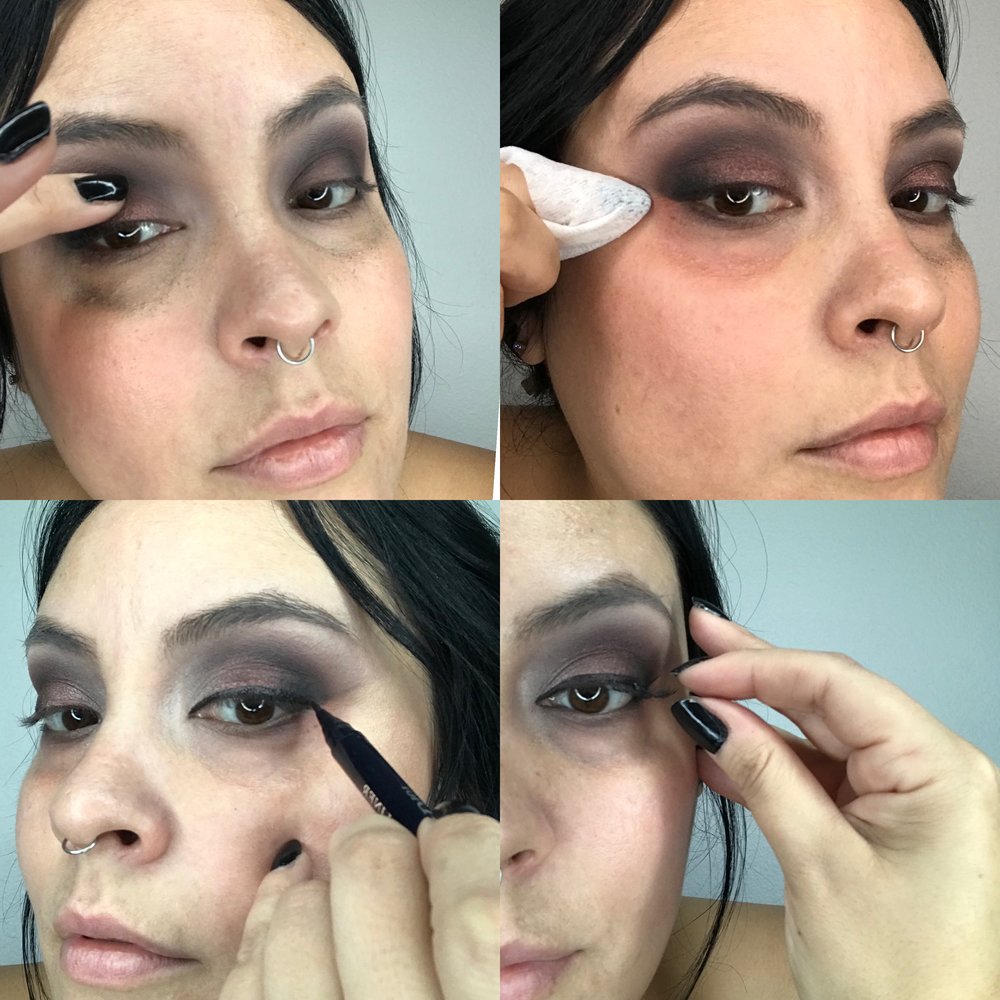
The far right row in the palette is all shimmery shades—use your finger to color pack the shimmery purple onto the center of your lid for an extra pop! I always use a makeup wipe to clean up after and create a sharp line to guide my wings! Dior has an awesome liquid liner, the felt tip makes it goof proof! Lashes are a must, try using the lash trios by Ardell! They’re like training wheels for lashes— so much easier to put on!
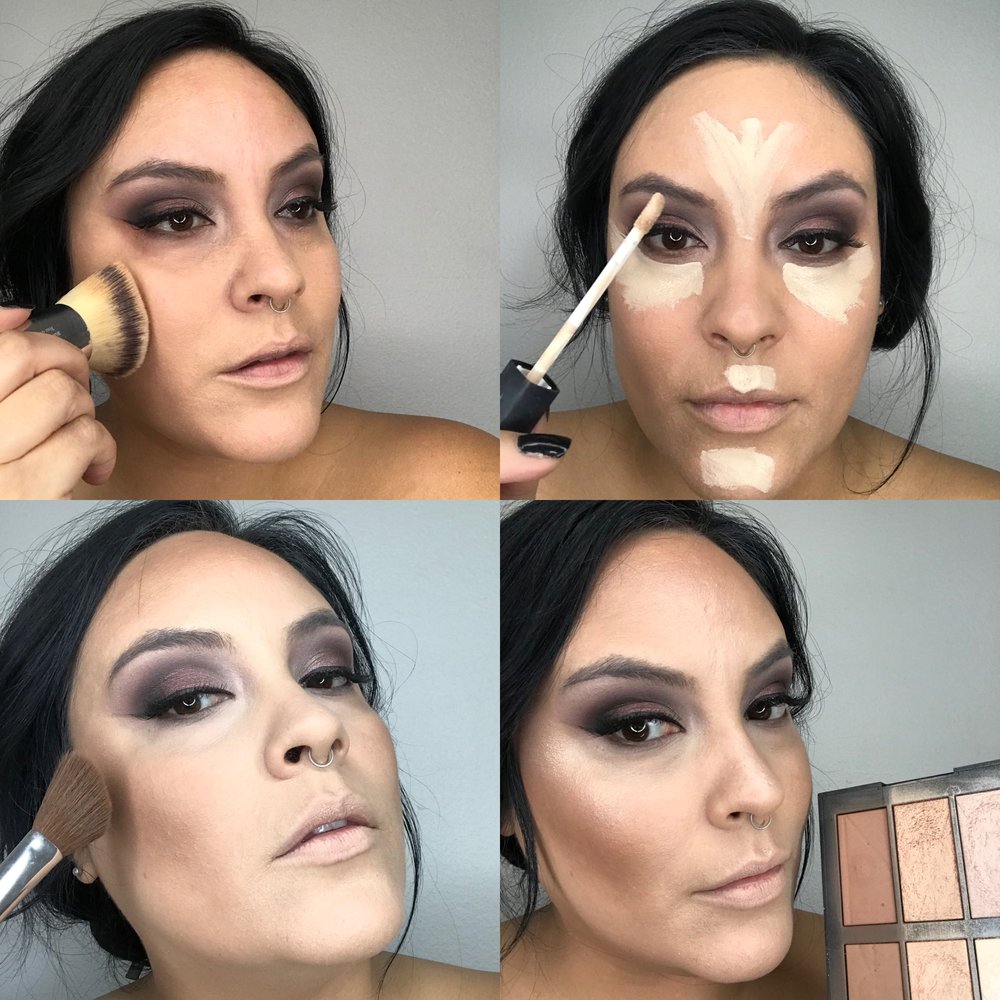
Now that you’ve cleaned up the fallout from the smokey eye, even your skin tone with your favorite foundation! I used Face Atelier ultra foundation and concealed and highlighted with the NARS creamy concealer. This bronzing and highlight palette was limited edition, but you can snag the shades individually from NARS as well. A nice sharp contour and highlight definitely adds that necessary severity to this look.
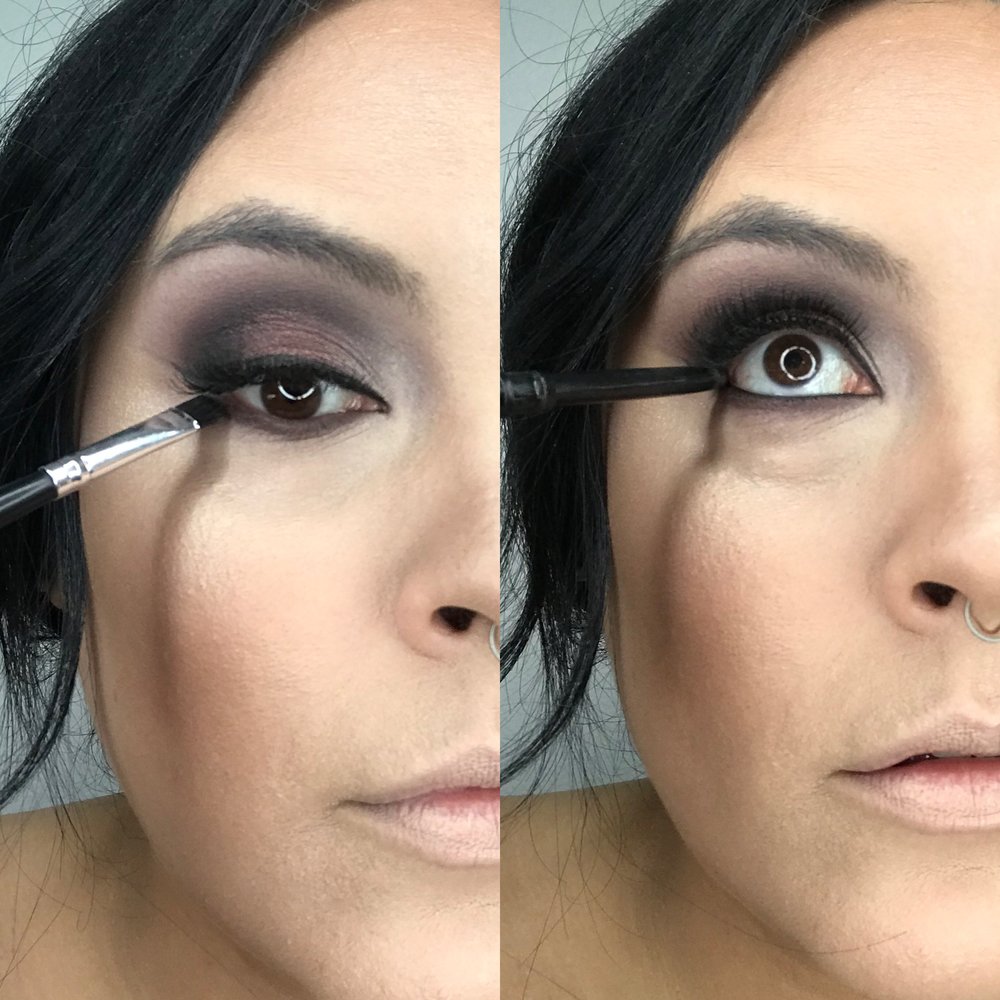
Loving this look so far! Smoke out under your lashes and add liner in your inner rim for extra drama.
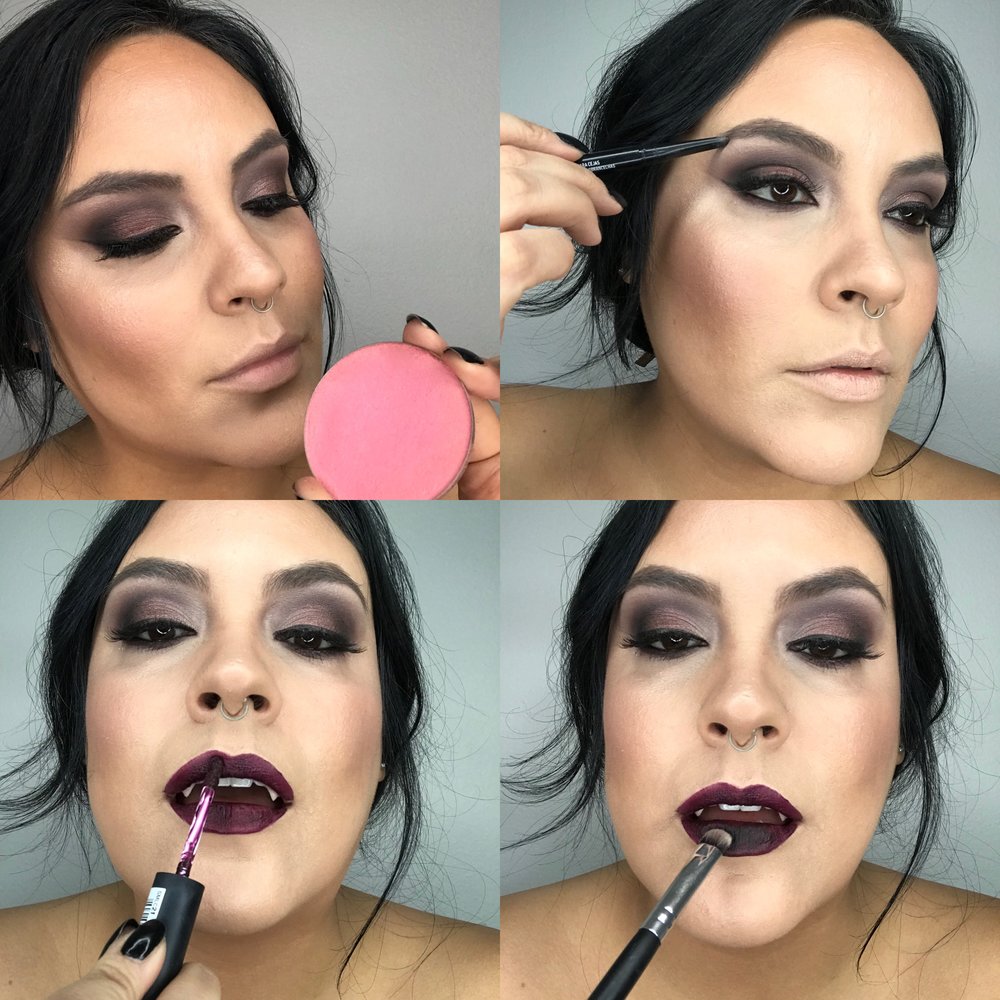
Blush by Cargo in Ibiza, strong brows with my new favorite brow pencil from NYX…it’s called Precision Brow Pencil and the shade taupe works for just about everyone! NYX lip in Transylvania—how apropos! I set it with black eyeshadow for extra depth and hold.
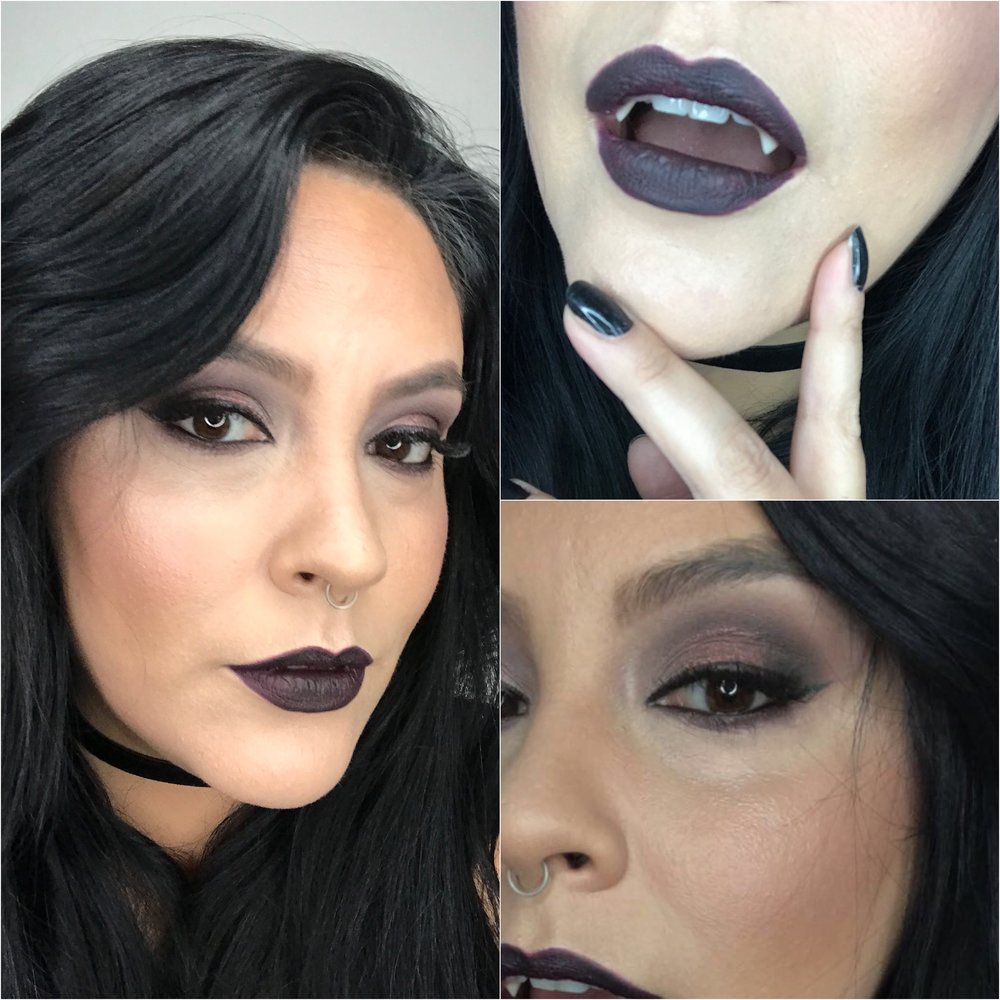
There it is! Love! Of course I added fangs. I used the petite set from Scarecrow Vampire. The set comes with a kit to make custom molds but I opted to go the lazy route and use poligrip since I only was wearing them for a couple hours.
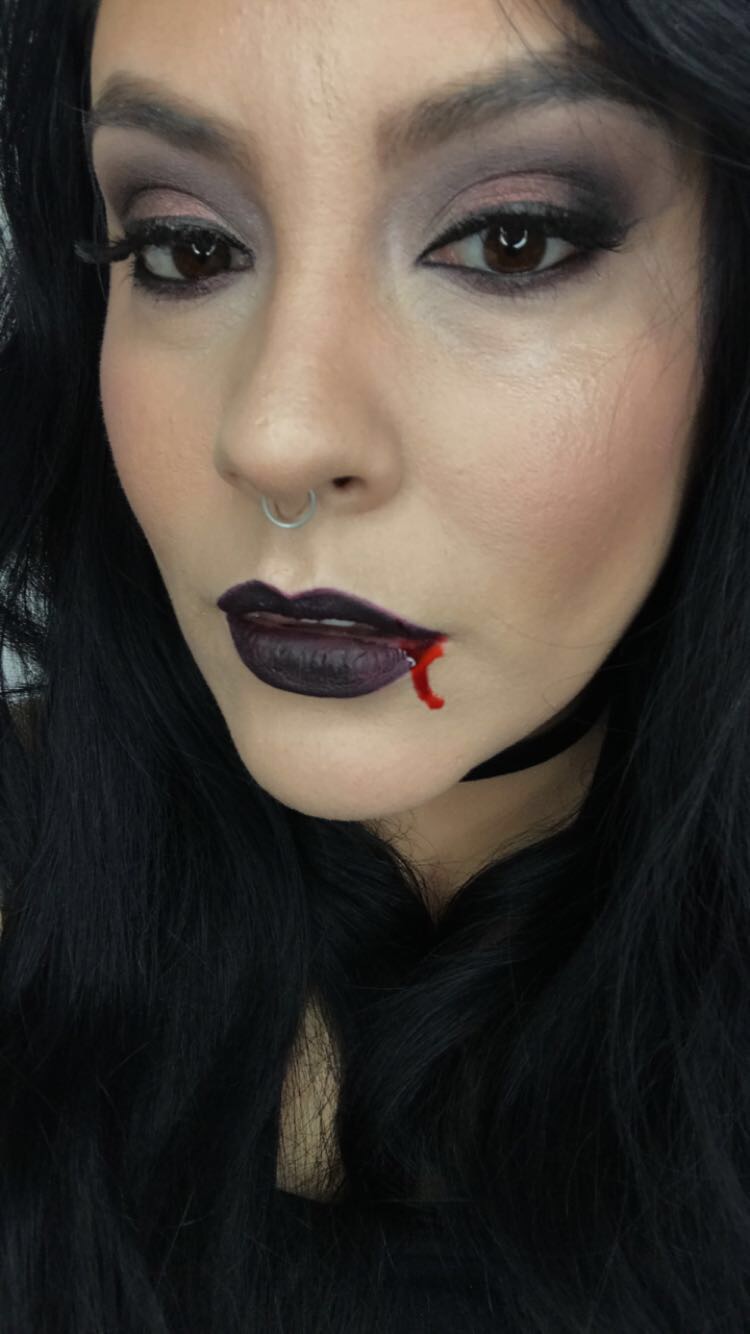
Bonus step: Add a drip of fx blood in the corner of your mouth!

Any outfit will do but I think all black is the way to go…leather, chockers, boots…the more badass the better!
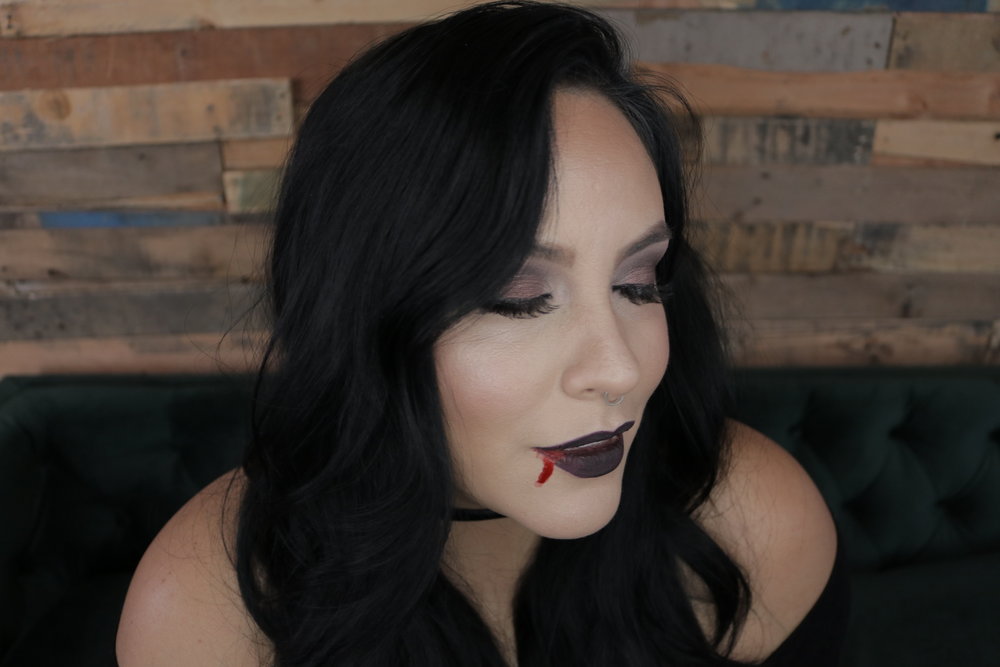
I’m not gonna lie, I kinda want to wear this look year round…fangs included!
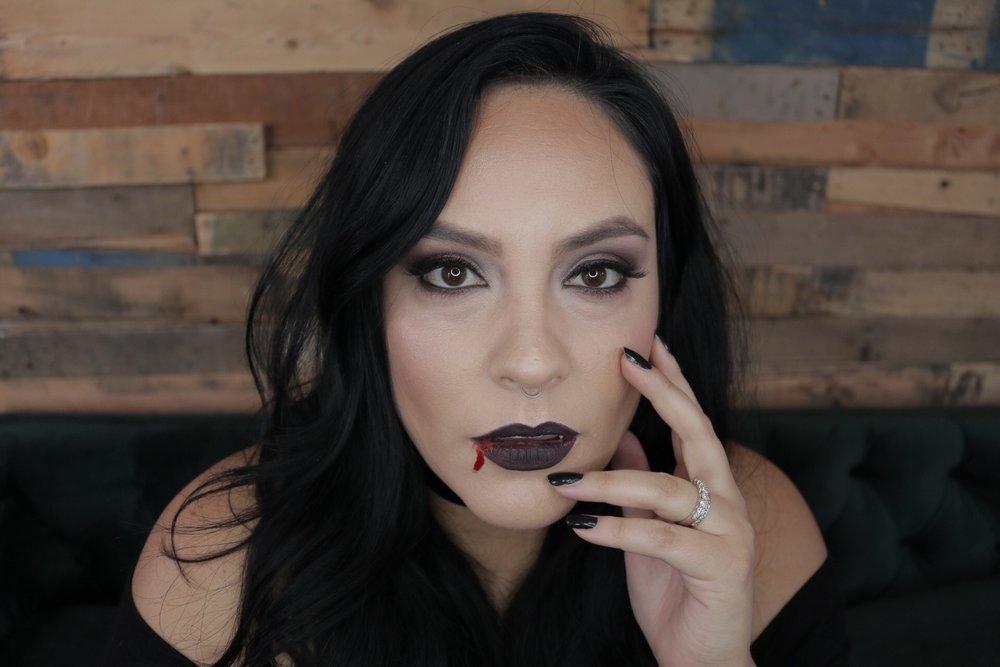
There you have it! You’re ready for your date with Dracula!
October 28, 2017
Last year we did a Día de Muertos photoshoot in conjunction with the headpieces from Idolatry and loved it so much we decided to do it again this year!
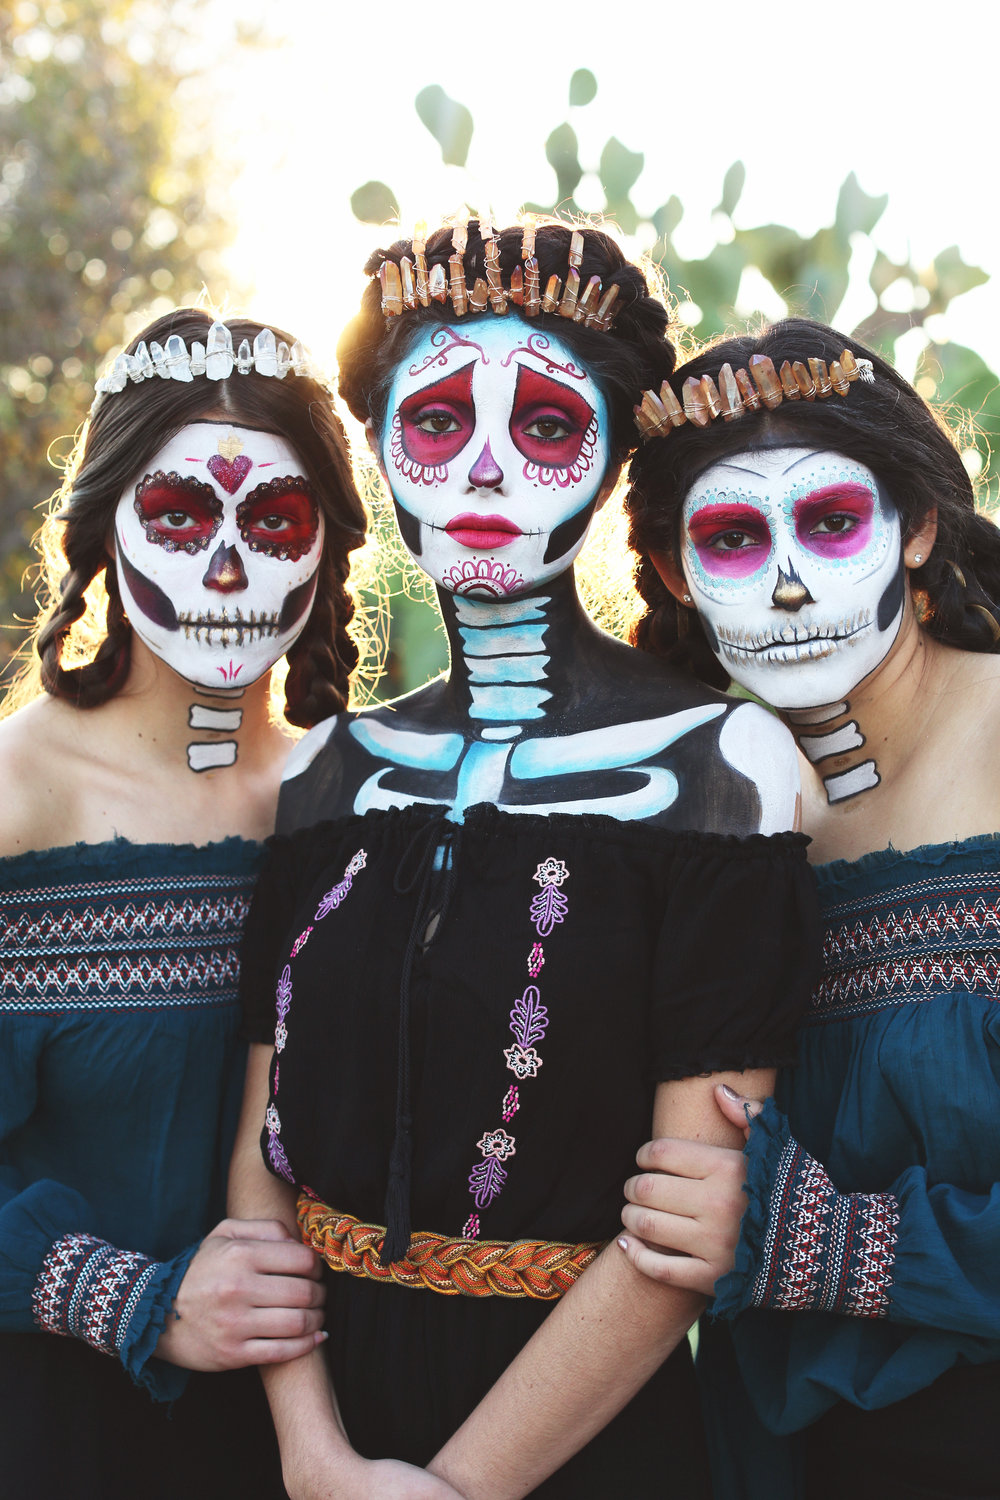
How gorgeous are our 3 Mexican models?!

We leveled up this year by having P&P Artist Gina Scheiber bring her amazing fx skills! We were in awe the whole time at the detail and vision she brought to the shoot.
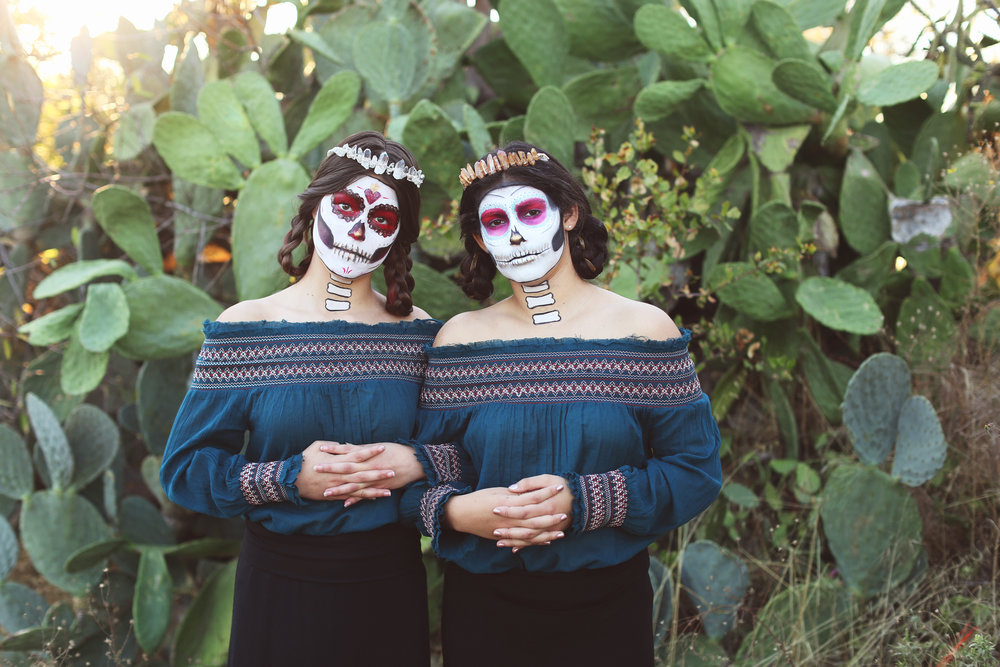
The Day of the Dead is such a special Mesoamerican celebration with roots in both indigenous traditions and Catholicism.

The imagery of skeletons and skulls walks hand in hand with this holiday.

The painting of a calavera on the face or on sugar is a lovely way to acknowledge mortality, remember your ancestors, and celebrate life.

Our friend Valerie Tejeda at Heart Your Heritage made this awesome video about it—take a peek and learn some more about the holiday!
Special thanks to Indulge Beauty Studio for these amazing photos!
October 27, 2017
Alongside the black cat, the witch is one of the easiest and best go-to’s for Halloween! It really only requires two things: black clothing and the classic pointy hat! Everything else is dependent on your imagination!
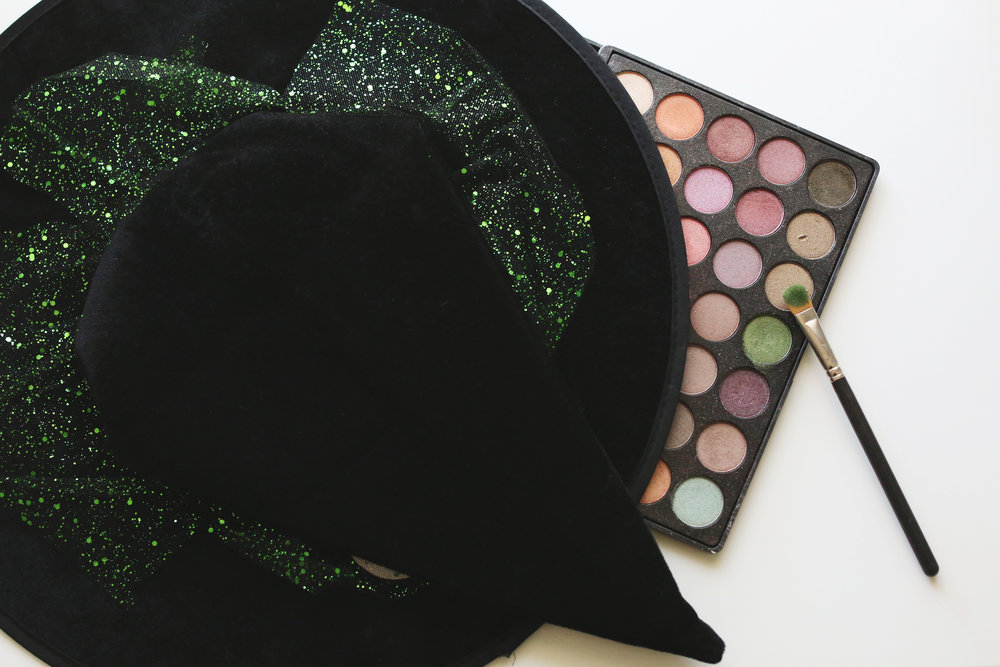
And thanks to the Target dollar section, dressing up like a witch has never been easier! We snagged our hat for $3 and paired it with a favorite black maxi dress. Bonus points if you add striped tights!
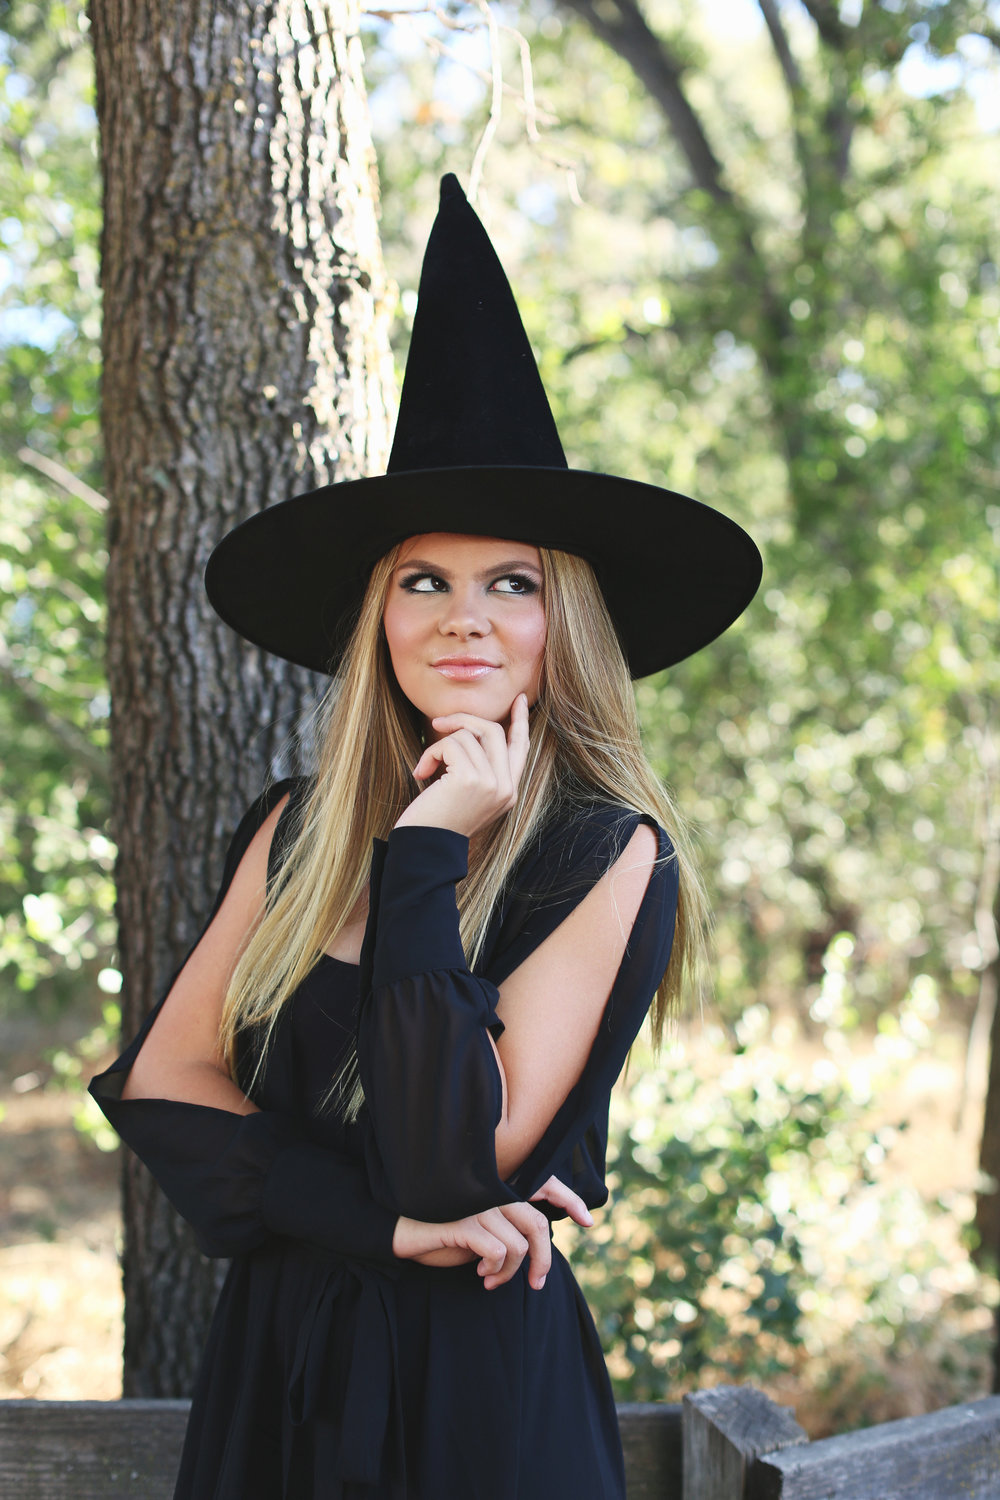
Another reason why I love this costume is because the makeup can be whatever you want! A smokey eye seemed like the obvious choice.

Build your smokey eye with black and then color pack some green shadow to the center of your lid for a witchy pop of color! I love keeping a colorful palette full of funky shades on hand for occasions like these. The morphe palette I used is sadly discontinued but they have lots of other colorful options and are super affordable!

There you go! Super easy and super glam! Special thanks to Indulge Beauty Studio for taking these rad pics of the lovely Emma!
October 24, 2017
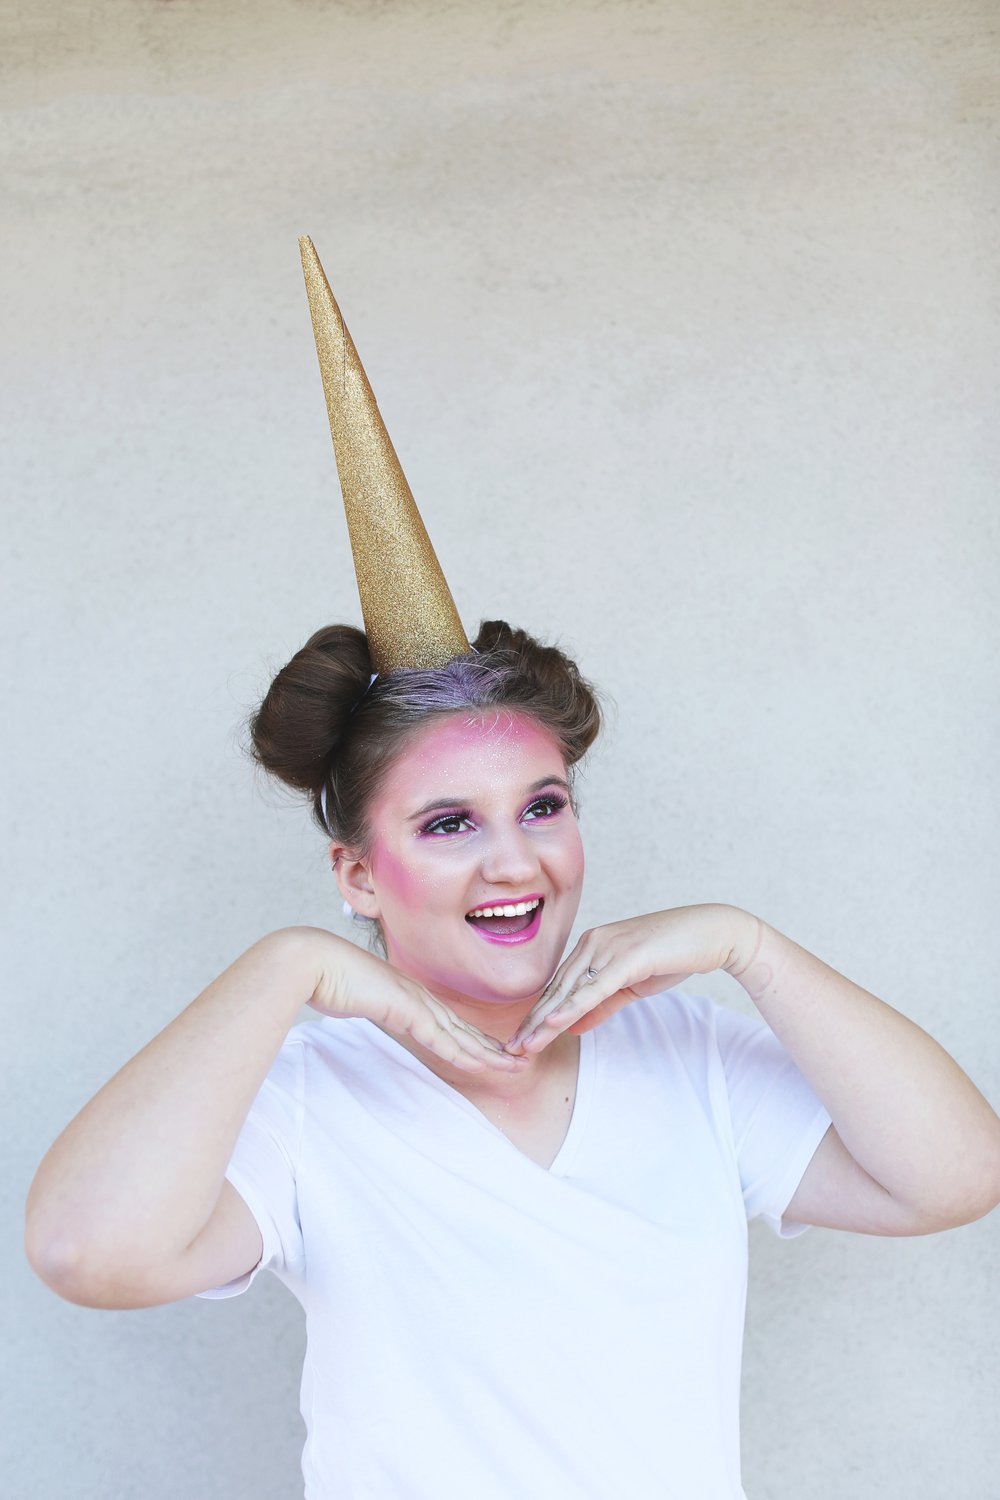
2017 was the year of the unicorn for sure…they’ve been everywhere from T-shirt’s, to coffee mugs, and even our Frappuccino’s! So it should come as no surprise that it also happens to be an excellent do it yourself costume idea!
Chances are you have most of these things lying around your house or can snag the things you’re missing for a few bucks!
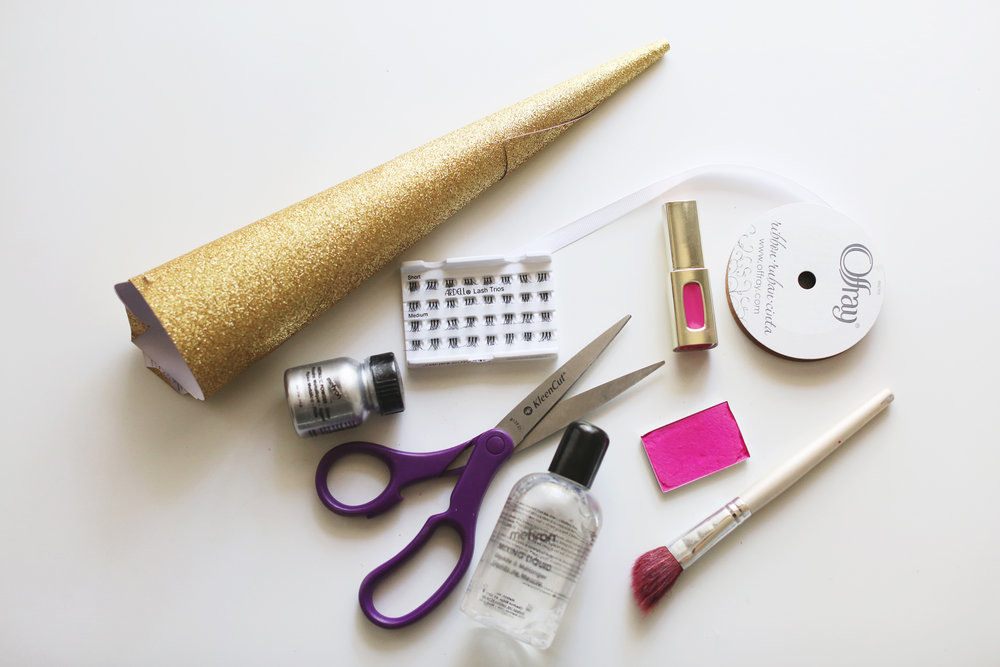
Ok so first things first you need to make a horn! A piece of paper will do the trick…a glittery or metallic piece of scrapbooking paper is even better! Simply roll it into an ice cream cone shape and secure it with hot glue!
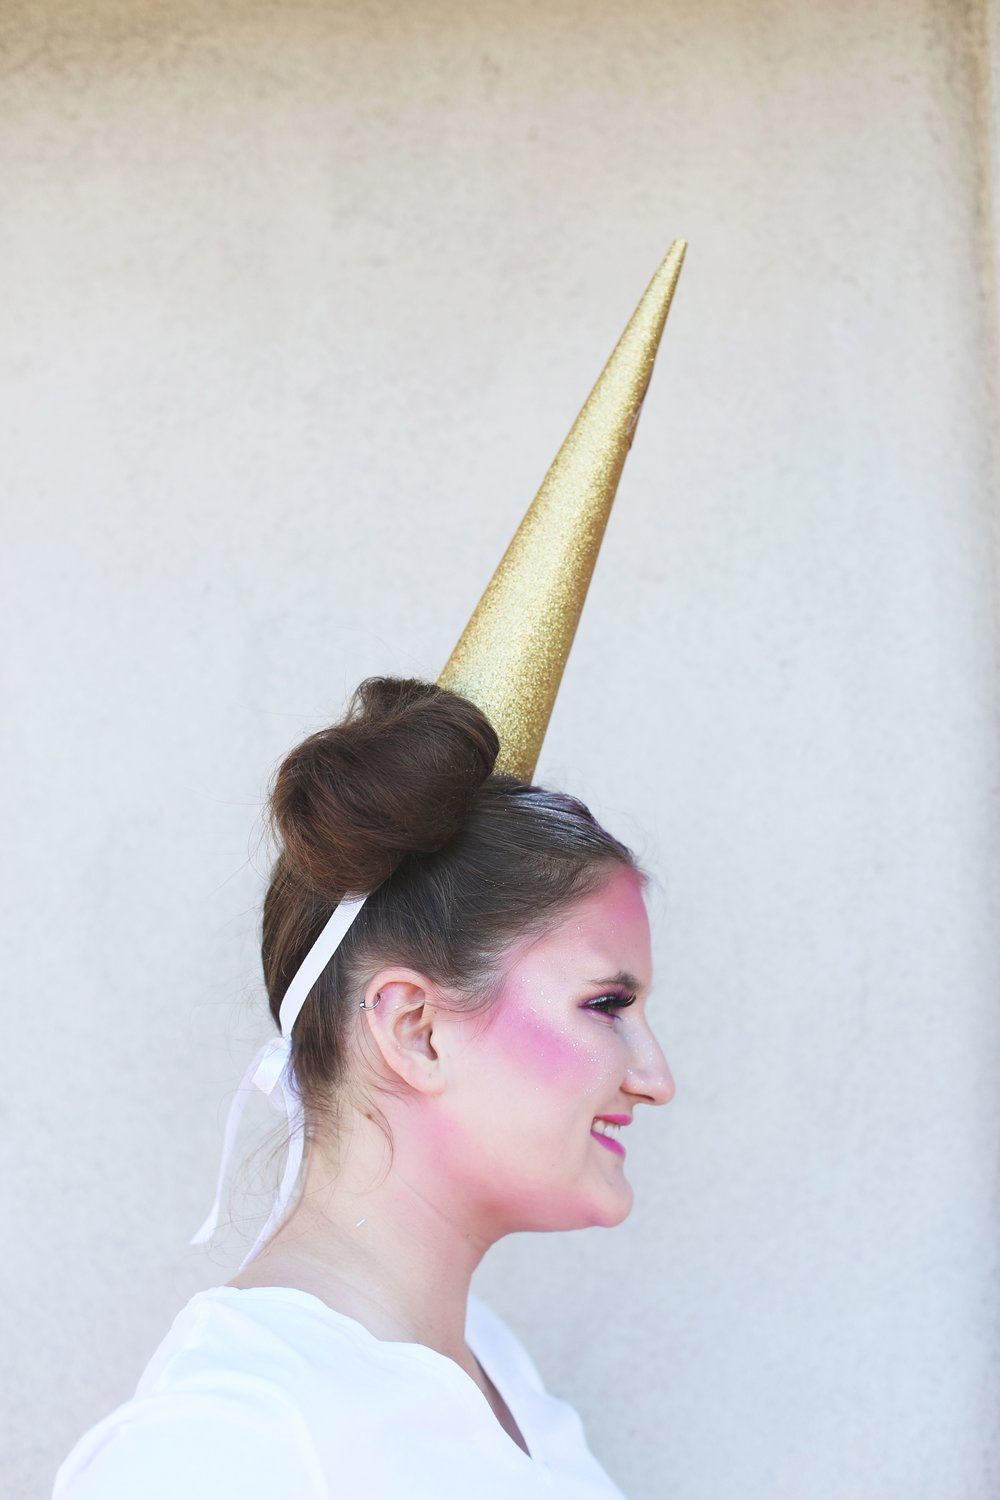
Punch two holes through each side of the end of the cone and put ribbon through it so you u can tie it around your head like a headband! The best hairstyle for this look will be pigtails or better yet twist your pigtails into double buns!
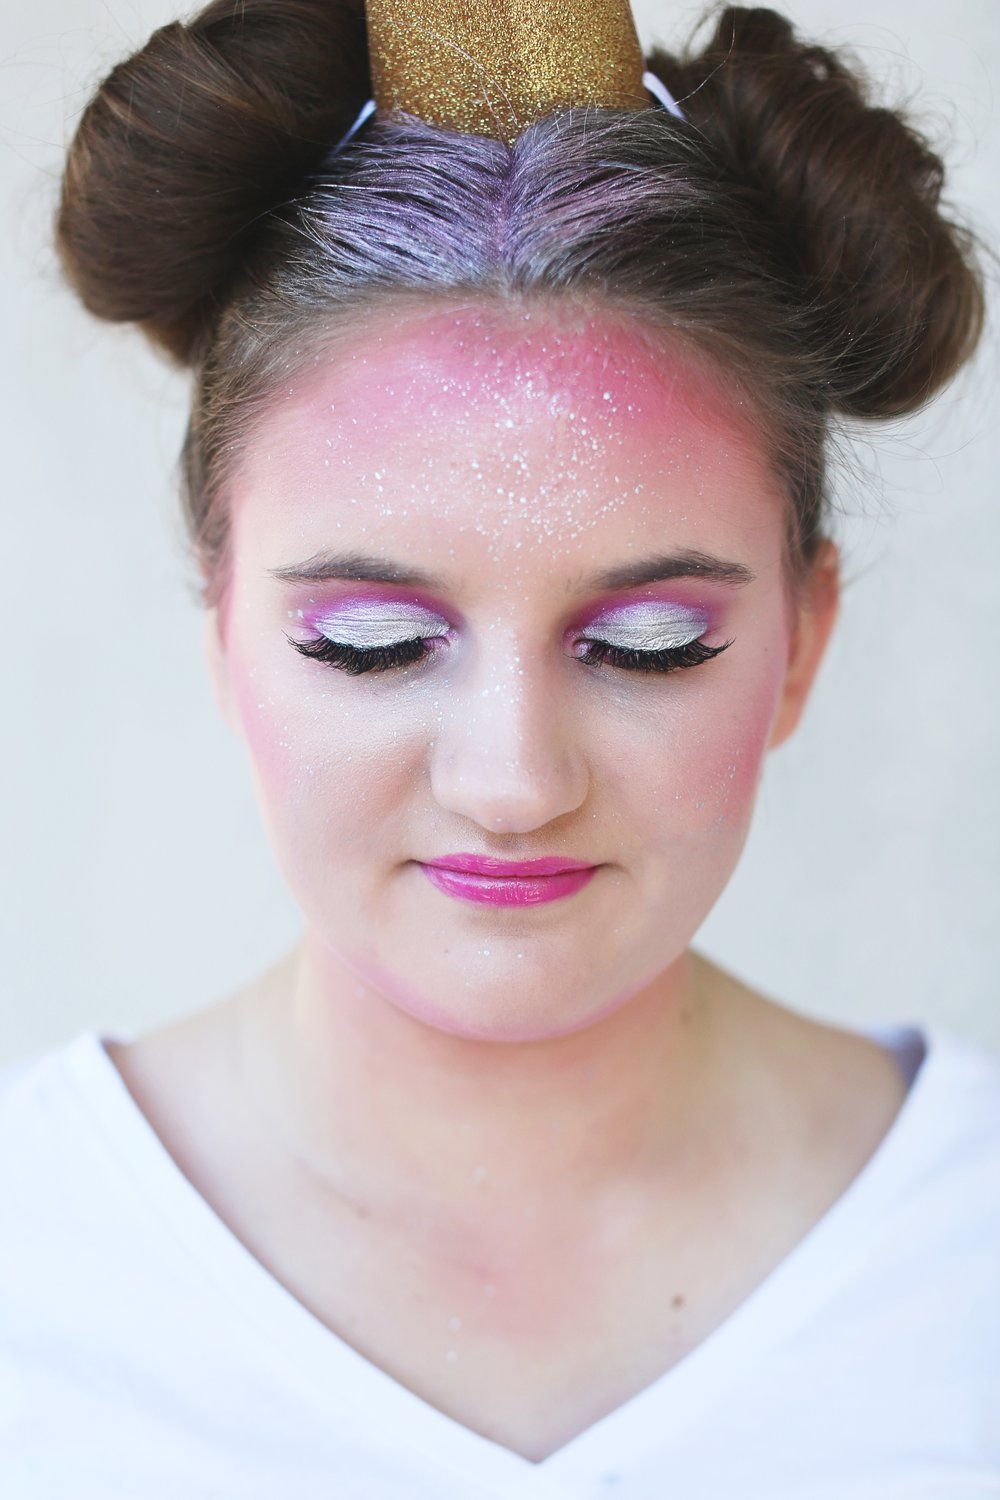
For makeup, the brighter the better! Use a bright pink blush and apply it everywhere you’d normally contour, bronze, or blush your face. This will add dimension and color in a fun way!

Added bonus points to use glitter or metallic eyeshadow on your eyes and down your hair part. I used my favorite metallic powder and mixing liquid from Mehron! And for the paint flecks on the forehead, dilute your shadow with setting spray and flick it onto your forehead.
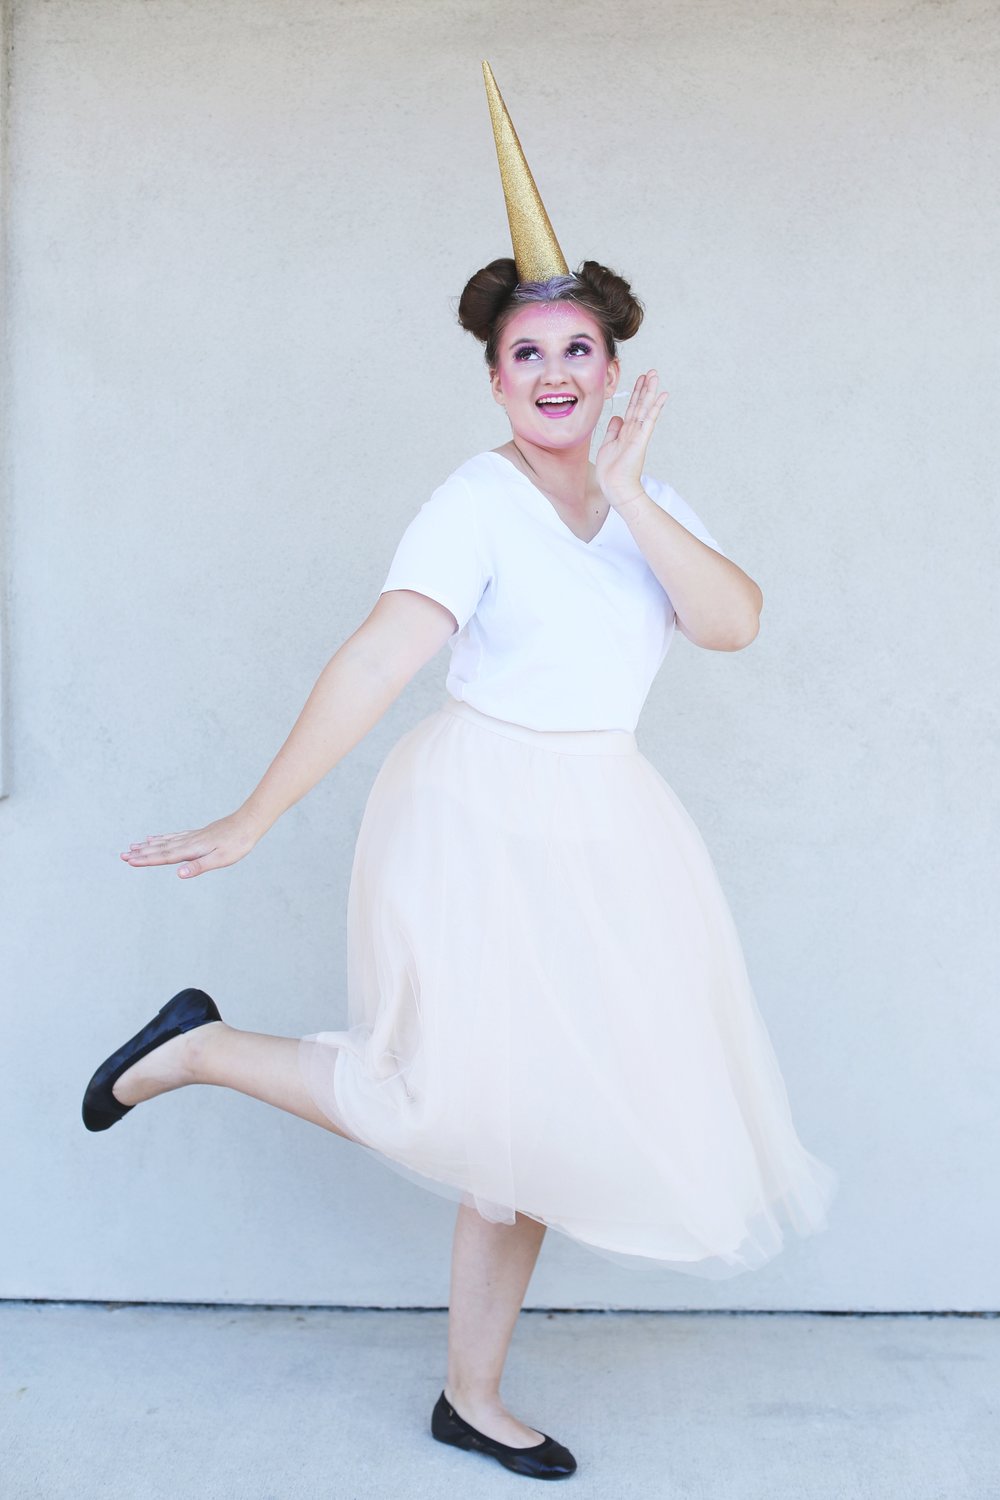
Toss on your twirliest fluffiest dress or tulle skirt! And there you have it…your unicorn dreams have come true!
Thank you to Indulge Beauty Studio for capturing these photos of the lovely Katelyn!
October 17, 2017
Forget buying a costume! For me, the best part about dressing up for Halloween is making your costume yourself! Here’s a super easy DIY and chances are you have most or all of these things already! Here we go…
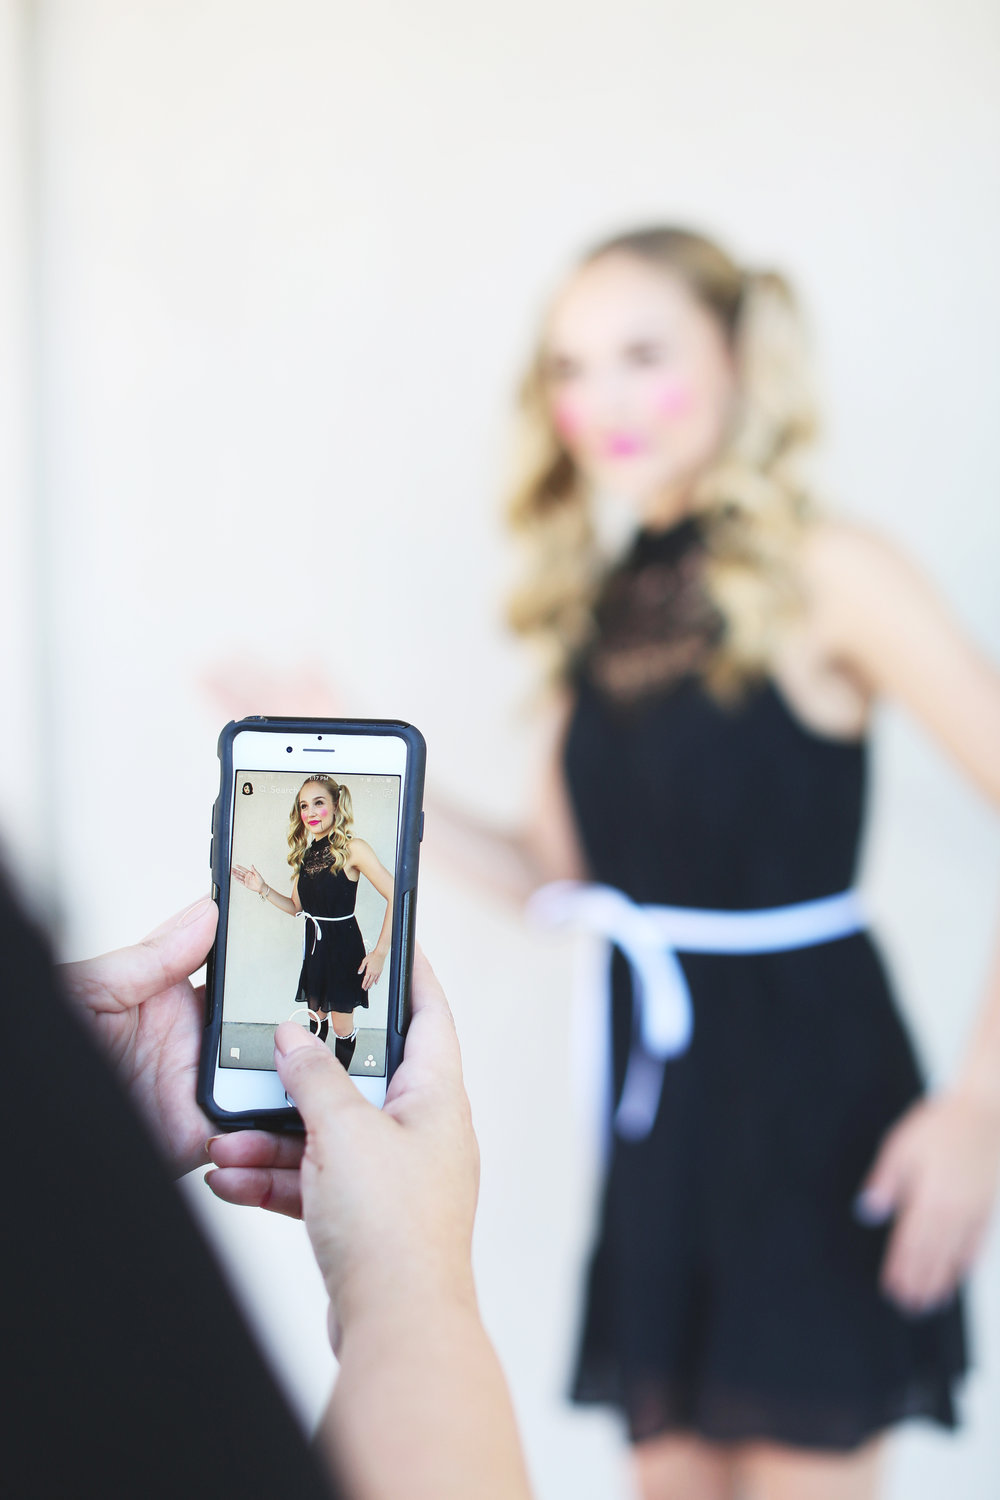
This look is selfie worthy for sure!
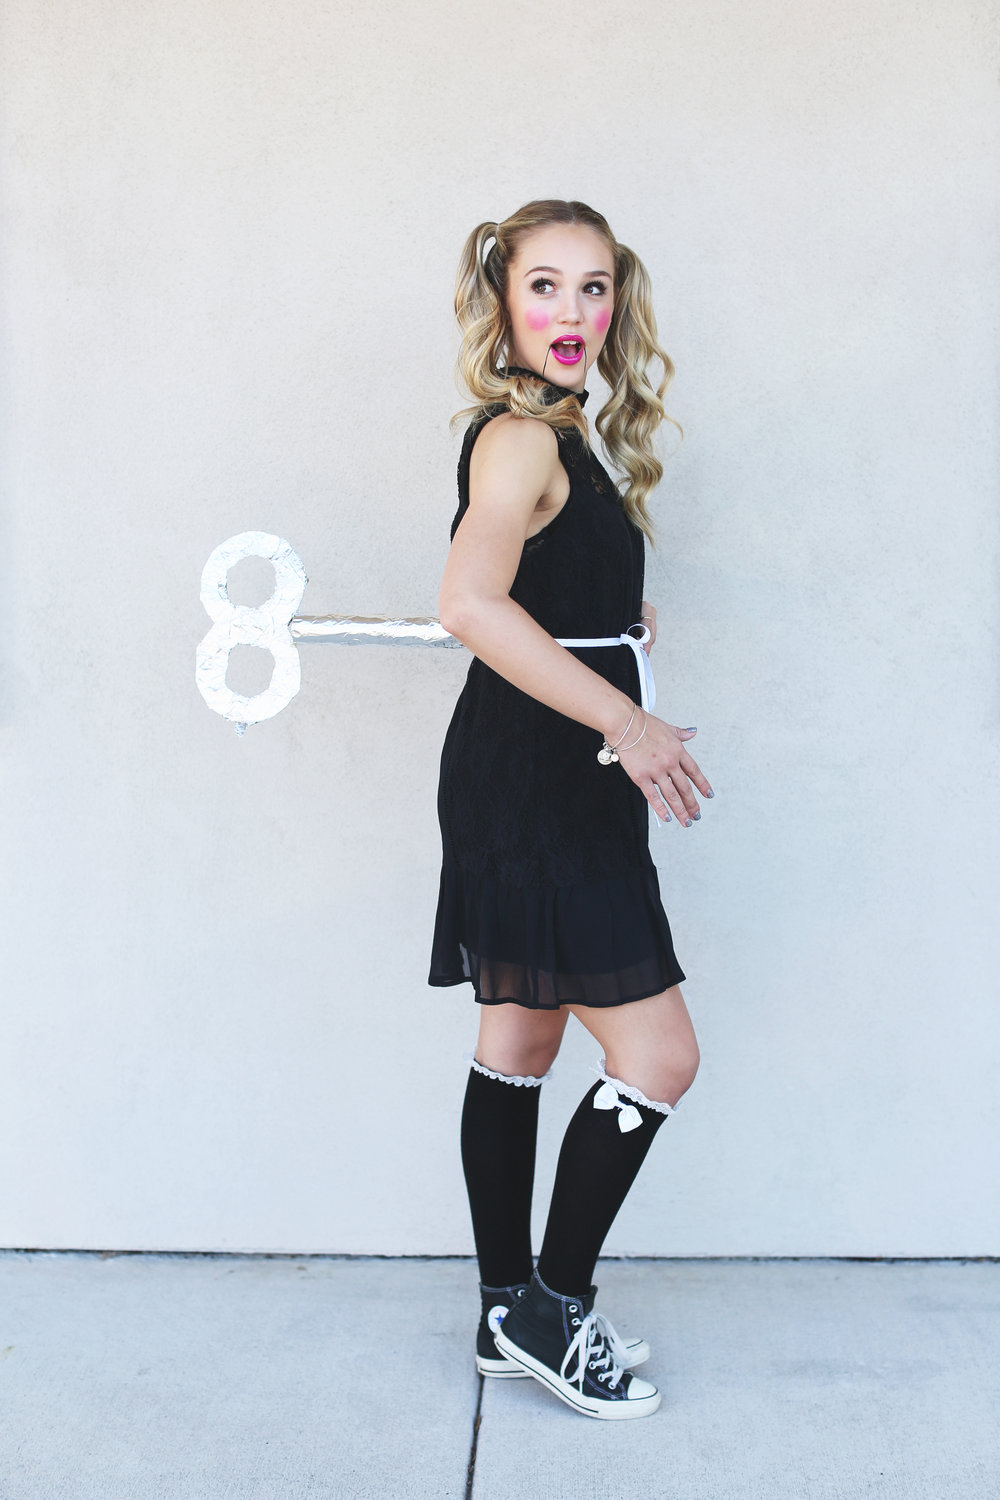
Ok so first things first, you’re going to have to make the wind-up key! It’s fairly simple. You’ll need: an empty paper towel roll, a piece of construction paper or cardboard, ribbon, aluminum foil, and some kind of glue {hot glue is best since it dries instantly!}.
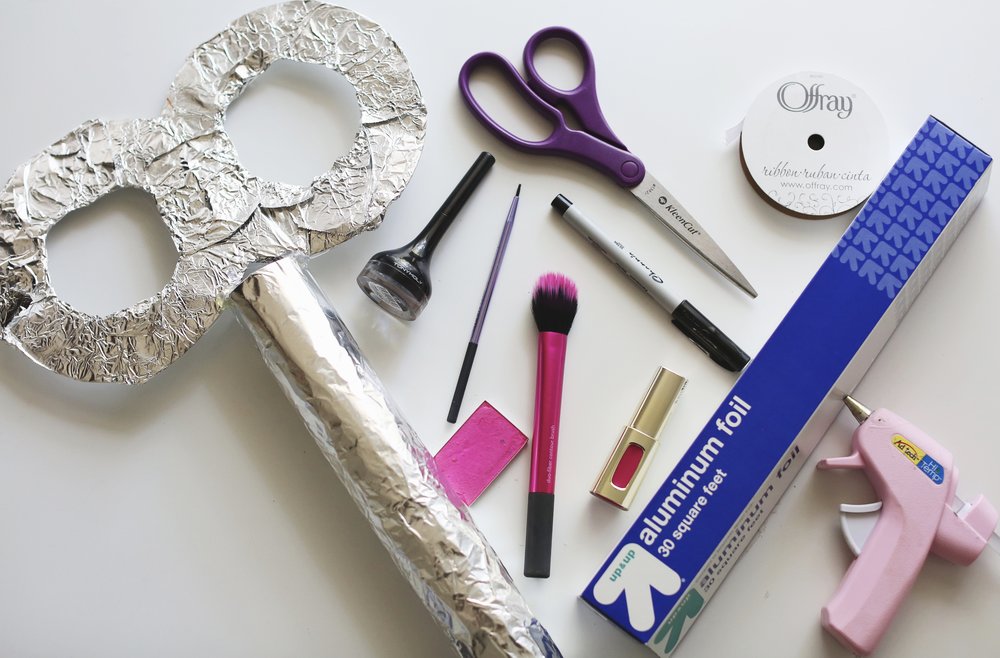
Here’s a little peek at the makeup and supplies you’ll need.
1. Cut a figure 8 out of the paper. Then cut out smaller circles in each end, so it looks like a giant number 8!
2. Cover the 8 and the paper towel roll in foil.
3. Hot glue them together to make the key shape.
4. Punch a hole on each side of the base of the paper towel role and thread the ribbon through.
5. Be sure to cut the ribbon long enough to wrap around your waist and tie a bow!
6. Side note: depending on the materials you use, the key may be heavy and sag after a while. If it does, you can tie ribbon or fishing wire to the key and attach it to your straps or shoulders to distribute the weight.
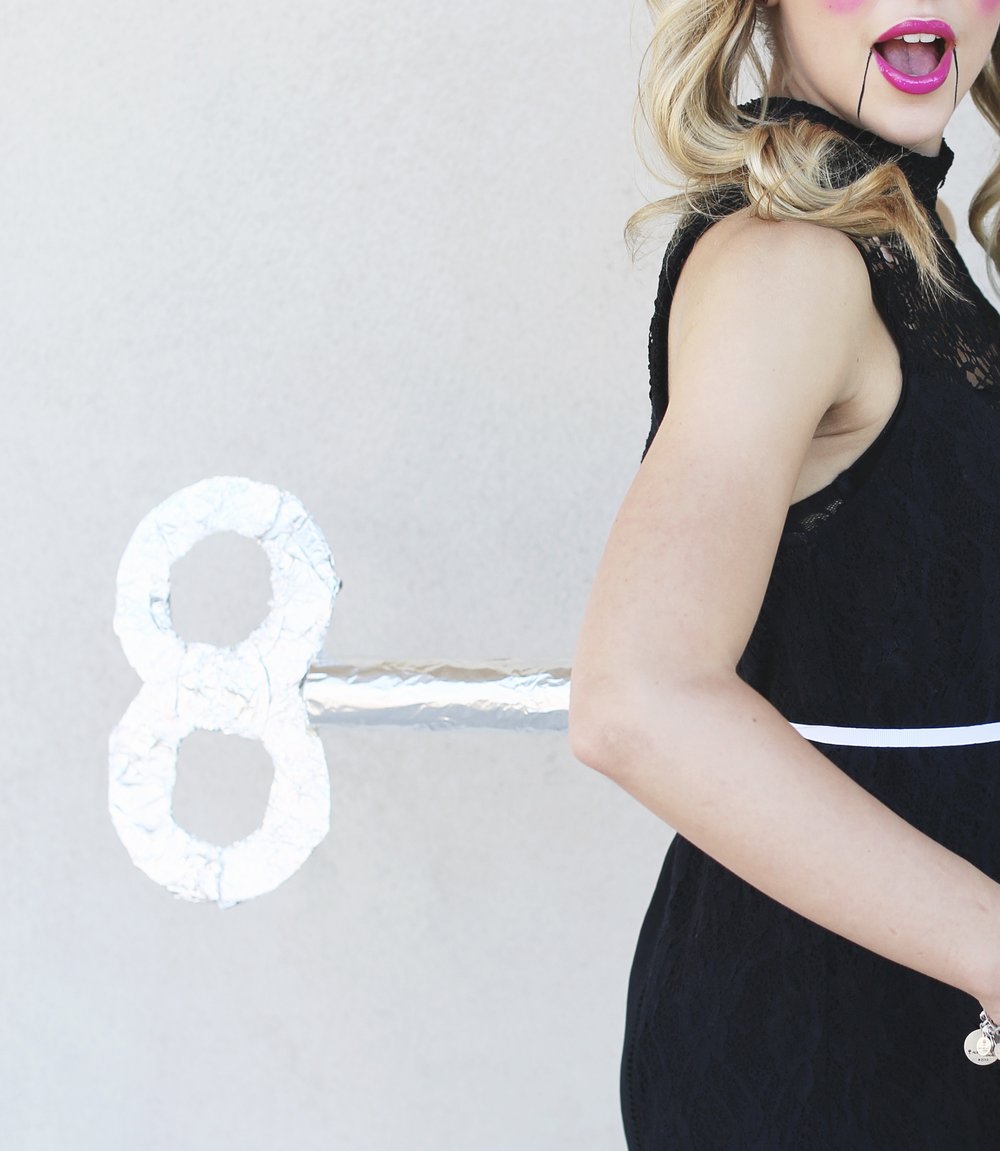
Here’s what the key should look like! Be sure to put on your favorite short length dress! Bonus points if you have knee highs!
Cute hair is a must!
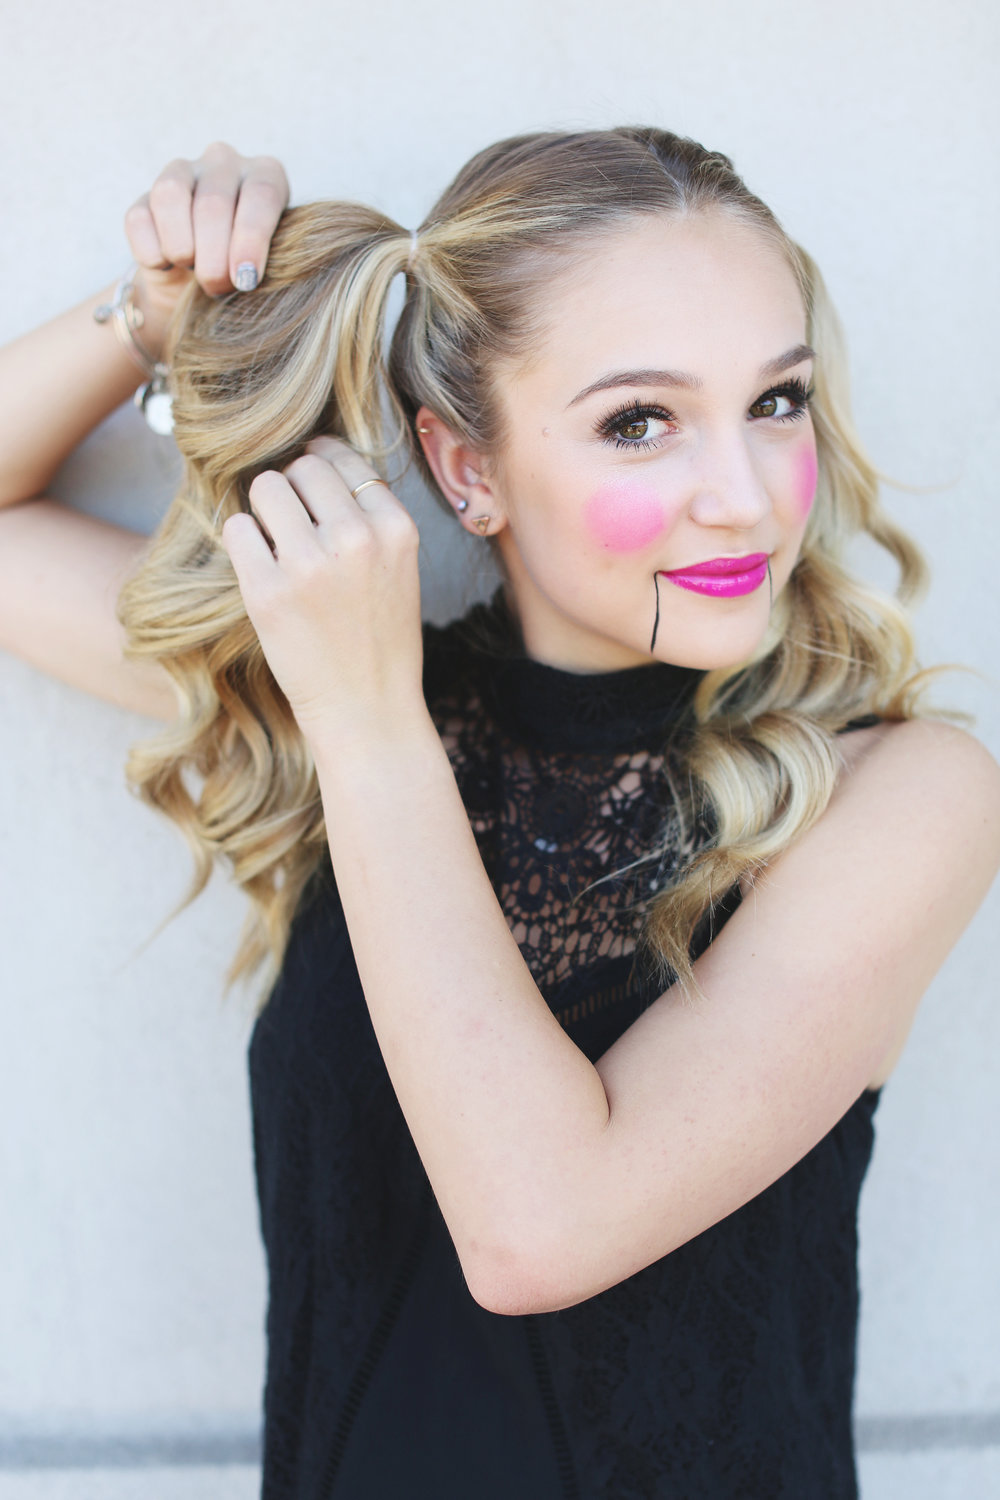
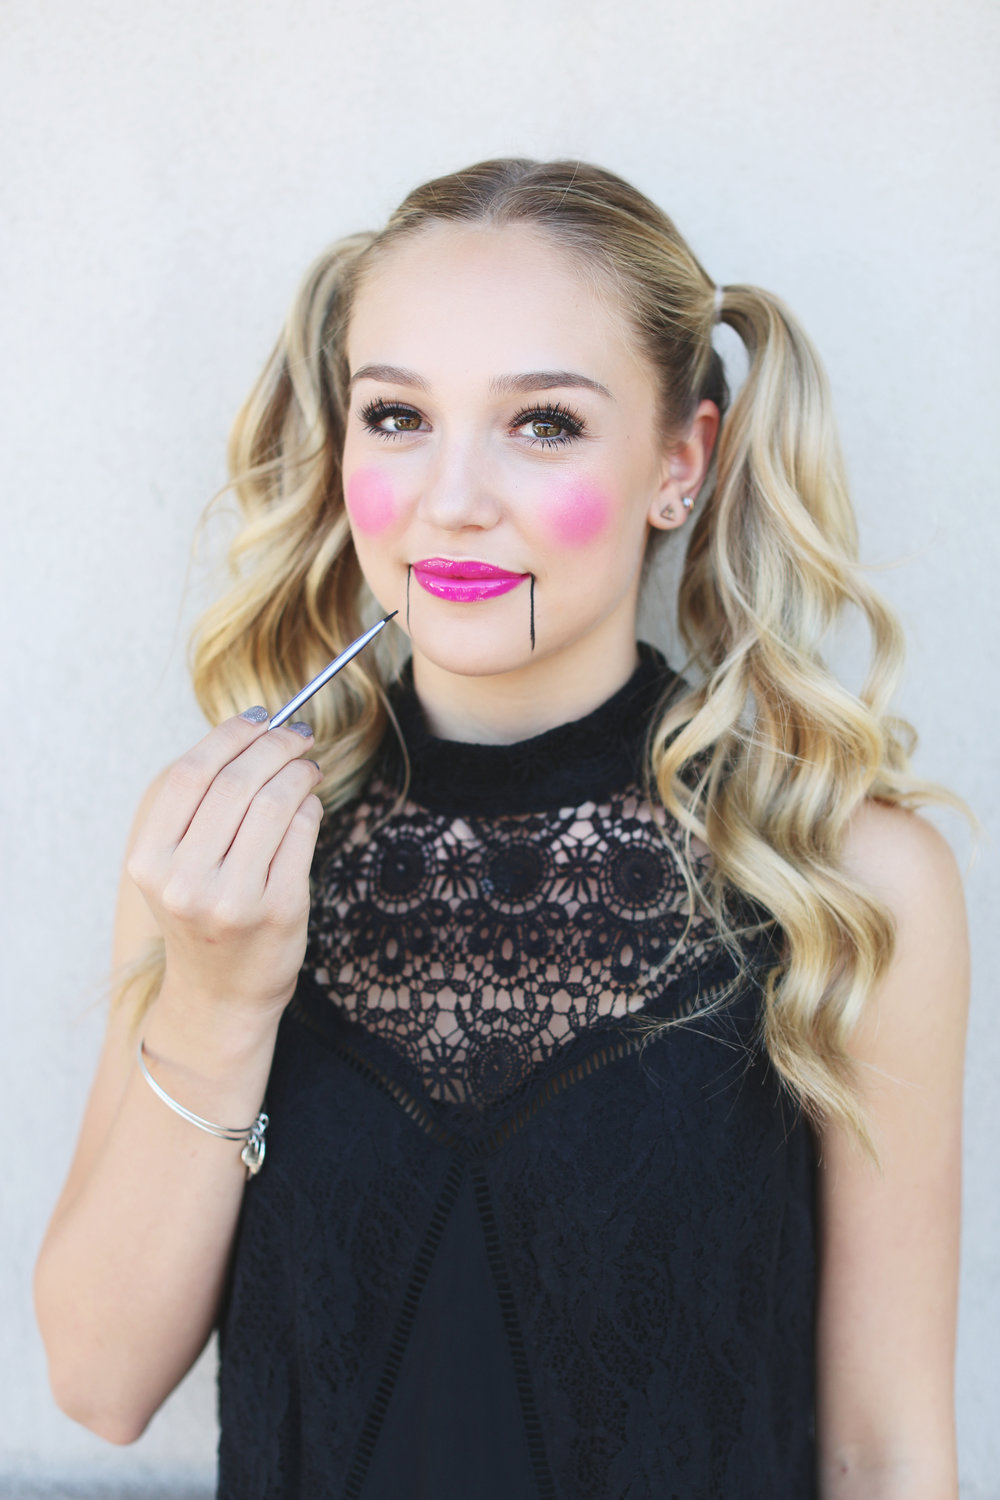
Ok so now for the look…put your hair in pigtails!
Now for the makeup…
Use black eyeliner and draw “marionette” lines around your mouth connecting the corner of your lips to your chin.

Bold bright lips is key! Think pink!

Circular bright blush finishes off the doll vibe! As far as the rest of your makeup goes, just do it the way you’re comfortable doing! Add lashes for extra flutter if you’re feeling bold!
Here’s the final look! So fun right?! Easy peasy DIY.
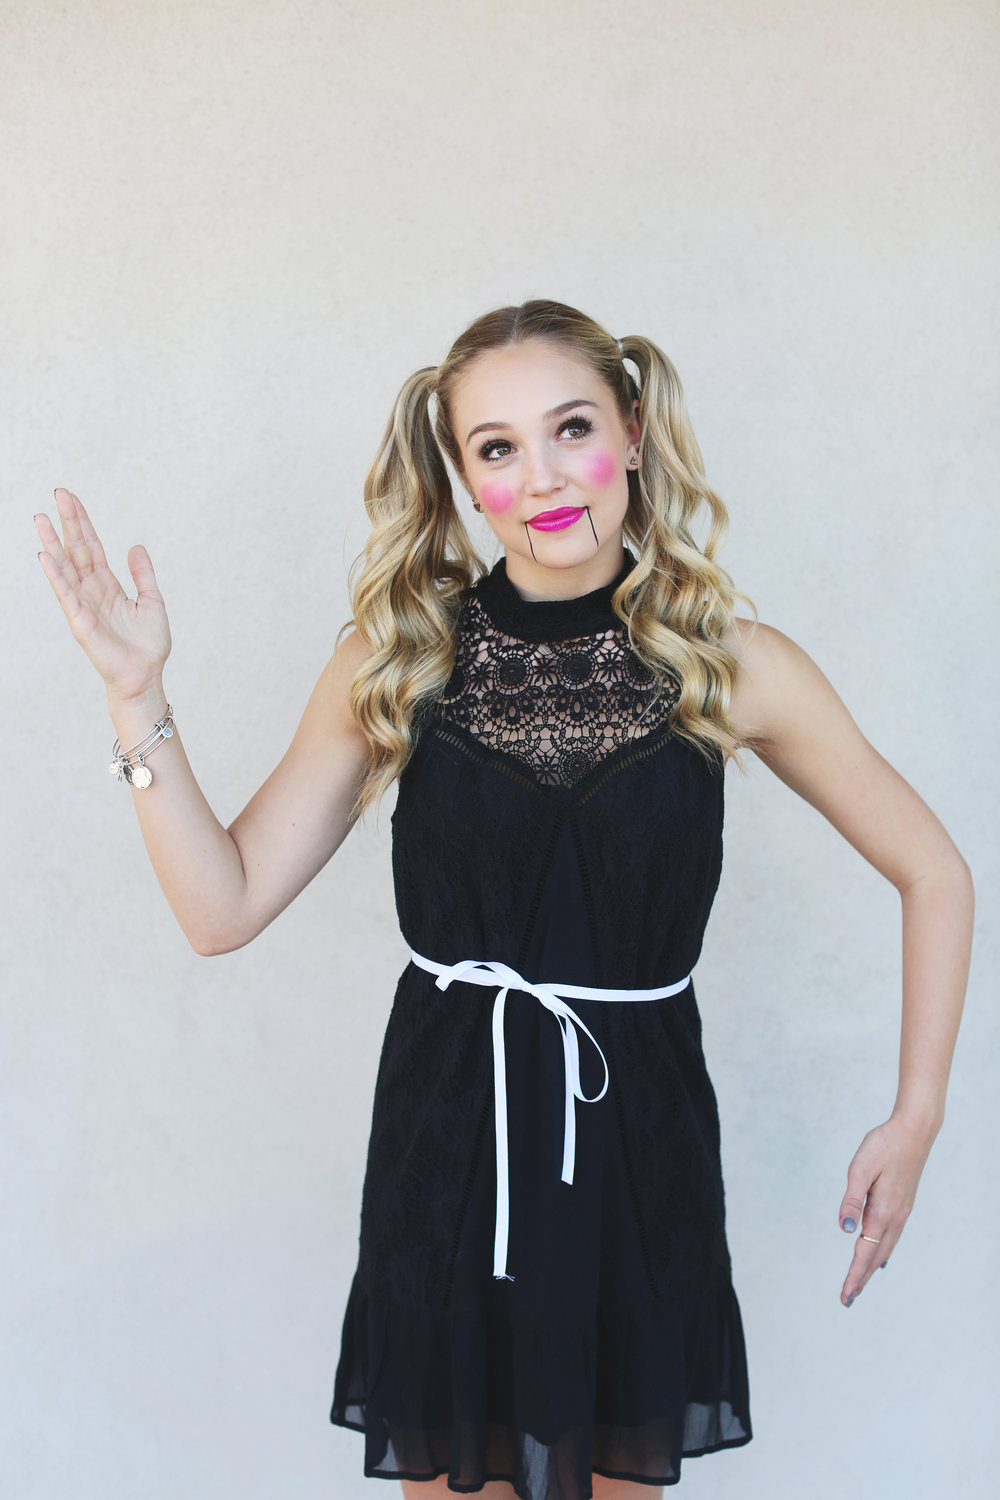
Special thanks to the lovely Taylor and to Indulge Beauty Studio for the awesomely rad photos of this look!
Try it out and tag us {@polishandpout} on IG so we can see your version of this fun look!
October 12, 2017
This month it seems that pinks, berries, and reds are on the brain…along with hearts and glitter. While I may not make homemade Valentine’s cards anymore, I still find a way to flex my Valentine’s Day creative muscles! Here’s a soft girlie look to try this V-day…or any day for that matter!
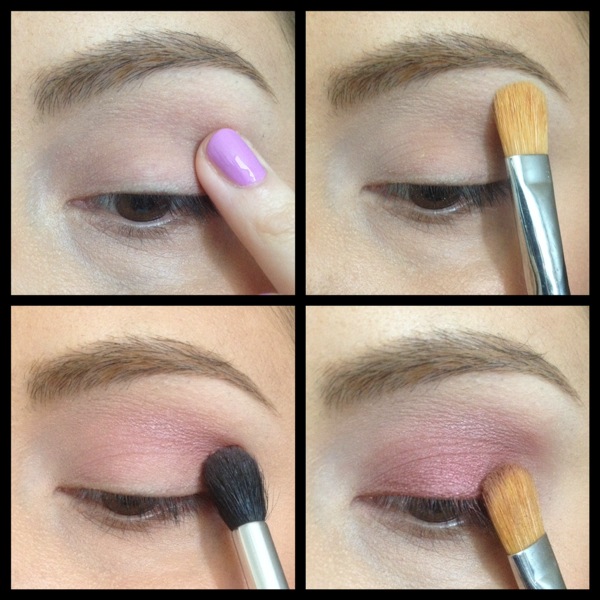
1. Prep your eyes with a good primer.
2. Sweep a matte vanilla shadow on your brow bone.
3. Using a windshield wiper motion, apply a soft pink shadow in your crease.
4. Pat a shimmery cranberry shadow all over your eyelid.
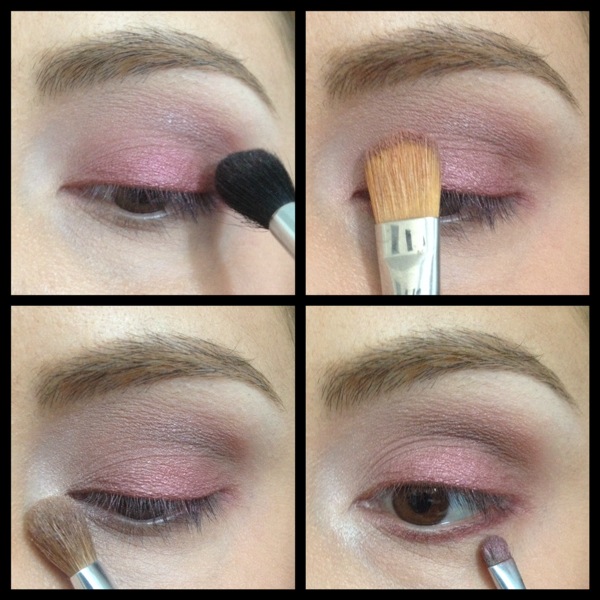
5. Blend a soft brown into your crease so everything is seamless!
6. Pat a shimmery light pink shadow on the inner third of your lid.
7. Add a pop of shimmery vanilla in your inner socket.
8. Line your lower lashline with the same frosty cranberry as before.
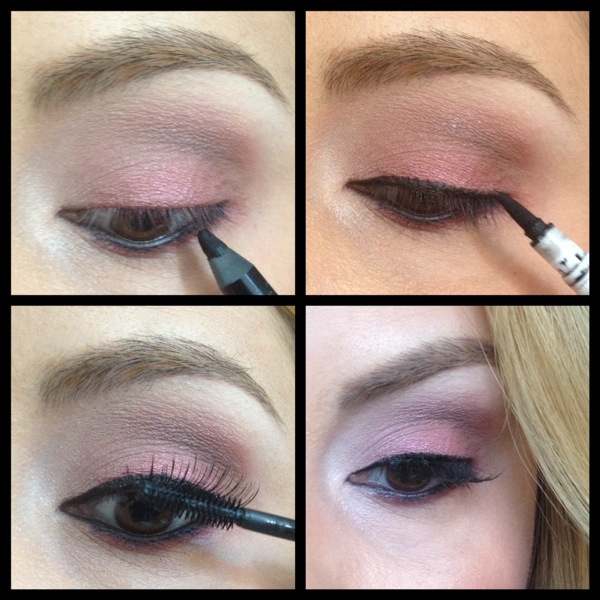
9. Use black pencil to line your waterline.
10. Line your upper lashline too, I opted for a slightly bolder liquid liner.
11. Curl your lashes and finish with mascara (bonus points if you add false lashes!).
Voilá!
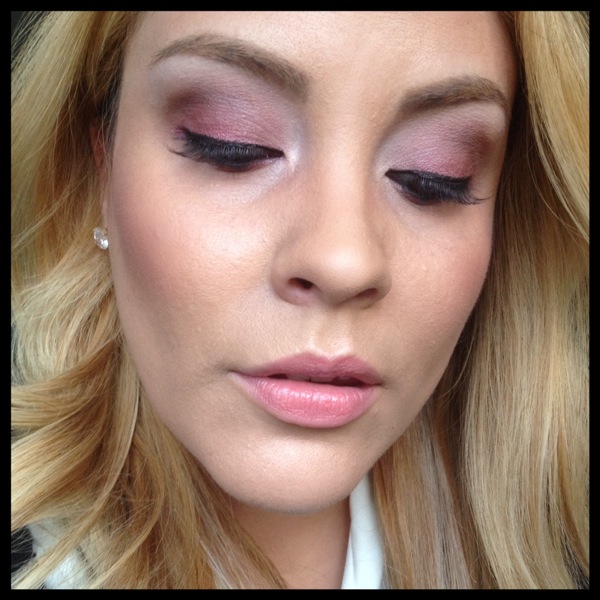
Products used:
Naked Basics palette by UD
MAC shadows in Girlie (pink) and Cranberry
Rimmel Scandaleyes liner in black
Almay liquid liner

Cheers to Pink, Reds, and Valentines,

February 11, 2014
I am so smitten with the look I did for a photoshoot this week with Nicole Cook (umm, by the way she is an AMAZING highschool senior –fashion– photographer in NorCal). Luckily I had the sense to take pics of the look as it developed so I could make this tutorial for you! The funny thing is that it doesn’t actually use any silver shadows in it…the hue is a result of the blending of the liner and shadows. Which I actually prefer because silvers often translate very blue on camera. This way you get the effect in a truer way. If you’re not a fan of silvery shadow, then sub the black pencil for an espresso one and blend out with dark brown shadow instead of black for a more chocolatey neutral look. I worked from my Naked Basics palette and also a few shades from Makeup Geek (creme brulee, shimma shimma, and homecoming).
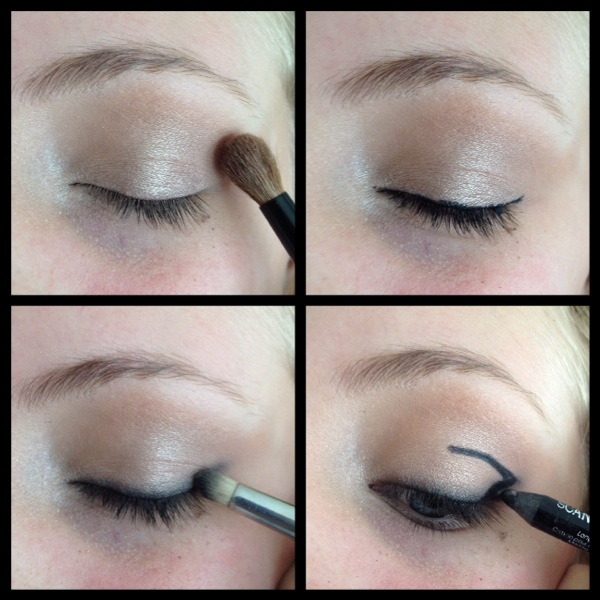
1. Prime your lids and dust on a neutral champagne or vanilla shadow all over your lid, the shimmery base will help when it comes time to blend.
2. Line your eyes, doesnt need to be precise.
3. Use a pencil brush (or your finger even) to blend and soften the liner.
4. Draw a V with your pencil to outline where your smokey cat eye will go. Make sure you open your eye first to determine how high up you want the line in your crease.

5. Use your pencil brush to blend and smudge the V more into the center of your eye, you essentially are focusing on the outer third portion of your eye. Dip your brush into black shadow as necessary to build the depth you are comfortable with. See how messy its getting? Trust the process and don’t get scared! I like to do eyes first and skin second when doing looks like this.
6. Pat a shimmery taupe shadow all over your lid, smoothing out the seams of where the black shadow stops.
7. Dust a soft brown in your crease, bronzer works fab!
8. Highlight under your brow and in your inner socket.
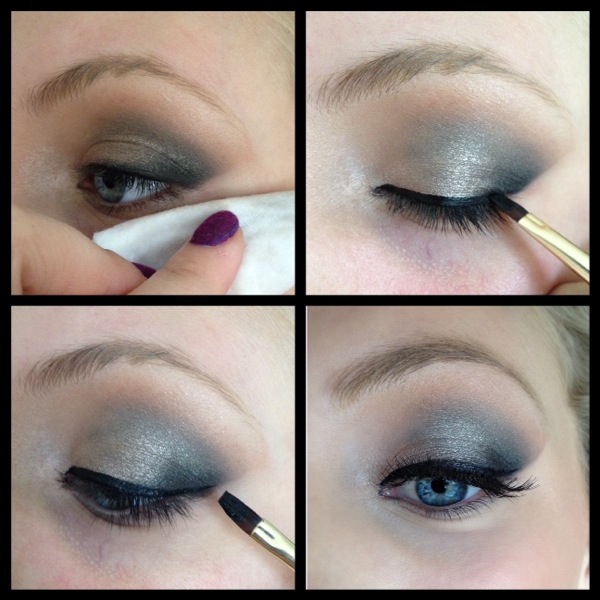
9. Now for the clean up! This step is what adds the sharp angled edge to the look. Take a cotton pad with remover or makeup wipe and fold it so you have a straight edge. Swipe the edge in an upward angled motion.
10. Line your eyes. I love the sharpness of a gel or liquid for this look.
11. Add the flick of liner at the end for your cat eye. The awesome part about this look is that the sharp edge we created is your guideline, so its goof-proof!
12. Load up with mascara…bonus points and more drama if you toss in some lashes too! I used medium length individuals.

And there you have it! Isn’t our model Lexy so lovely?!
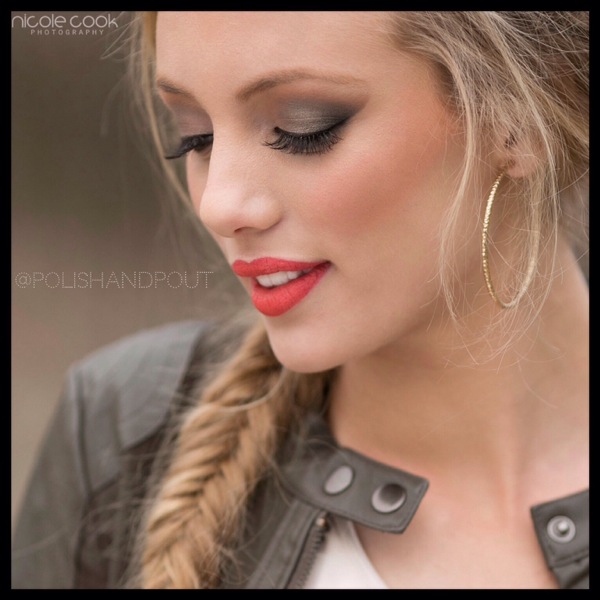
We were going for drama so we paired her look with a bold punchy lip (Rimmel Kate Moss #12)…but a nude lip is a great option for this look!
Cheers to Seniors, Silver, and Smokey Eyes,
January 29, 2014

