

2017 was the year of the unicorn for sure…they’ve been everywhere from T-shirt’s, to coffee mugs, and even our Frappuccino’s! So it should come as no surprise that it also happens to be an excellent do it yourself costume idea!
Chances are you have most of these things lying around your house or can snag the things you’re missing for a few bucks!
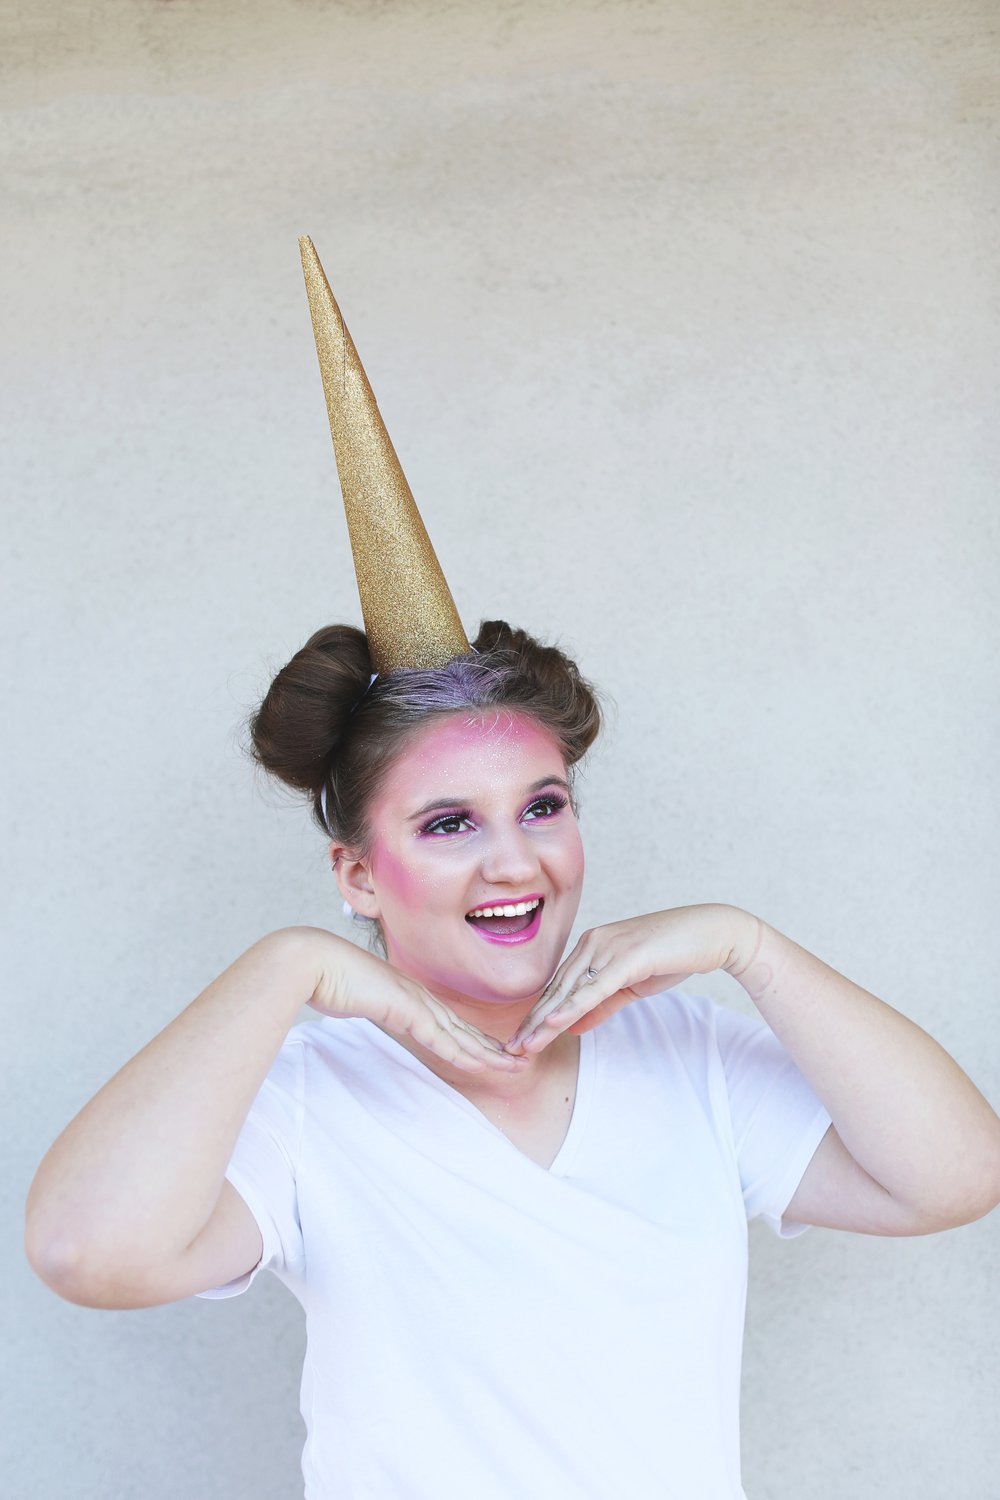
Ok so first things first you need to make a horn! A piece of paper will do the trick…a glittery or metallic piece of scrapbooking paper is even better! Simply roll it into an ice cream cone shape and secure it with hot glue!
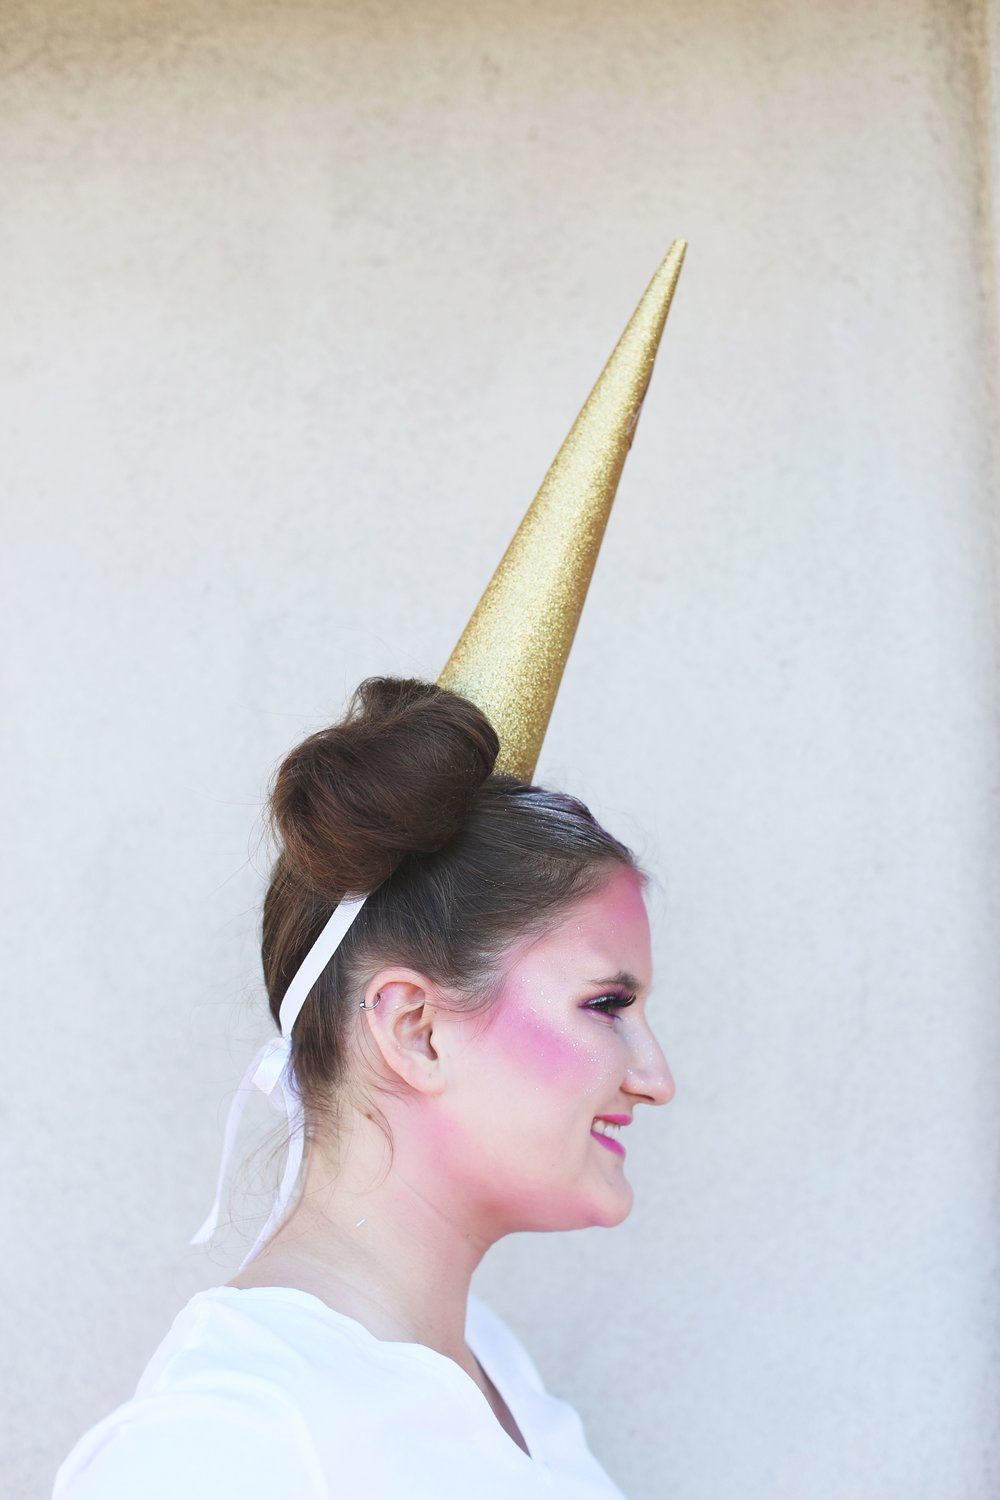
Punch two holes through each side of the end of the cone and put ribbon through it so you u can tie it around your head like a headband! The best hairstyle for this look will be pigtails or better yet twist your pigtails into double buns!
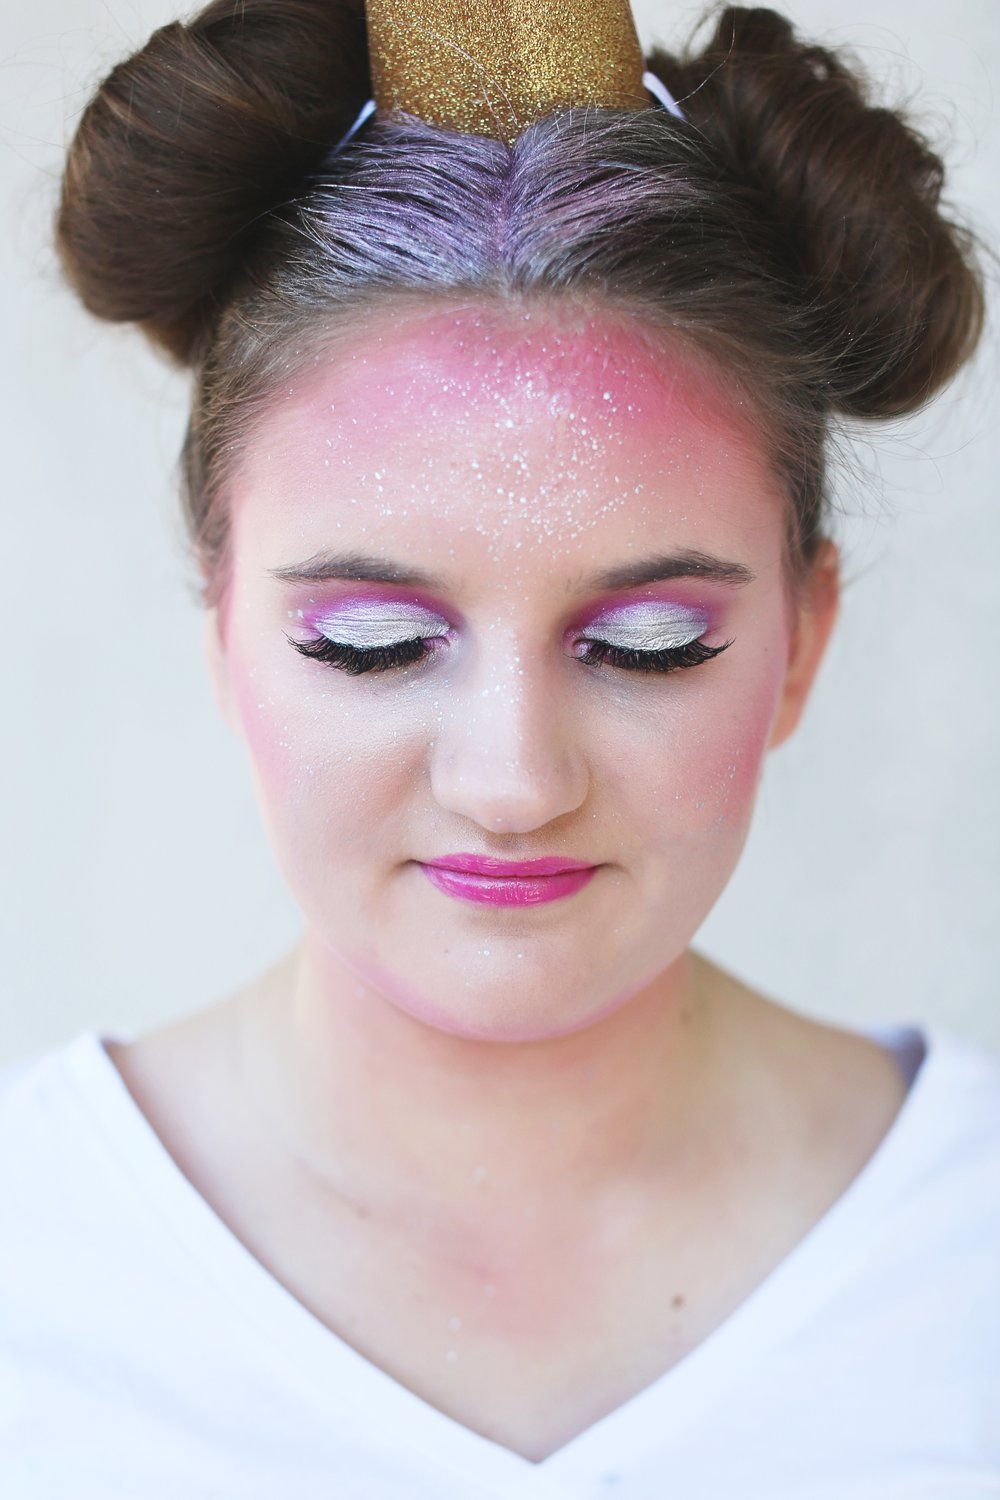
For makeup, the brighter the better! Use a bright pink blush and apply it everywhere you’d normally contour, bronze, or blush your face. This will add dimension and color in a fun way!

Added bonus points to use glitter or metallic eyeshadow on your eyes and down your hair part. I used my favorite metallic powder and mixing liquid from Mehron! And for the paint flecks on the forehead, dilute your shadow with setting spray and flick it onto your forehead.
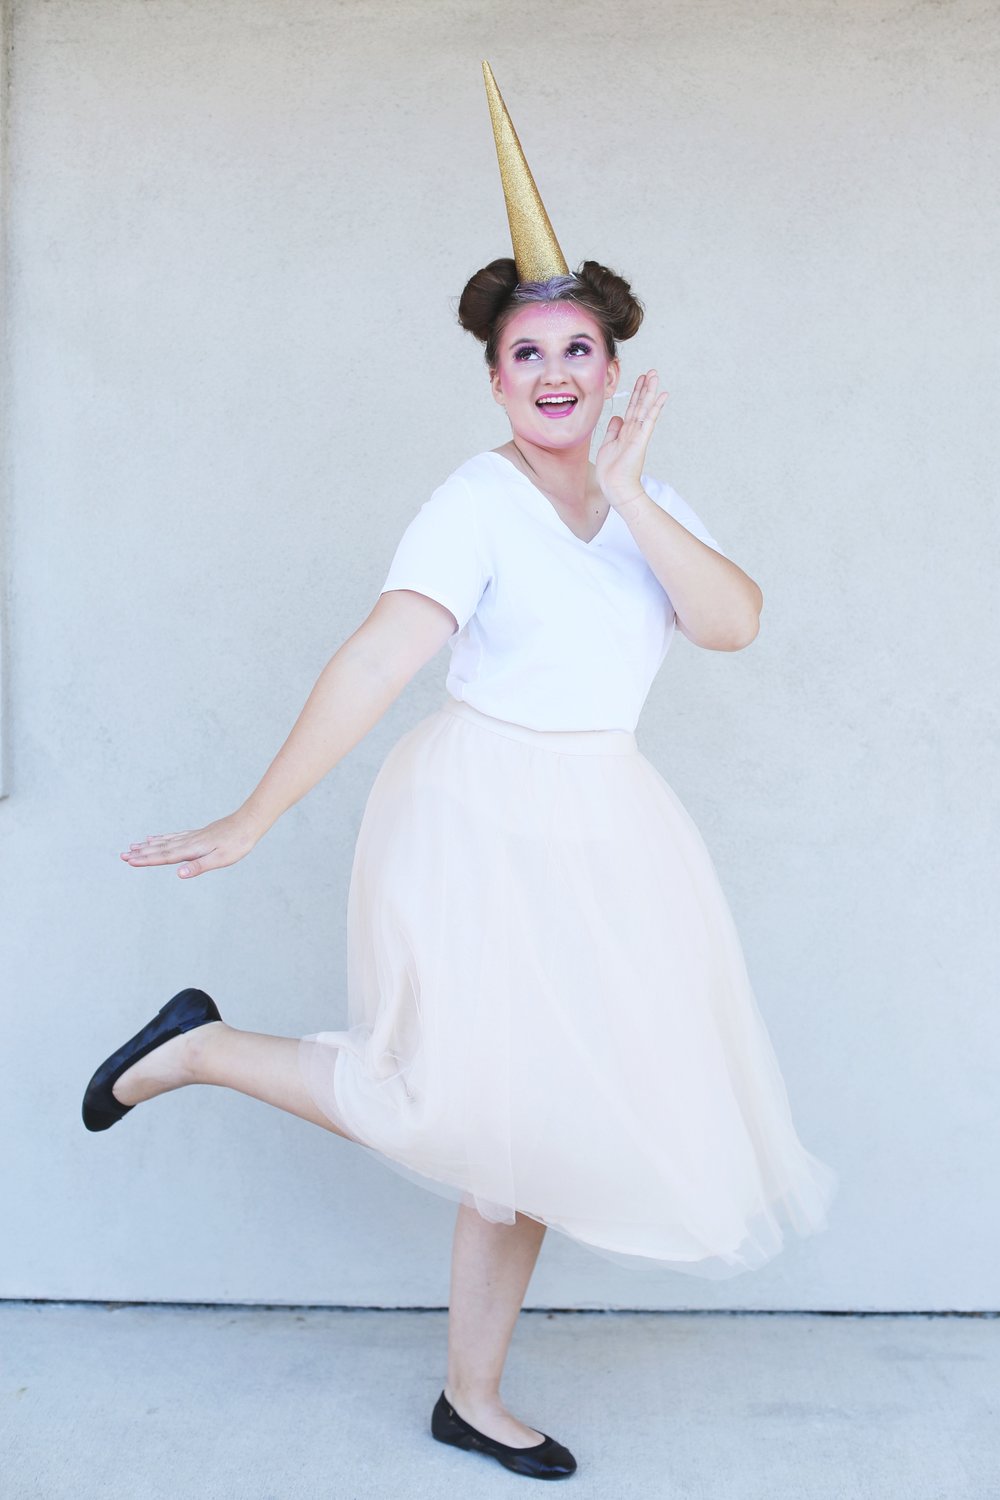
Toss on your twirliest fluffiest dress or tulle skirt! And there you have it…your unicorn dreams have come true!
Thank you to Indulge Beauty Studio for capturing these photos of the lovely Katelyn!
October 17, 2017
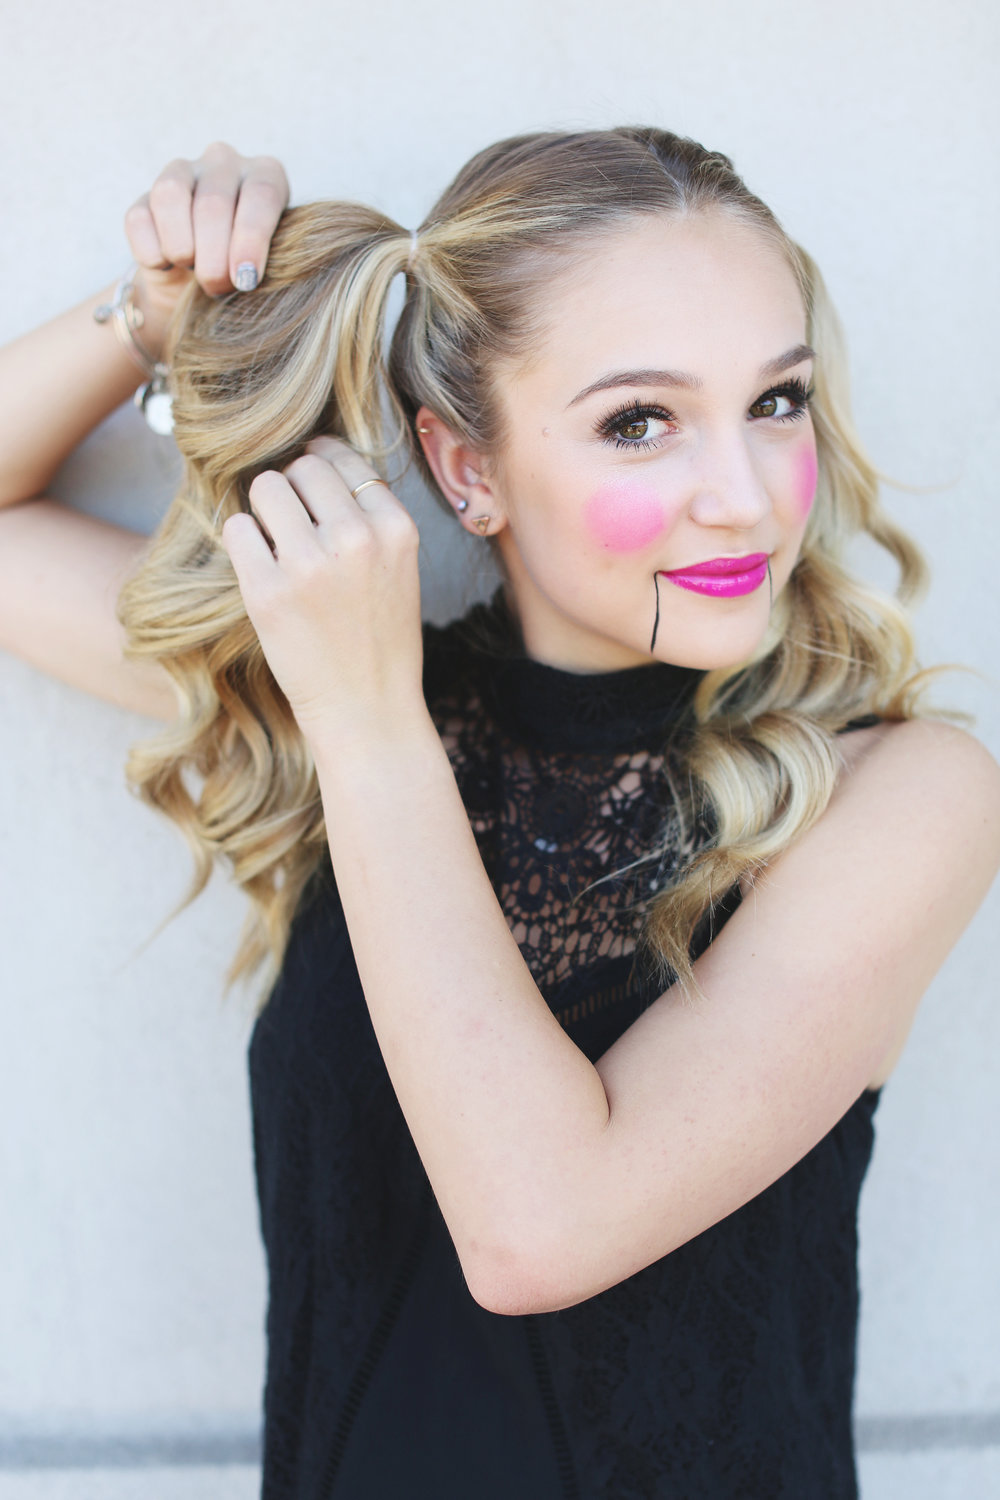
Forget buying a costume! For me, the best part about dressing up for Halloween is making your costume yourself! Here’s a super easy DIY and chances are you have most or all of these things already! Here we go…
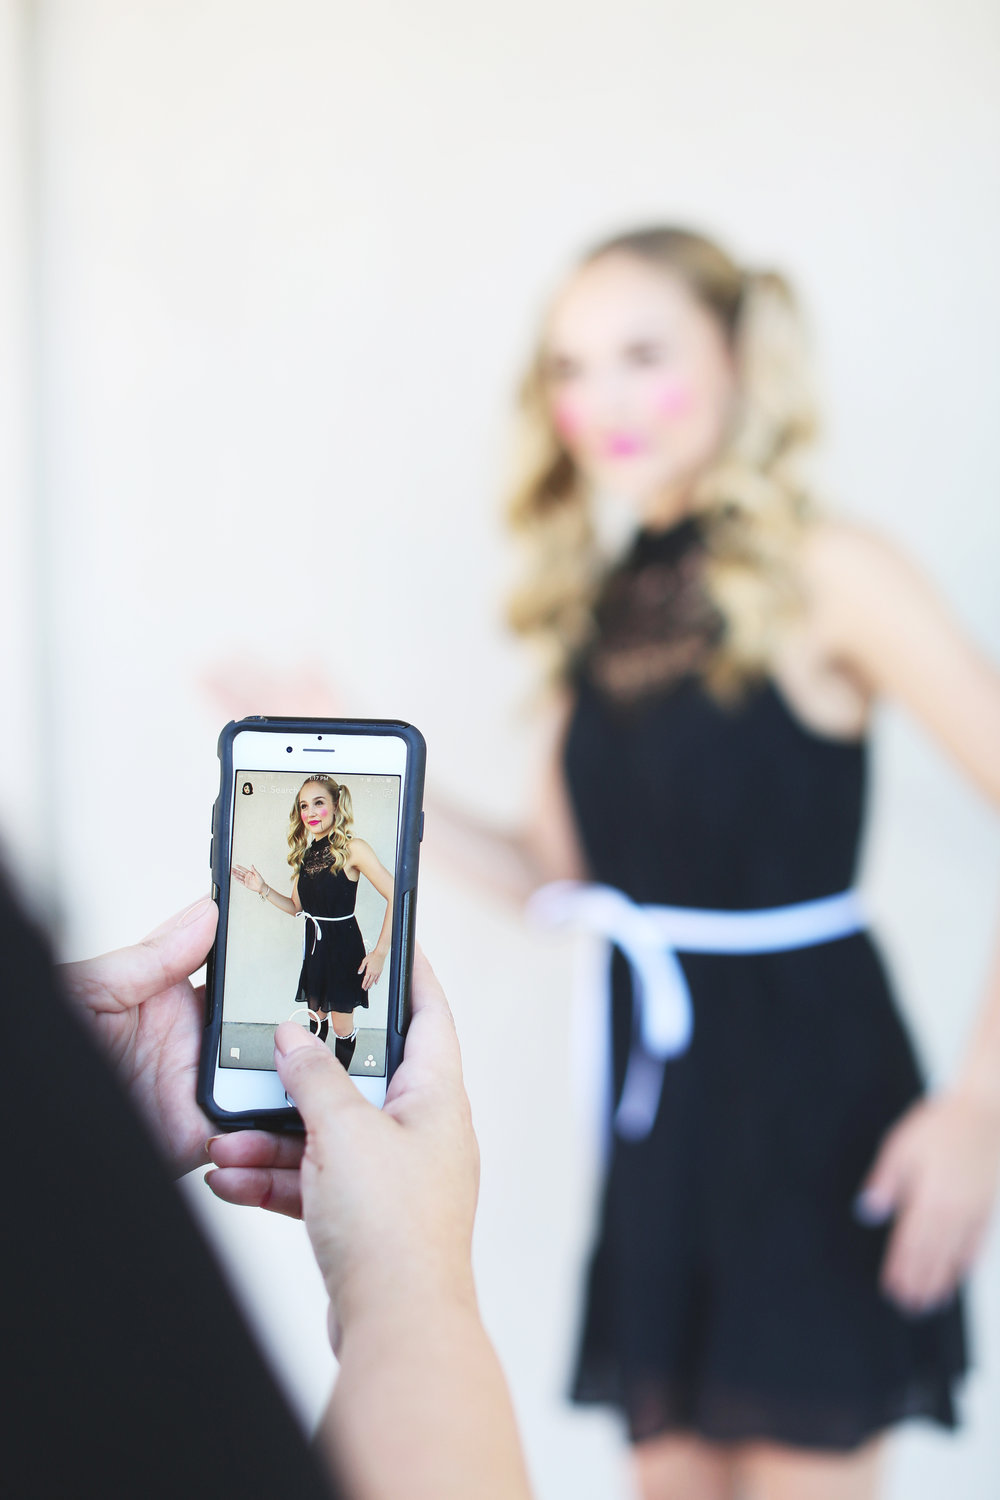
This look is selfie worthy for sure!
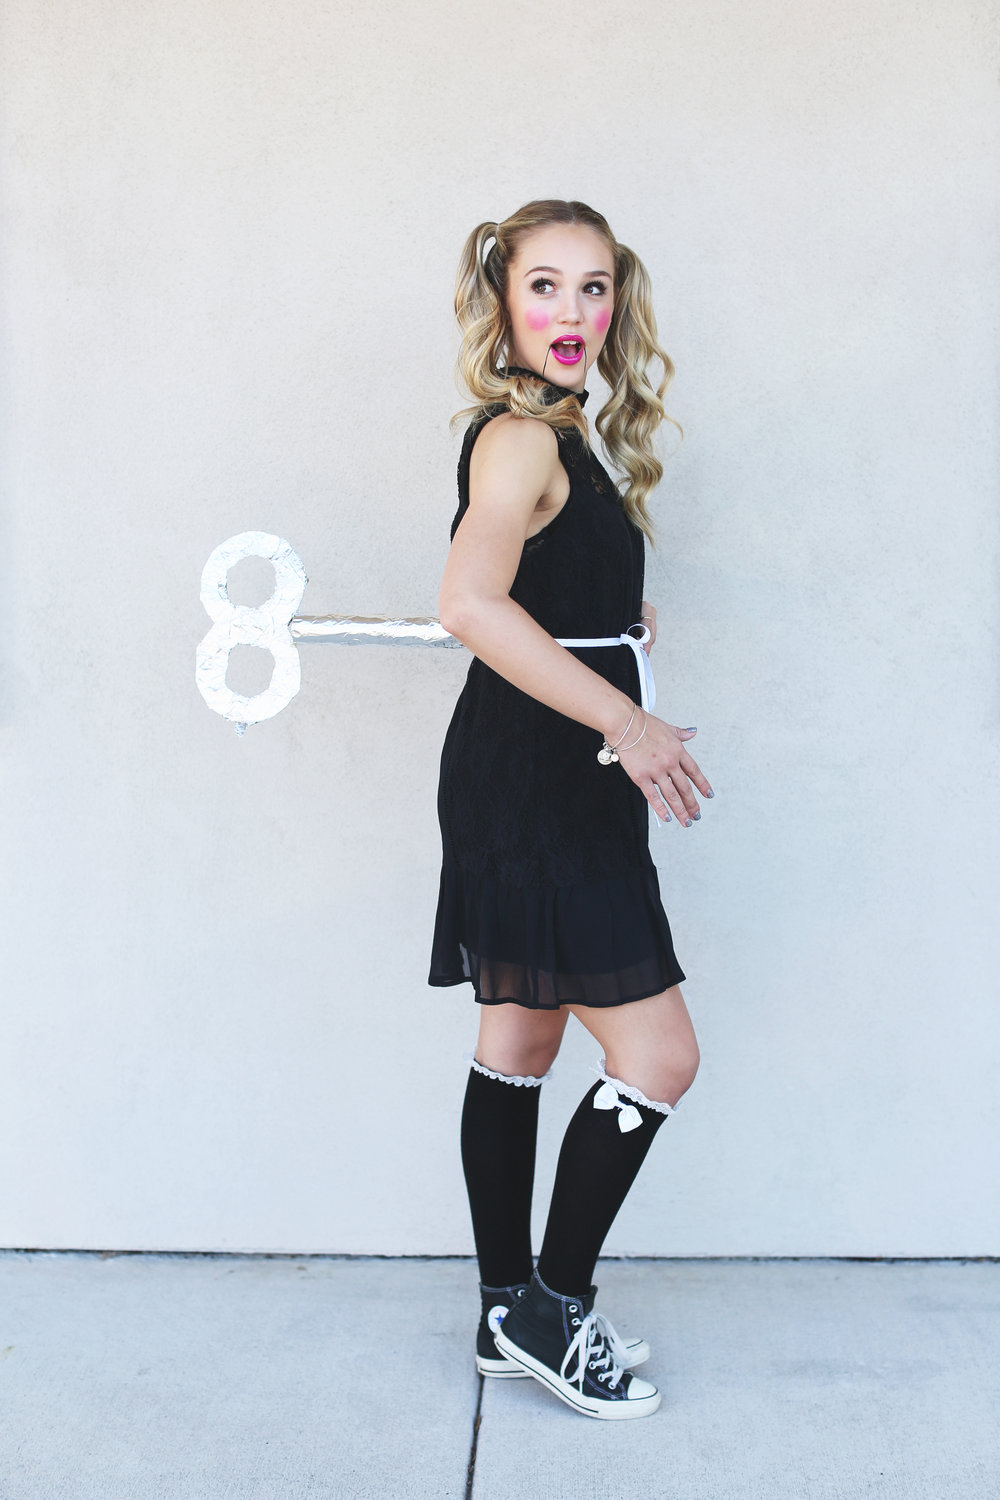
Ok so first things first, you’re going to have to make the wind-up key! It’s fairly simple. You’ll need: an empty paper towel roll, a piece of construction paper or cardboard, ribbon, aluminum foil, and some kind of glue {hot glue is best since it dries instantly!}.
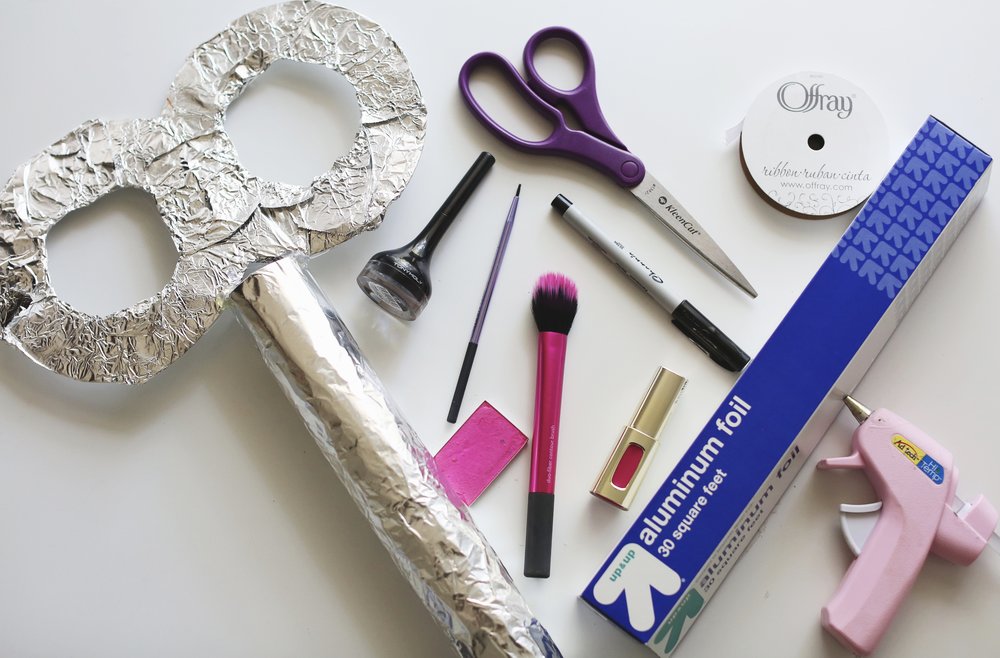
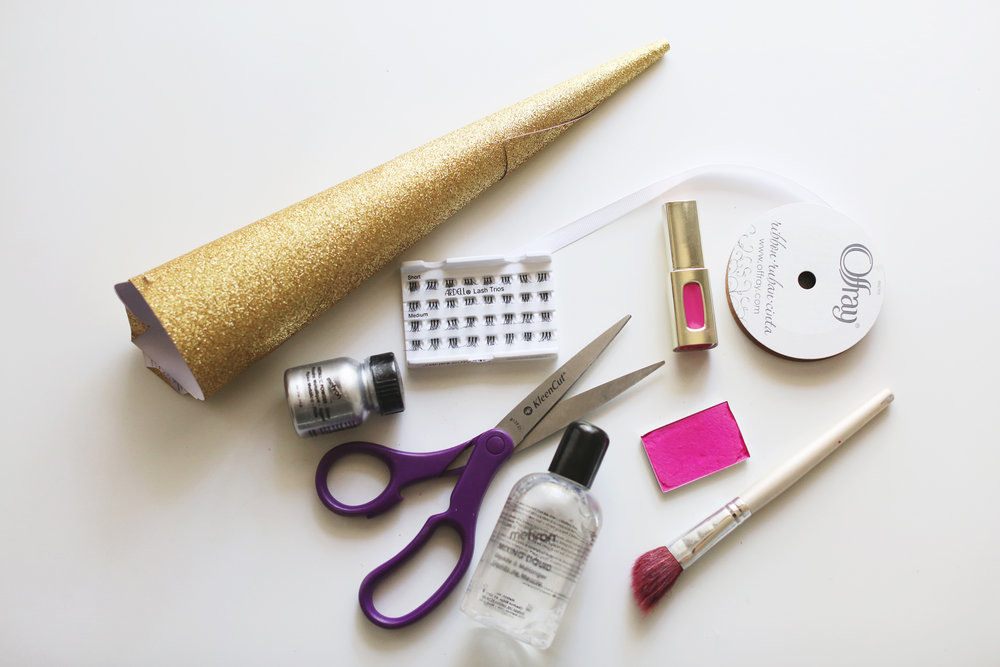
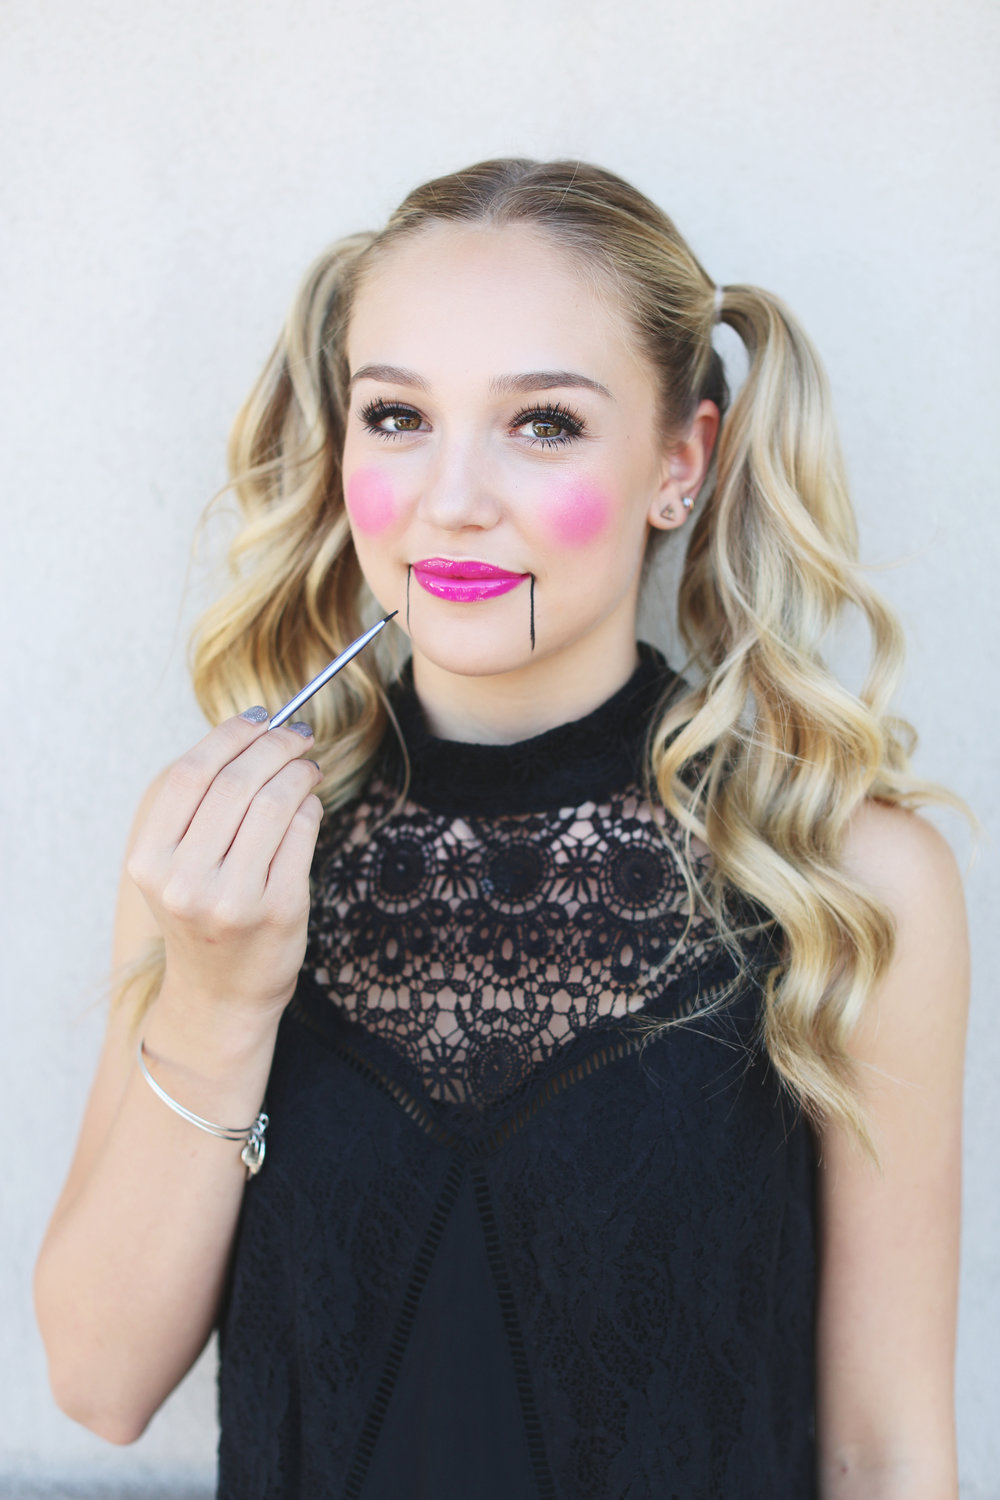
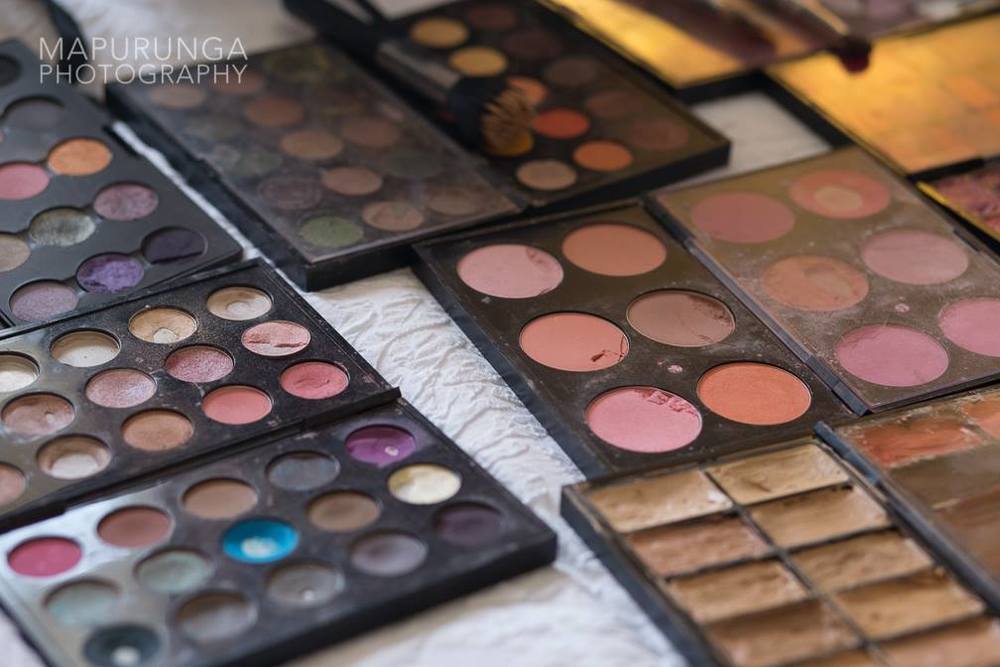
Here’s a little peek at the makeup and supplies you’ll need.
1. Cut a figure 8 out of the paper. Then cut out smaller circles in each end, so it looks like a giant number 8!
2. Cover the 8 and the paper towel roll in foil.
3. Hot glue them together to make the key shape.
4. Punch a hole on each side of the base of the paper towel role and thread the ribbon through.
5. Be sure to cut the ribbon long enough to wrap around your waist and tie a bow!
6. Side note: depending on the materials you use, the key may be heavy and sag after a while. If it does, you can tie ribbon or fishing wire to the key and attach it to your straps or shoulders to distribute the weight.
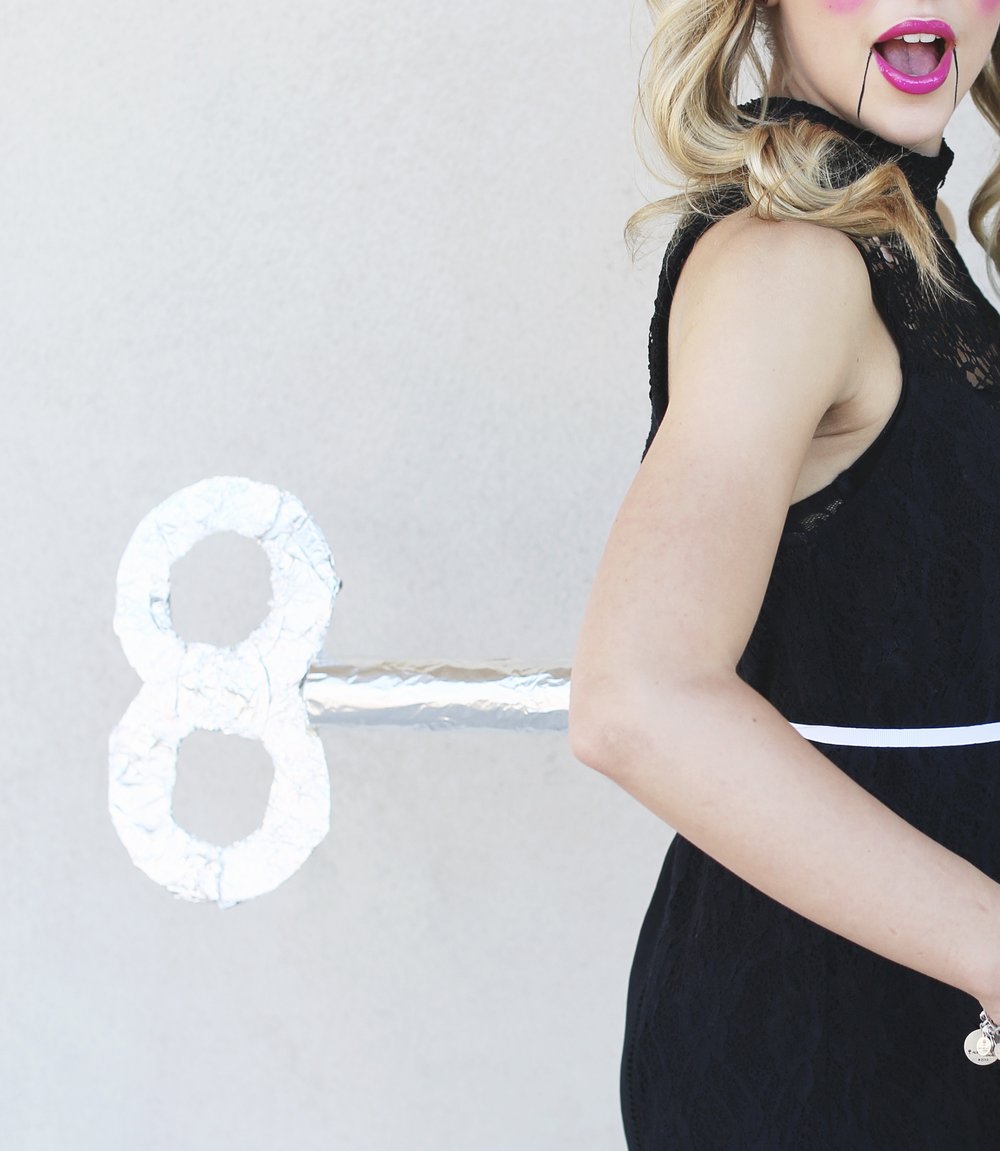
Here’s what the key should look like! Be sure to put on your favorite short length dress! Bonus points if you have knee highs!
Cute hair is a must!
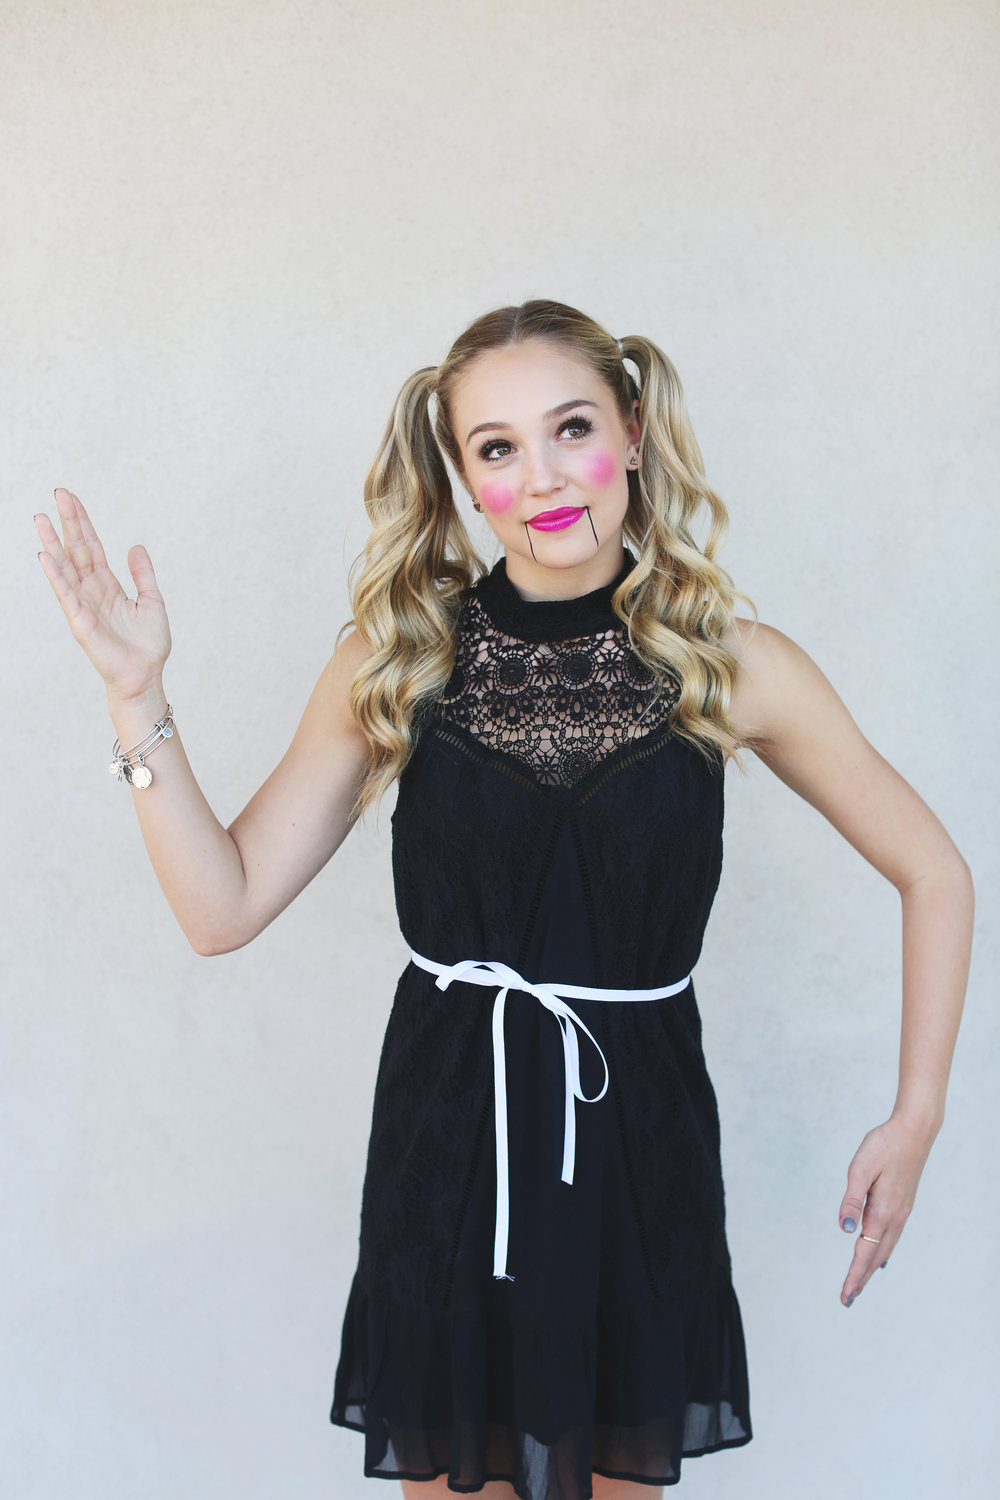
Ok so now for the look…put your hair in pigtails!
Now for the makeup…
Use black eyeliner and draw “marionette” lines around your mouth connecting the corner of your lips to your chin.

Bold bright lips is key! Think pink!

Circular bright blush finishes off the doll vibe! As far as the rest of your makeup goes, just do it the way you’re comfortable doing! Add lashes for extra flutter if you’re feeling bold!
Here’s the final look! So fun right?! Easy peasy DIY.
Special thanks to the lovely Taylor and to Indulge Beauty Studio for the awesomely rad photos of this look!
Try it out and tag us {@polishandpout} on IG so we can see your version of this fun look!
October 12, 2017
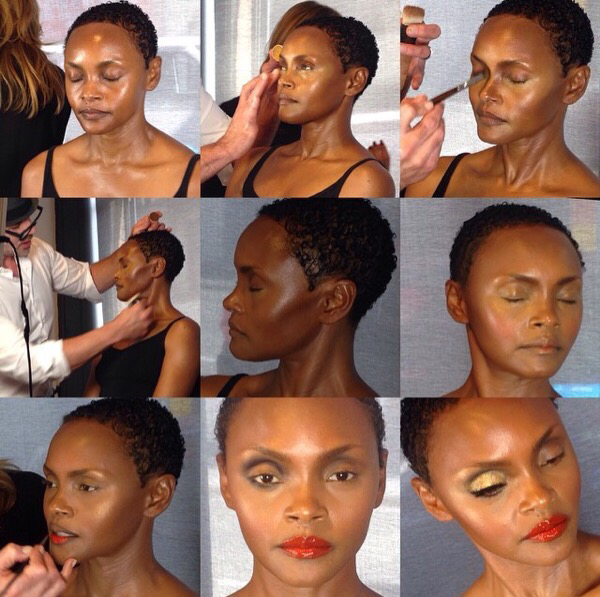
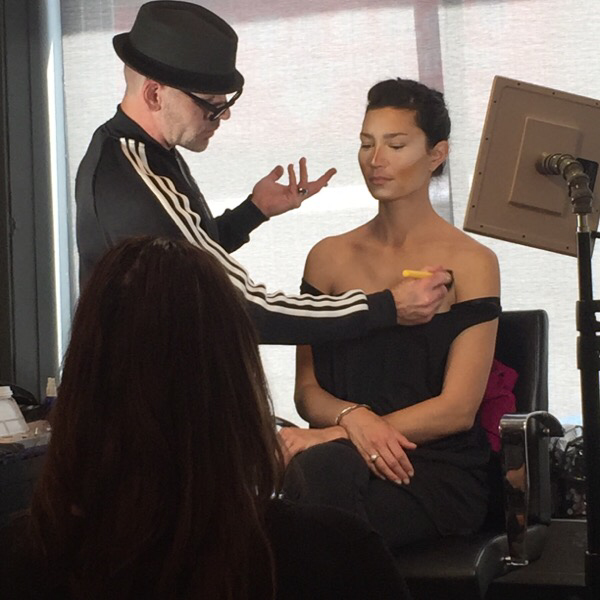
The air is brisk, the leaves are changing, and there’s even been a bit of rain—It’s finally feeling like Fall here in NorCal! Fall means coats, scarves, boots, and {{my favorite}} deeper lipstick! Seriously how lovely is Aine McMullen from Cast Images?! P&P Stylist Ashley and I loved crafting this fall inspired look for a photoshoot with Nicole Cook! Aine is the epitome of fall beauty trend in this shot…
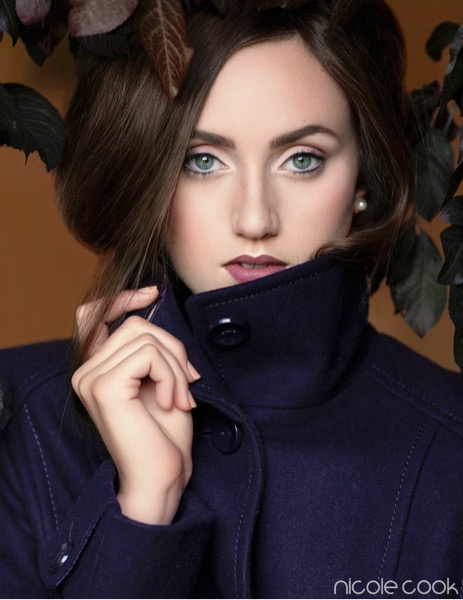
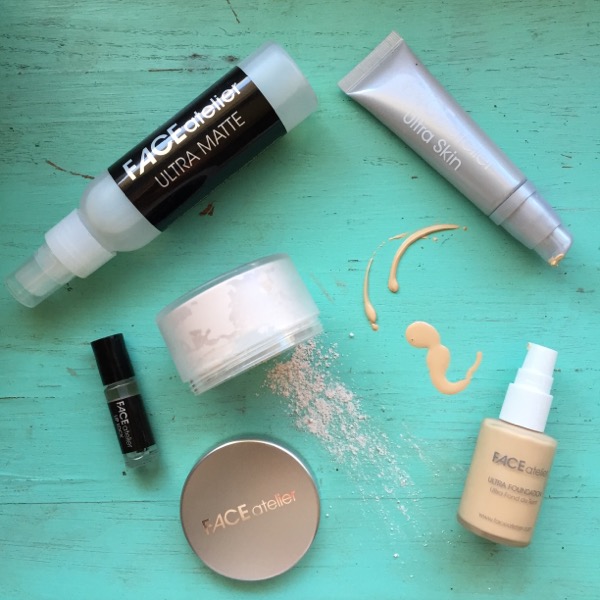
This fall, the 90’s throwback trend is still alive and well. We went for a more matte look with a deeper lip and tousled hair. Here is a breakdwon of the products used so you can recreate the look yourself!

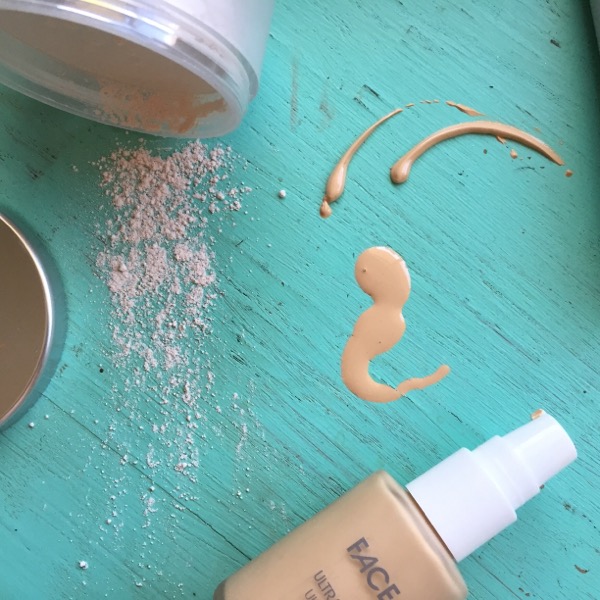
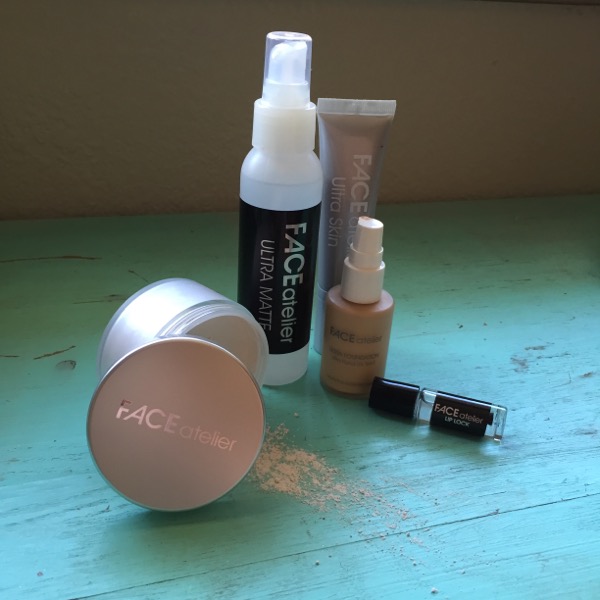
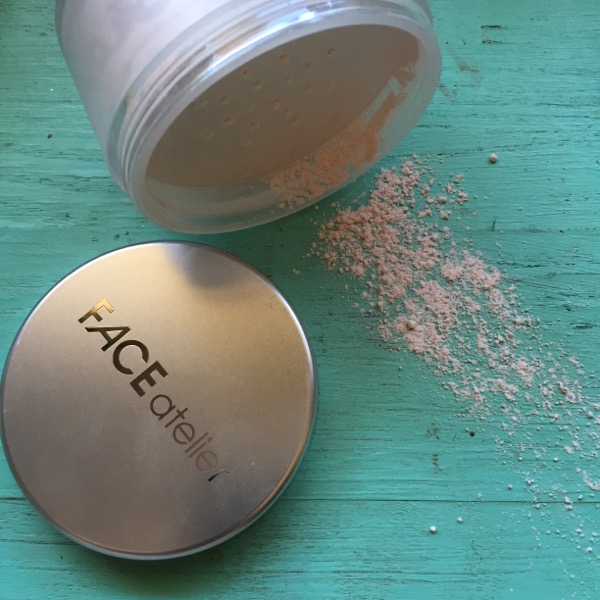
For the skin, I reached for Face Atelier’s Ultra Foundation in shade No.2 Ivory. I love this foundation because it provides ample coverage without caking up, is buildable, looks like skin, feels so lightweight, and comes in every shade imagineable! The unique formula boasts a built in primer and works for all skin types.

For the eyes, I couldn’t resist reaching for my Mehron EYE Powder palette. This thing seriously comes with me to every job. So blendable and pigmented…and the shades are everything you’ll need to craft everything from a barely there natural to a super dramatic look. For Aine, I gave her a classically contoured eye with a little twist…Love the hint of mauve in Aine’s outer edge to tie in the lip shade!
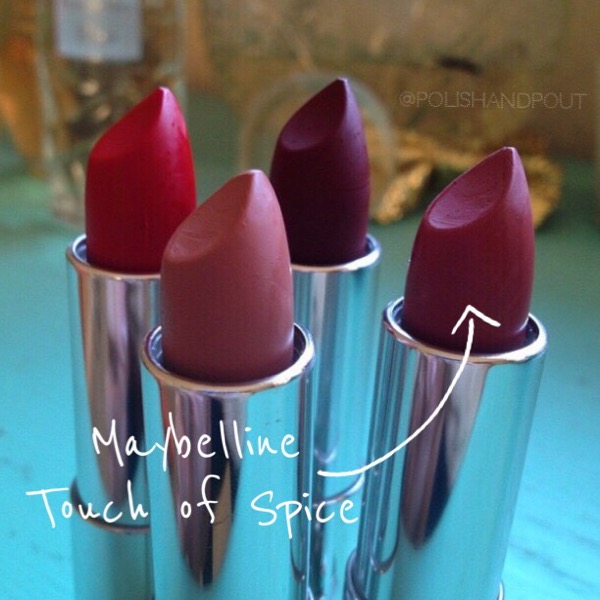
Ahh this lip!!! When Maybelline launched their matte shades, this one quickly became my favorite: Touch of Spice. Long wearing, velvety finish, super affordable…and that perfect hint of grunge that’s so hot right now!
So Cheers to Mauves, Mattes, and Maybelline,

December 10, 2015
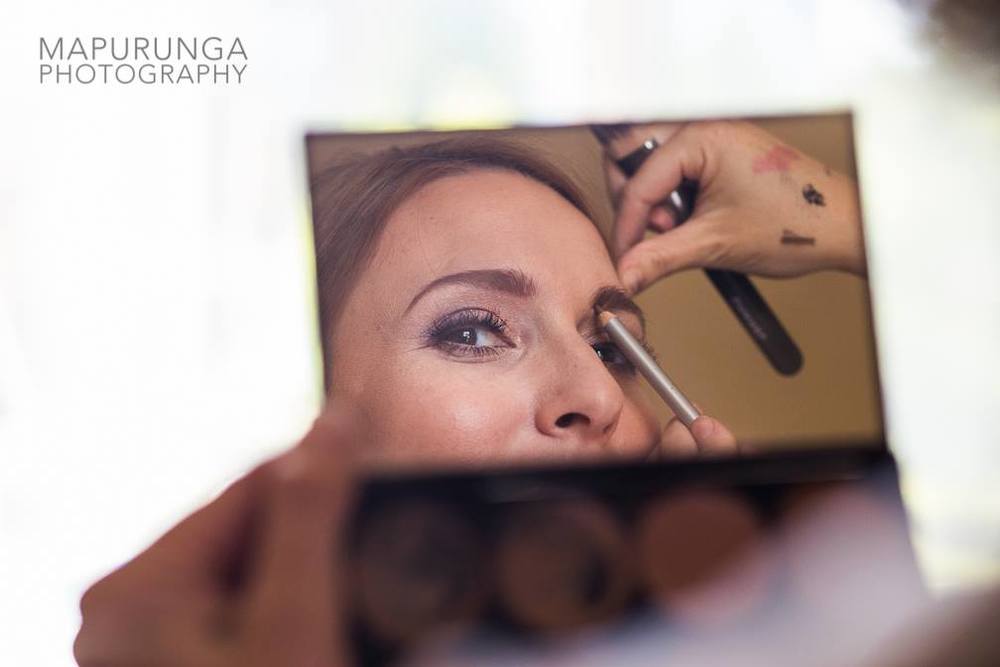
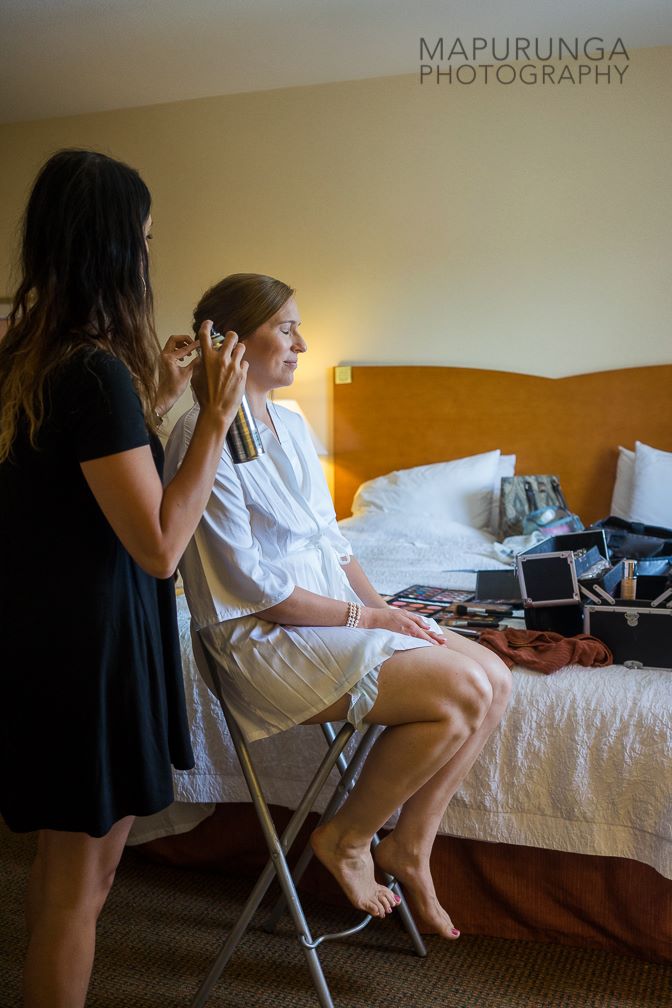
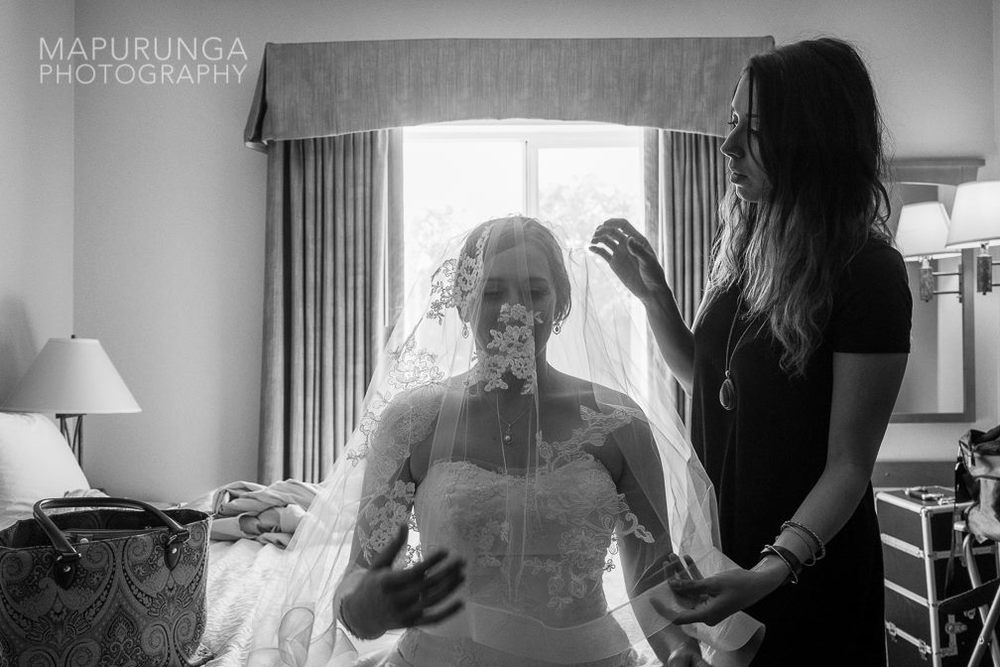
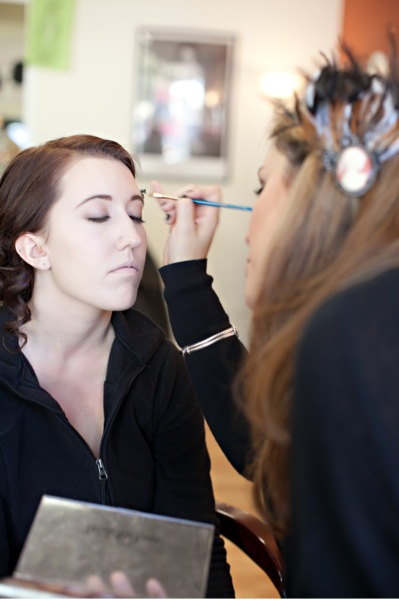
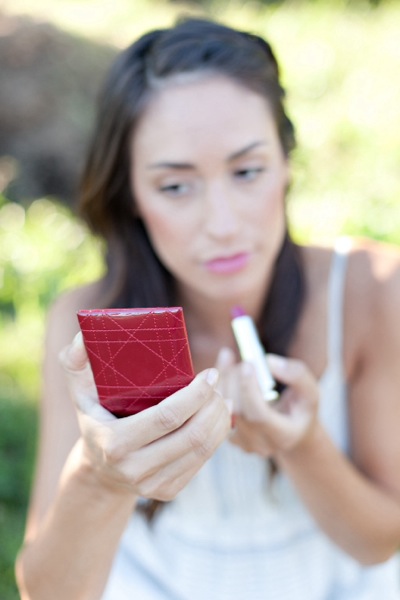
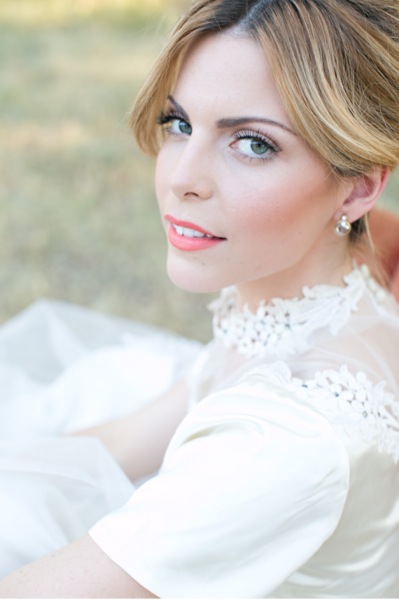
Helping people tell their stories is what we are all about. Melissa said “I Do” to the love of her life this summer and we were so honored to be there to help her prepare for that walk down the aisle! Follow along as P&P Artists Gina and Ashley work their bridal beauty magic…Amazing photos by Mapurunga Photography.
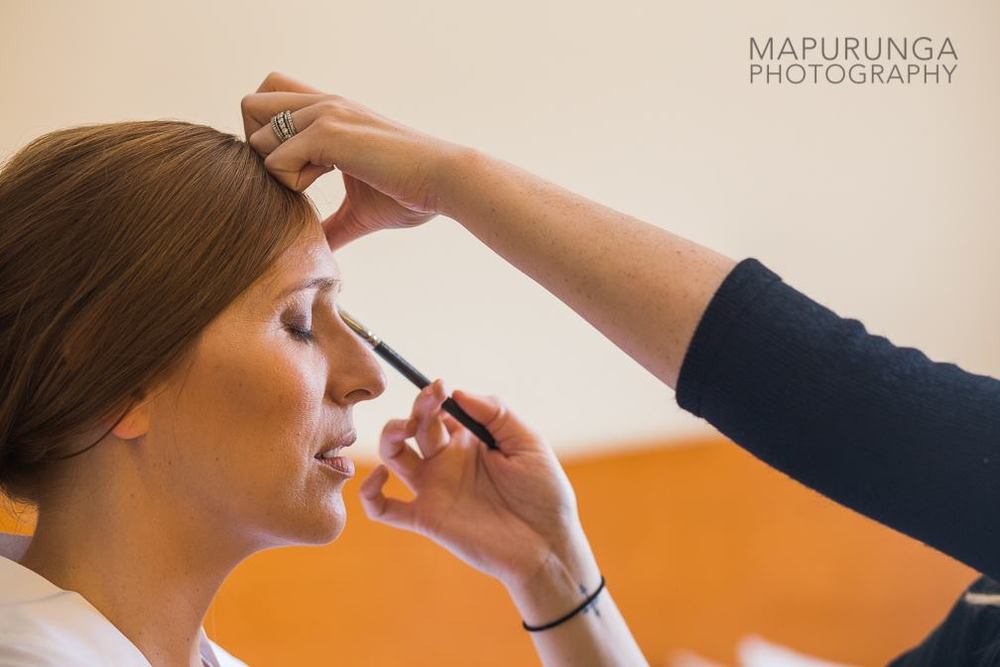

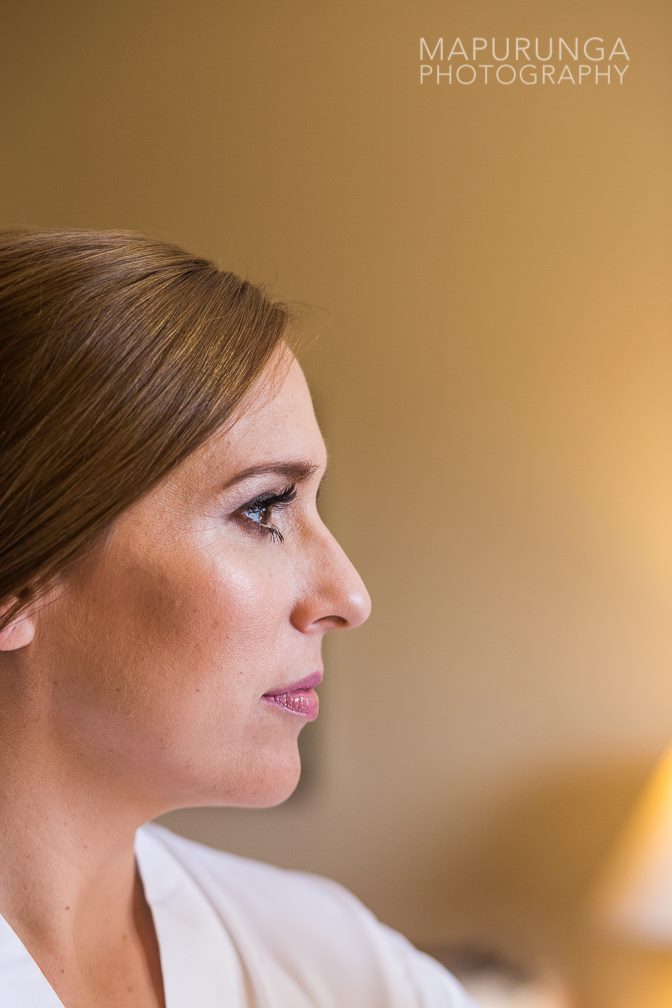
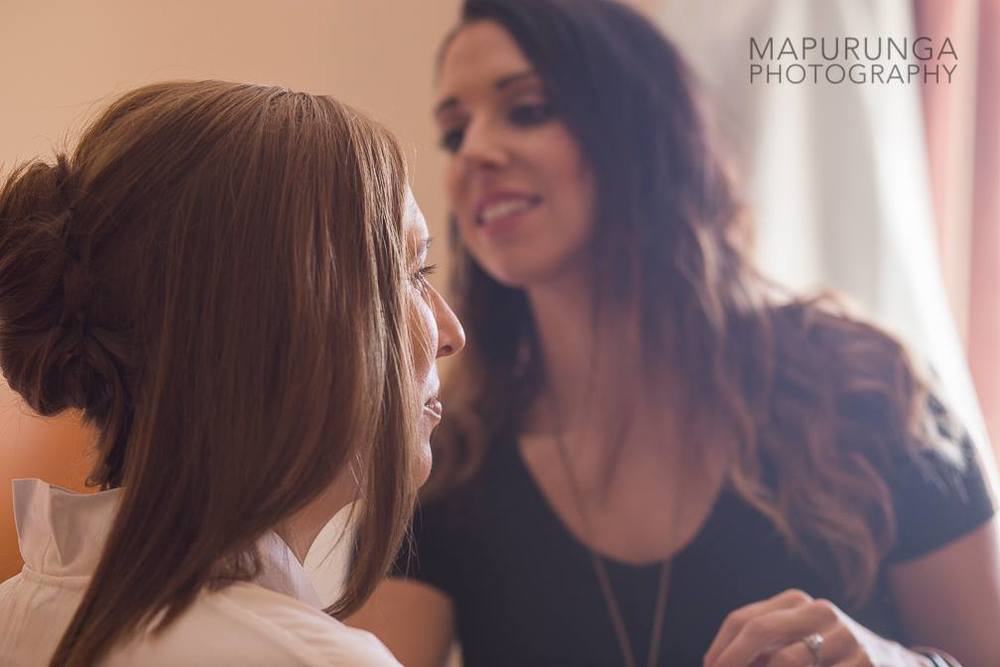
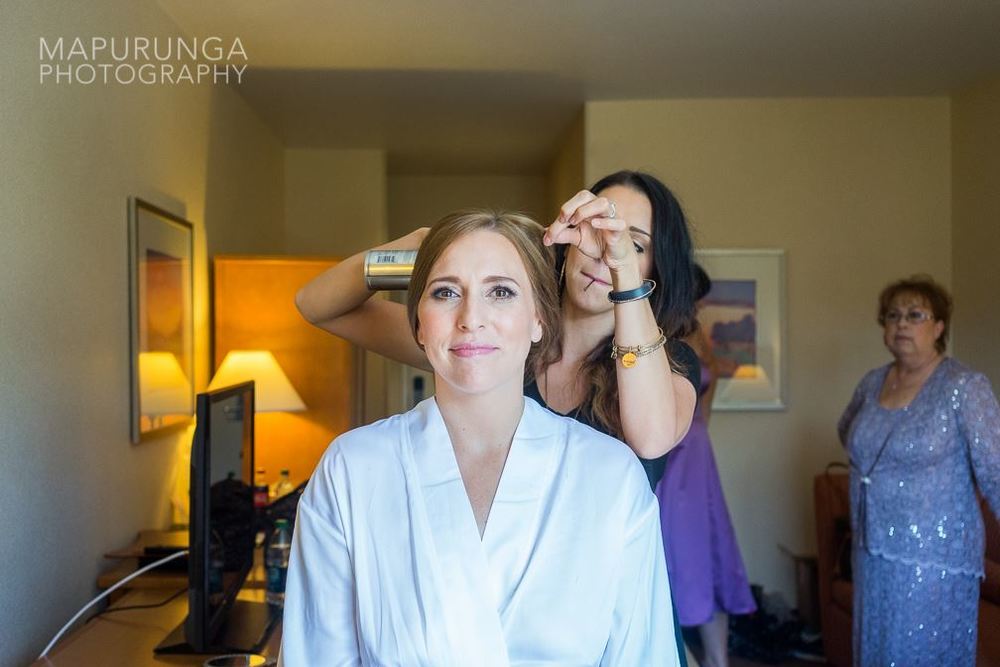
Finishing touches…
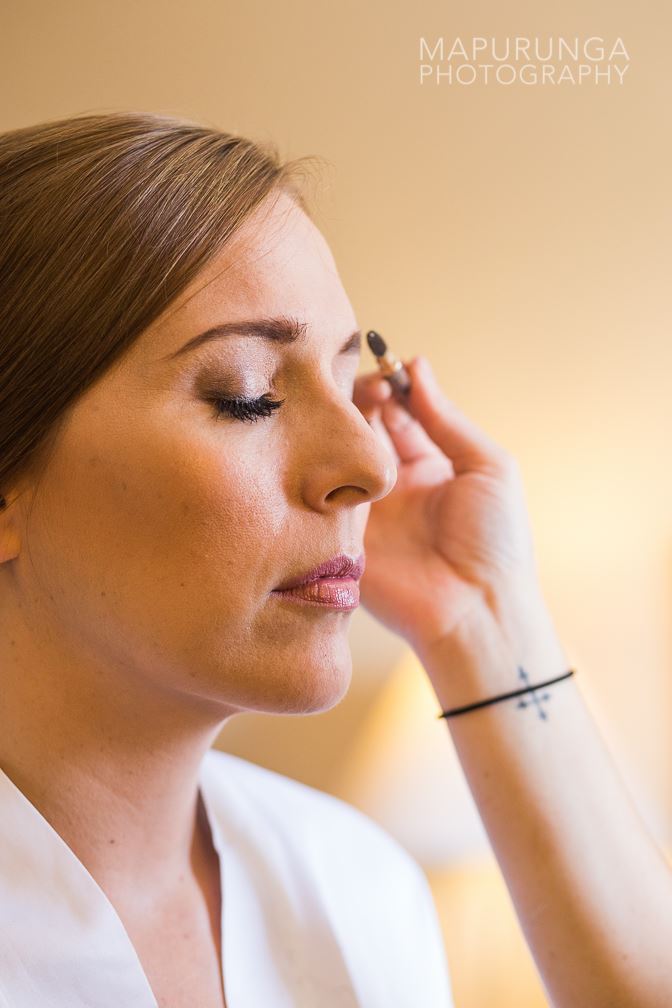
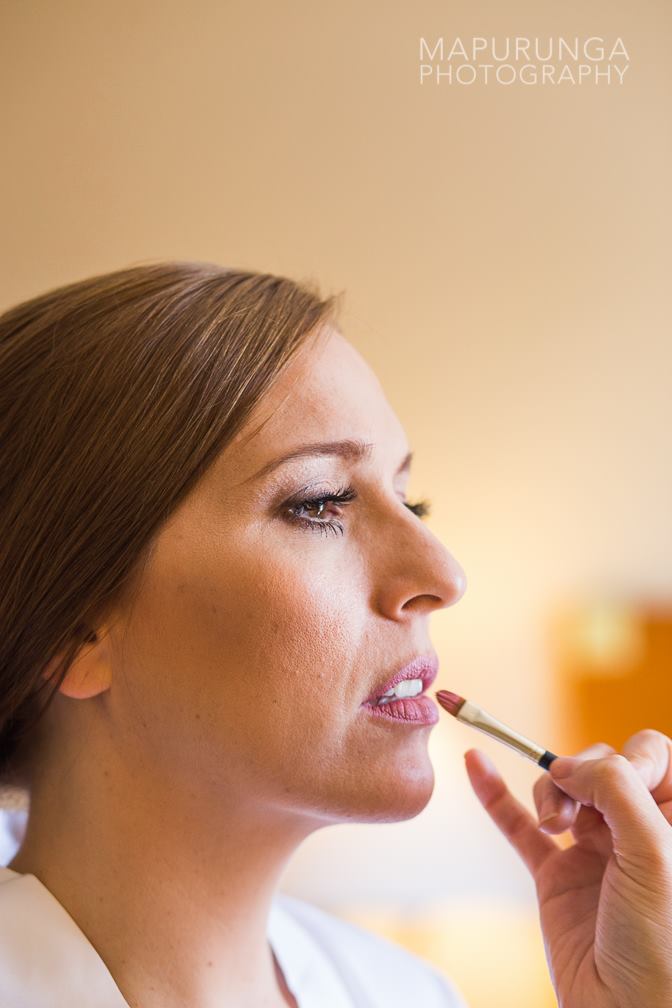

And that final detail to complete the look…
Cheers to True Love, Telling Your Story, and The Best Day Ever,

August 11, 2015
What do you do when you find yourself going through a major life change? Why, start a makeup line of course! Meet Debbie Bondar, the genius behind Canadian brand FACE Atelier. I was lucky enough to have a conversation with her recently and I’m so excited to share about this line with you all!
She embodies the kind of woman we love here at P&P: educated, intelligent, tenacious, business savvy, and able to rock lipstick while doing it all!

Debbie describes starting FACE Atelier as her post divorce reinvention. With her life shifting gears, she found herself evaluating her beauty routine and realized that despite being in her forties, she had yet to find her perfect foundation match, “I have a basic olive complexion. If I can’t find a good shade then who can?”
So she took her experience and education (did I mention her background is in journalism and law?!) and launched a brand full of not-so-secret weapons that you’ll find in the kits of many celebrity makeup artists.
FACE Atelier prides themselves on their universal appeal and was designed for consumers while still meeting the needs of professional makeup artists. Debbie shared a simple but very real truth, “Artists and consumers want the same thing: High performing easy to use products that help them look their best.”
The brand has a less is more vibe, with no-nonsense packaging and multitasking products rather than having a multitude of products for singular needs. Products that are developed by listening to the feedback and needs of the artists and people who use them? You bet…function and performance are in mind when items are launched, not trend.
Debbie shared the impact she feels cosmetics can have, “Healthy self esteem is exceptionally important…I’m a mother of daughters. So much illness starts from within! Makeup can be an important tool in a woman’s toolbox to help her feel better if she so chooses.”
As far as those specific “tools” goes, stay tuned in the coming weeks on Instagram and here on the blog for some product breakdowns and favorites from FACE Atelier! Oh, did i mention the line is Peta and Leaping Bunny approved?!
“I always believed there was magic in the bottle,” we do too, Debbie!
Cheers to Makeup, Multitasking, and Magic in the bottle,

Beauty, Beauty Spotlight, Celebrity, industry professional, Makeup, Product review, Products, Shopping
June 17, 2015
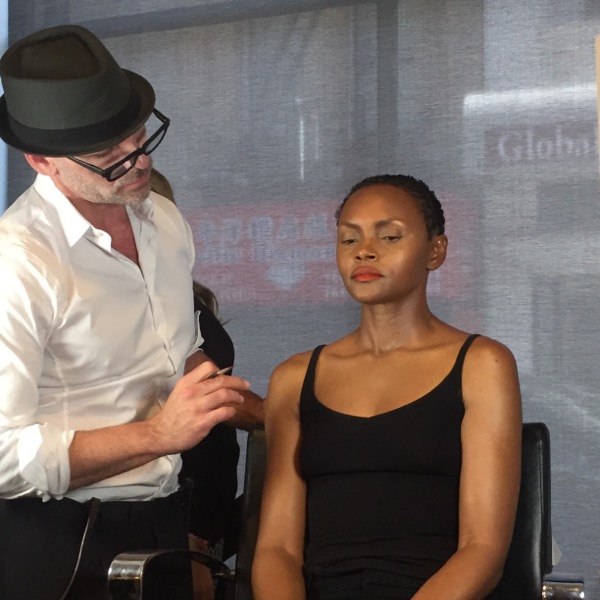
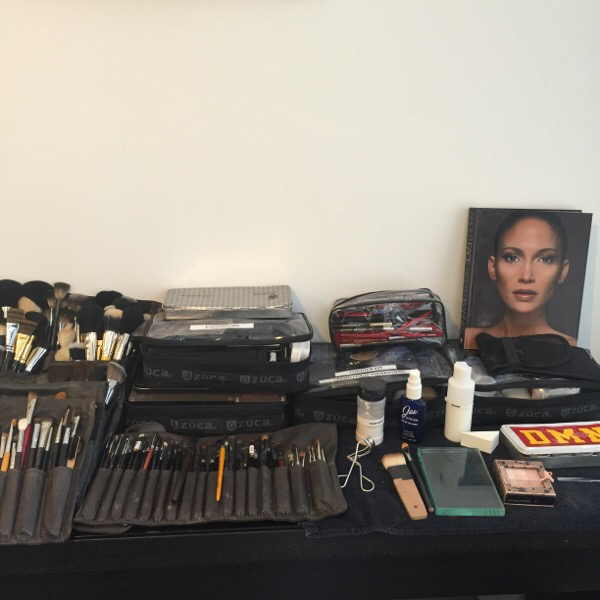
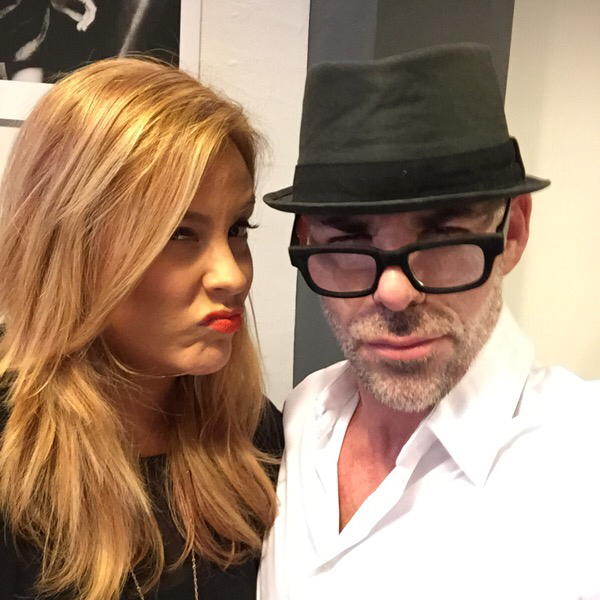
Last week I had the immense pleasure of attending a class with celebrity makeup artist Scott Barnes hosted by The Working Artist Company!
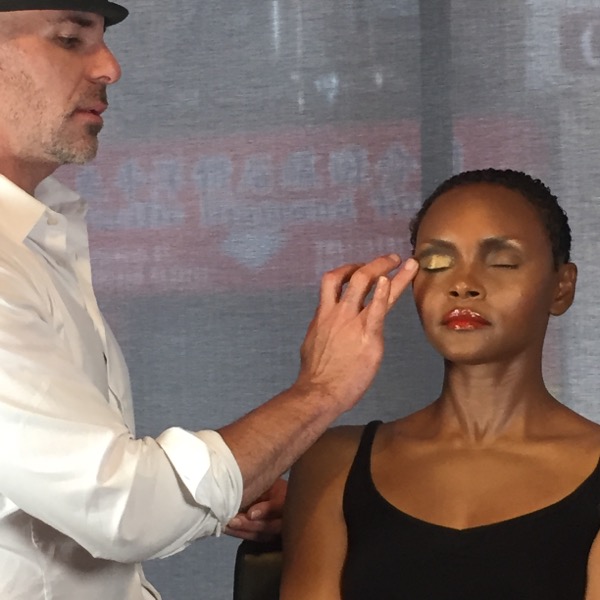
Scott is known for his expertise in complexion and the famous faces he works on…in fact he created that infamous glow that Jennifer Lopez is known for!

A lot of people call themselves makeup “artists” but Scott embodies the true essence of the word. His background in fine arts painting shows from the way he handles his tools to the way he sweeps and blends the product… It is mesmerizing to watch his human canvas transform.
His approach with makeup is much like how he painted. His attention to light and shadow resulted in the monochromatic look he’s famous for.
The glow…the contour…this approach essentially birthed a movement within makeup.
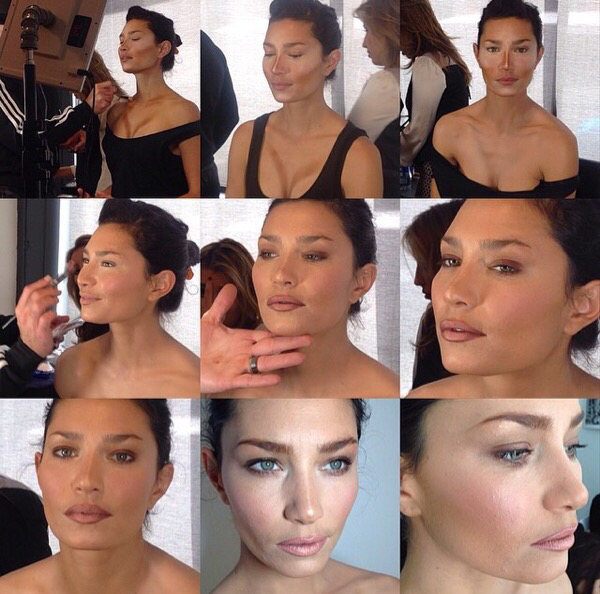
One thing that Scott said that really resonated with me was, “A good artist knows when to stop.” He demonstrated this by his minimal use of product and impeccable blending. Something we all should take a cue from with the recent contour craze that has swept beauty trend!
Reading something in a book, seeing pictures online, or even a quick video is helpful but nothing compares to being able to see things in person…and having the ability to ask questions!
Along with all of the amazing tips and techniques he demonstrated came a huge dose of inspiration!

Attending this class reminded me yet again of a very important truth: Education is not a destination, it is an ongoing journey. And a true professional never stays still.
So the question is, makeup artist or not, how are you moving forward in your education?
Cheers to Education, Art, and Always Moving Forward,

May 7, 2015
Note: the pictures of these lovely ladies below are NOT examples of looking old or doing things wrong…in fact they are evidence of the opposite! Plus, let’s be honest, the pictures break up my long winded soap box! Thank you Lydia Photographyfor the amazing shots from our previous photoshoots!
Dear Friend,
You asked for my honest opinion, “Am I looking old? Honestly Jess, tell me. I can take it. I know you’ll tell me the truth!,” you said. So here it is. And listen, regardless of my answer, you should ultimately do what you love…how you feel is what is most important, so if you do something in this list and you love it then be my guest! It’s your right to look haggard err umm I mean everyone is entitled to their wrong opinion—uh What I mean is, more power to ya! And yes friend I know you think I’m a little snarky, but it’s only to emphasis my point and because I would NEVER be this unfiltered with a client…but since we are friends, I know you can handle the truth.
1. Your brows are way too thin. Maybe it’s over plucking, maybe you’re just not particularly hairy, or maybe they’ve thinned with age but they are too thin. It seems counterintuitive but fuller brows actually make your eyes look more lifted! Thin brows overexpose the orbital bone and makes your eyes appear droopy. A fuller brow is an instant face lift, so grab some filler and make them fuller! Or head to an Anastasia counter for some brow rehab–Don’t worry, we can tell the press it was just for “exhaustion.”
2. Your lipstick is too brown or too dark…Honestly women are pretty religious about their lipstick. I get it. That shade is perfect right? You’ve been wearing it for years ya? Well that’s just it, you’ve been wearing it so long you don’t know any other way to view your lips. That doesn’t make it the best shade for you. Dark lips age, period. Sometimes that’s ok if we are going for a vampy look. But for everyday, you should go with something a little more rosy with more life in it! It will brighten your complexion and your smile.

3. You’re still wearing the same mattifying or oily skin formula foundation from years ago. You’d be surprised at how many women when discussing their skin type claim to be oily when what they really mean is, I was labeled as oily in my teens and I never reevaluated that as I got older. Oily skin formulas tend to combat shine, sucking out radiance…which when we were much more oily was great, we had radiance coming out the wazoo! But now, you aren’t anymore. I mean ya, you may still get shiny or even the occasional zit, but you are not the oil slick gal you used to be (thank God right?!). So using those formulas is essentially making your skin look dull and tired. And you don’t need that mega coverage anymore! Something lighter and more radiant is going to make your skin look fabulous! I know I know, it’s a total paradigm shift. It’s the right thing to do though, I promise.
4. You’re not concealing under your eyes. “But I feel like it makes me look wrinkly, or I feel like it settles in my lines.” First, let’s do some hunting to find a good formula that works best for you! Not all concealers are created equally. Second, darkness under your eyes will make you look more old and run down than a few lines ever will. The lines are there whether you care to acknowledge them or not, the darkness doesn’t have to be.
5. You’re not using good skincare. Whether it’s because you think it’s too late, or you’re in denial of it being necessary…you need to pay attention to your skin. If you’re thinking to yourself: should I start using an eye cream? The answer always is: yes you should of started years ago, regardless of how young you are. It’s never too late to give your skin what’s best for it. That’s like not watering a wilting plant…it’s not dead yet, so give it what it needs! And if you’re old enough to question if you should be using reparative creams or nutrient packed serums, then your answer is yes.
So there you have it friend, I’m only telling you this because I love you…and because you asked my advice. I mean, I think you’re fantastic and have great taste (after all, we are friends!). But you know I will always tell you truth when you ask for it, that’s why we are such good friends.
PS- if we really do know each other personally and you saw something on this list and wondered, “Is Jess talking about me??” Yes, yes I am talking about you. Coffee next week?
Cheers to Honesty, Friendship, and Aging Gracefully,

Beauty, Health, Makeup, Musings, Personal, Photoshoot, Product review, Products, Skincare, Trend, Tutorial
February 19, 2014
It’s not Valentine’s Day without kiss-worthy lips…and these 5 lipsticks are the perfect picks this week whether you have a date with someone special, a dear friend, or even just your favorite pj’s!

1. Kate Moss for Rimmel in number 17: the perfect classic pink! Great for a soft daytime look.
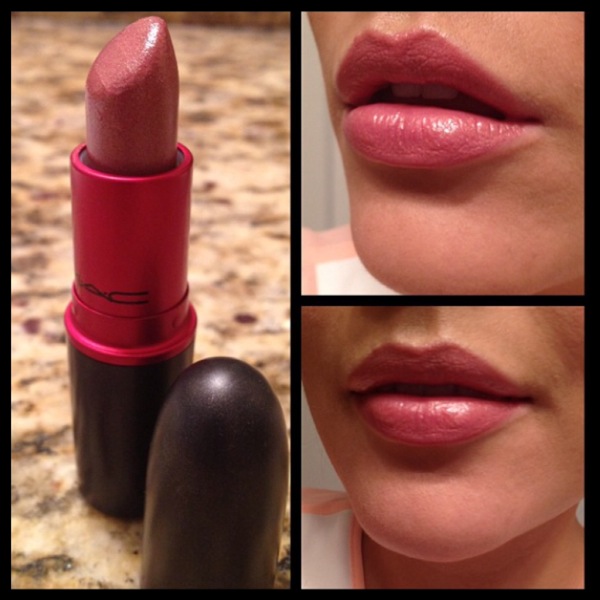
2. MAC Viva Glam V: a shimmery rosy beige, a great compliment to a smokey eye. Added bonus, the full price you pay goes to charity!
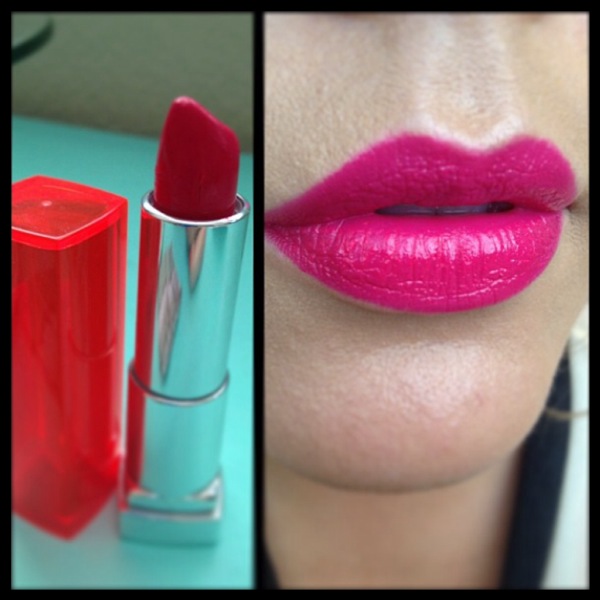
3. Vivid Rose by Maybelline: Ok, so not so much great for a date…but going out with your friends, or feeling sassy? This lippy packs a punch!
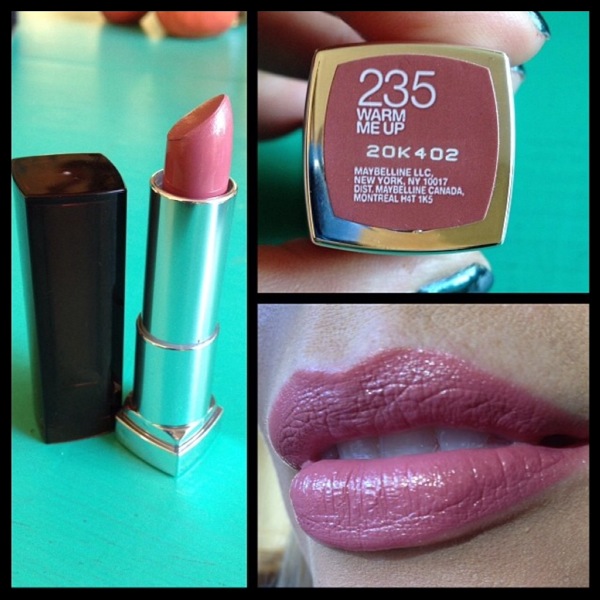
4. Warm Me Up #235 by Maybelline: the name says it all.
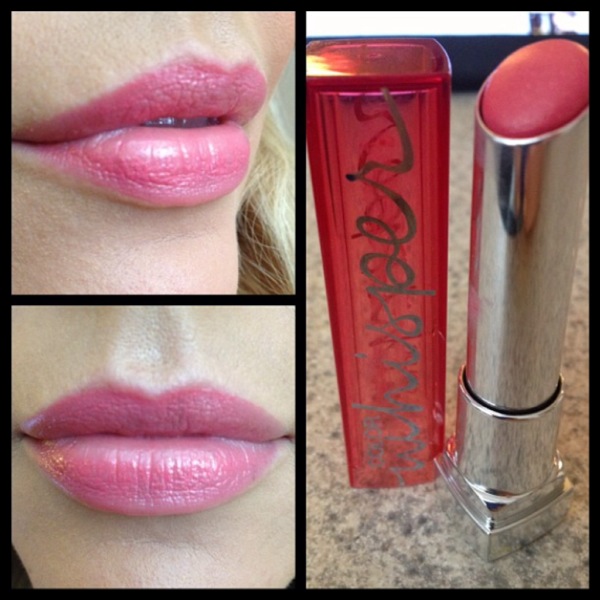
5. Color Whisper by Maybelline in Pin up Peach: a sheer hydrating wash of color for a low maintenance girlie touch.
Happy Valentine’s Day everyone!
Cheers to the Perfect Pinks for your Pout,

February 12, 2014
This month it seems that pinks, berries, and reds are on the brain…along with hearts and glitter. While I may not make homemade Valentine’s cards anymore, I still find a way to flex my Valentine’s Day creative muscles! Here’s a soft girlie look to try this V-day…or any day for that matter!
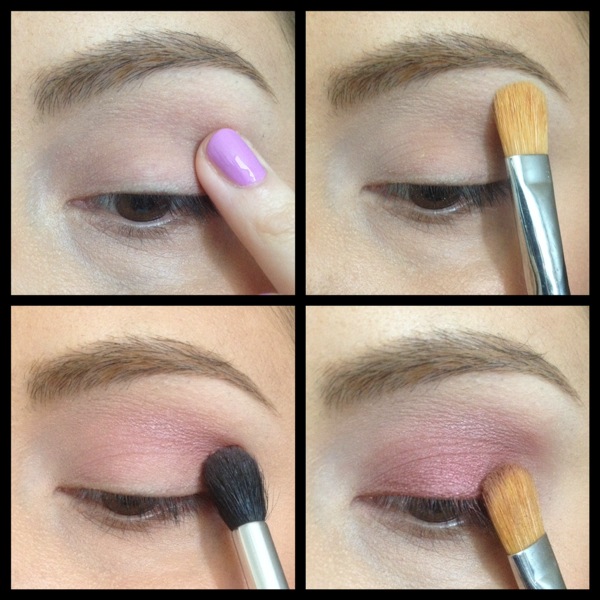
1. Prep your eyes with a good primer.
2. Sweep a matte vanilla shadow on your brow bone.
3. Using a windshield wiper motion, apply a soft pink shadow in your crease.
4. Pat a shimmery cranberry shadow all over your eyelid.
5. Blend a soft brown into your crease so everything is seamless!
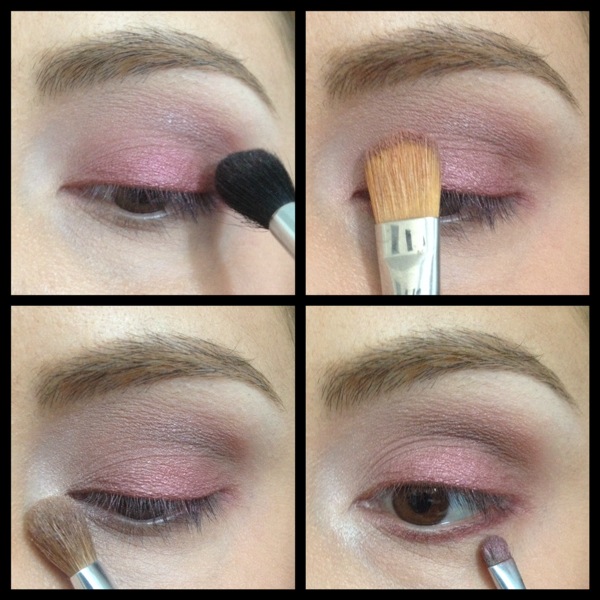
6. Pat a shimmery light pink shadow on the inner third of your lid.
7. Add a pop of shimmery vanilla in your inner socket.
8. Line your lower lashline with the same frosty cranberry as before.
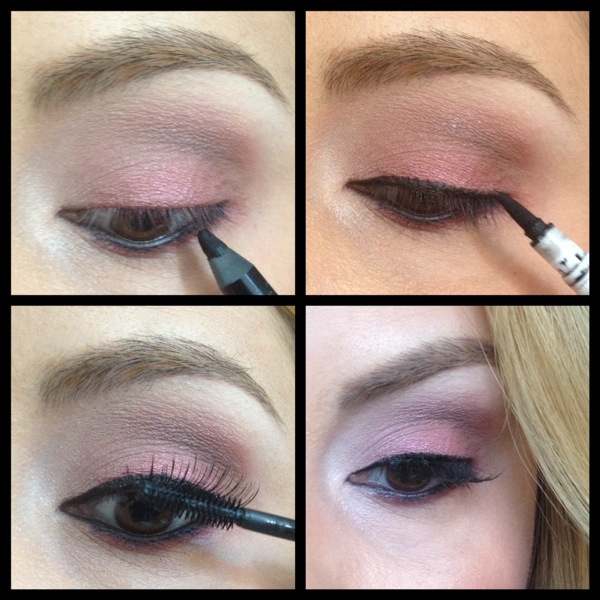
9. Use black pencil to line your waterline.
10. Line your upper lashline too, I opted for a slightly bolder liquid liner.
11. Curl your lashes and finish with mascara (bonus points if you add false lashes!).
Voilá!
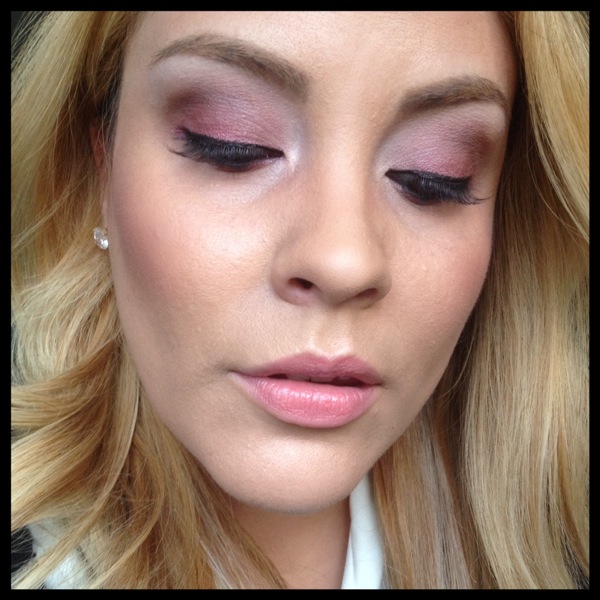
Products used:
Naked Basics palette by UD
MAC shadows in Girlie (pink) and Cranberry
Rimmel Scandaleyes liner in black
Almay liquid liner

Cheers to Pink, Reds, and Valentines,

February 11, 2014
I am so smitten with the look I did for a photoshoot this week with Nicole Cook (umm, by the way she is an AMAZING highschool senior –fashion– photographer in NorCal). Luckily I had the sense to take pics of the look as it developed so I could make this tutorial for you! The funny thing is that it doesn’t actually use any silver shadows in it…the hue is a result of the blending of the liner and shadows. Which I actually prefer because silvers often translate very blue on camera. This way you get the effect in a truer way. If you’re not a fan of silvery shadow, then sub the black pencil for an espresso one and blend out with dark brown shadow instead of black for a more chocolatey neutral look. I worked from my Naked Basics palette and also a few shades from Makeup Geek (creme brulee, shimma shimma, and homecoming).
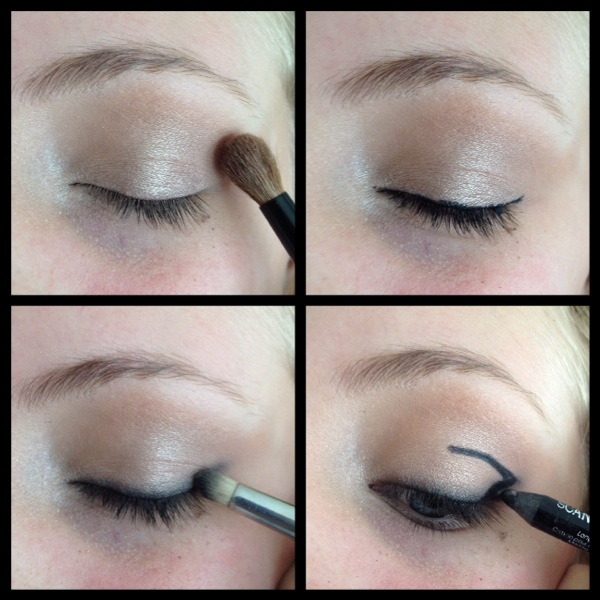
1. Prime your lids and dust on a neutral champagne or vanilla shadow all over your lid, the shimmery base will help when it comes time to blend.
2. Line your eyes, doesnt need to be precise.
3. Use a pencil brush (or your finger even) to blend and soften the liner.
4. Draw a V with your pencil to outline where your smokey cat eye will go. Make sure you open your eye first to determine how high up you want the line in your crease.

5. Use your pencil brush to blend and smudge the V more into the center of your eye, you essentially are focusing on the outer third portion of your eye. Dip your brush into black shadow as necessary to build the depth you are comfortable with. See how messy its getting? Trust the process and don’t get scared! I like to do eyes first and skin second when doing looks like this.
6. Pat a shimmery taupe shadow all over your lid, smoothing out the seams of where the black shadow stops.
7. Dust a soft brown in your crease, bronzer works fab!
8. Highlight under your brow and in your inner socket.
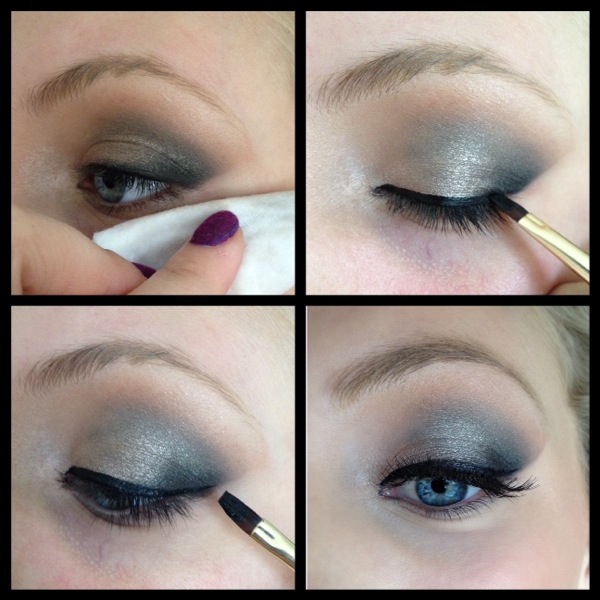
9. Now for the clean up! This step is what adds the sharp angled edge to the look. Take a cotton pad with remover or makeup wipe and fold it so you have a straight edge. Swipe the edge in an upward angled motion.
10. Line your eyes. I love the sharpness of a gel or liquid for this look.
11. Add the flick of liner at the end for your cat eye. The awesome part about this look is that the sharp edge we created is your guideline, so its goof-proof!
12. Load up with mascara…bonus points and more drama if you toss in some lashes too! I used medium length individuals.

And there you have it! Isn’t our model Lexy so lovely?!
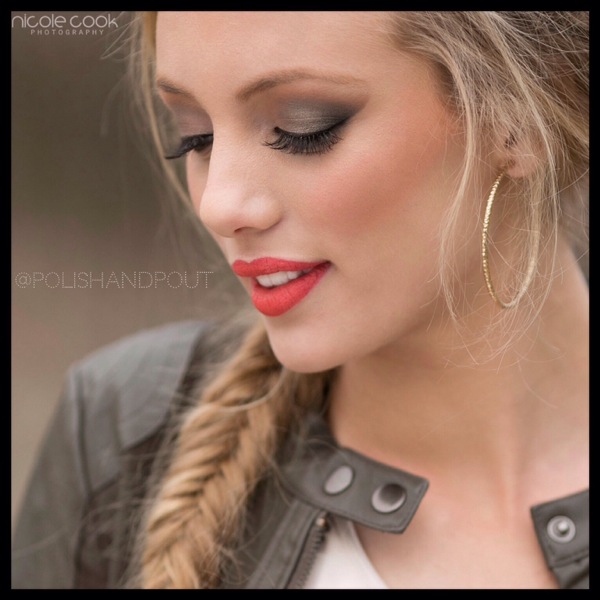
We were going for drama so we paired her look with a bold punchy lip (Rimmel Kate Moss #12)…but a nude lip is a great option for this look!
Cheers to Seniors, Silver, and Smokey Eyes,

January 29, 2014

