

Only a few more days to go until Halloween! Still don’t have an idea? Here’s one that you’re sure to have the stuff for!

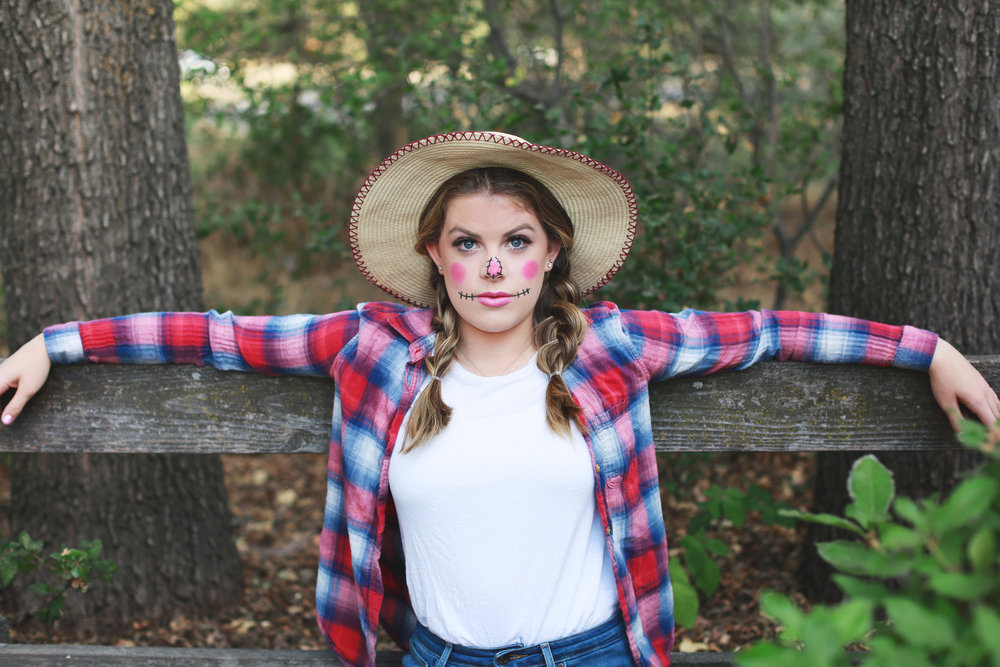
For the outfit grab jeans or overalls, a white tee, a flannel, and a straw sun hat!

For the makeup, start with your face as done as you like it. For Gracie, we opted for foundation and powder and some big fluffy doll-like lashes! Then go in with hot pink blush and make a distinct circle shape with it on each cheek! We used Tarte blush in Rad.

Make a tear drop shape with the blush on your nose too and top off the look with a bright pink lip! Try NYX Butter Gloss in Peaches and Cream or Cupcake!
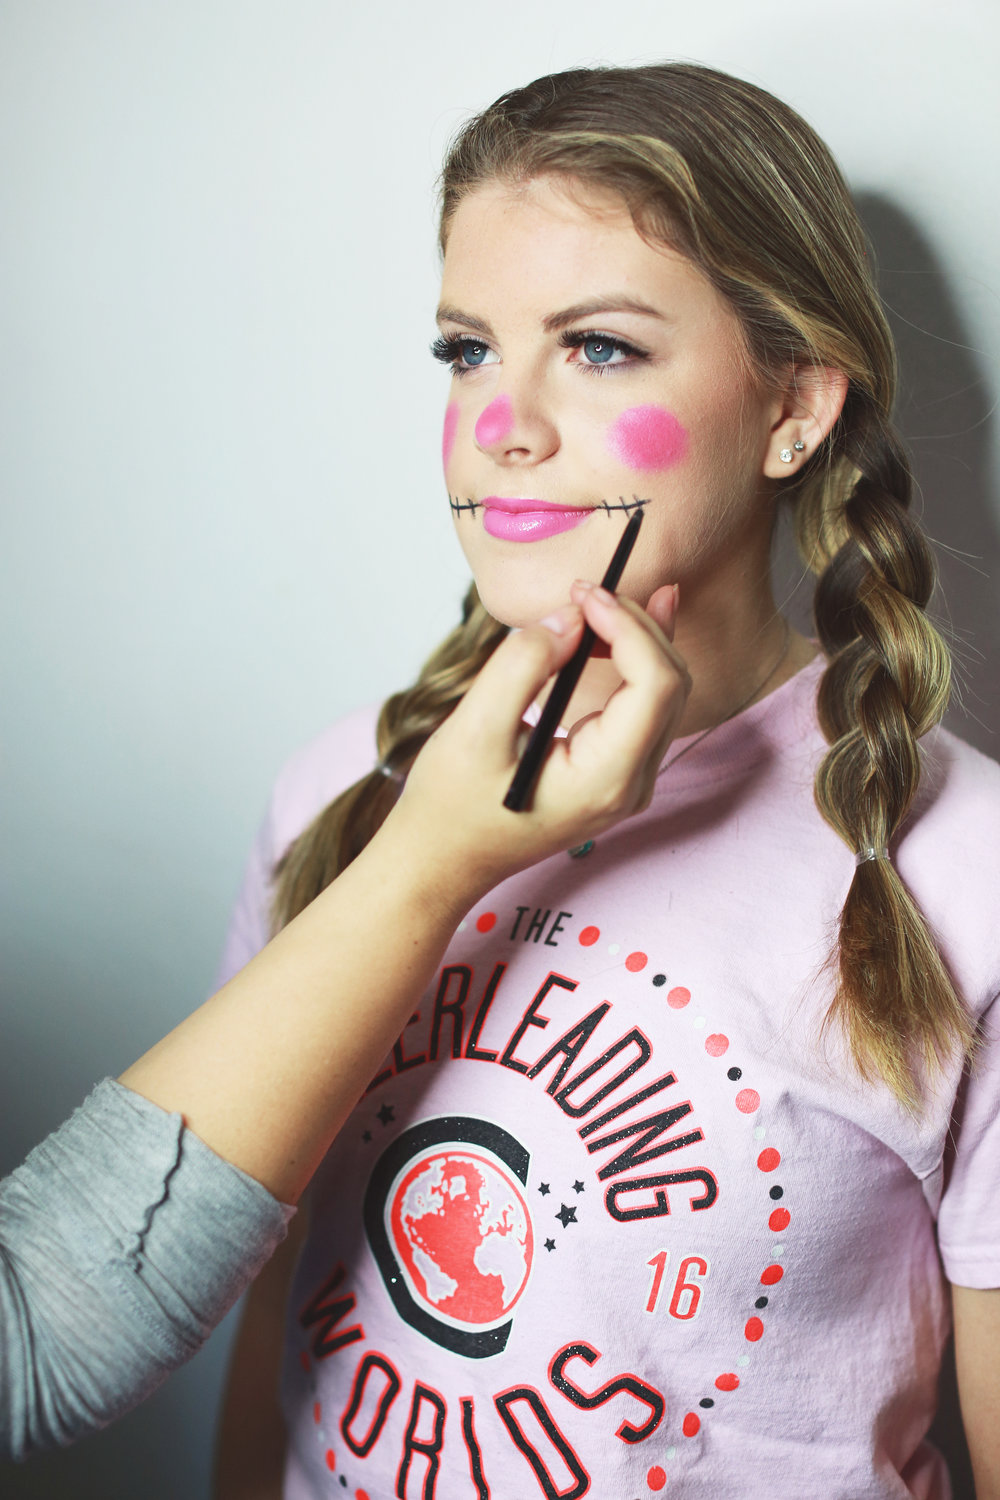
Now take a black eyeliner pencil—we opted for Urban Decay Perversion—and draw smile lines with stitches and outline the pink on your nose the same way too!

Double braids add to the country farm vibe!
There you have it! And chances are you already have all these things lying around!

Special thank you to Indulge Beauty Studio for taking pics of the gorgeous Gracie in this tutorial!

Give this a try and be sure to tag @polishandpout on IG when you do so we can see your version of this costume!! Happy {almost} Halloween!!!
October 22, 2018

Last year we did a few fun super simple Halloween DIY costumes and it was SO MUCH fun we just had to do more this year too!
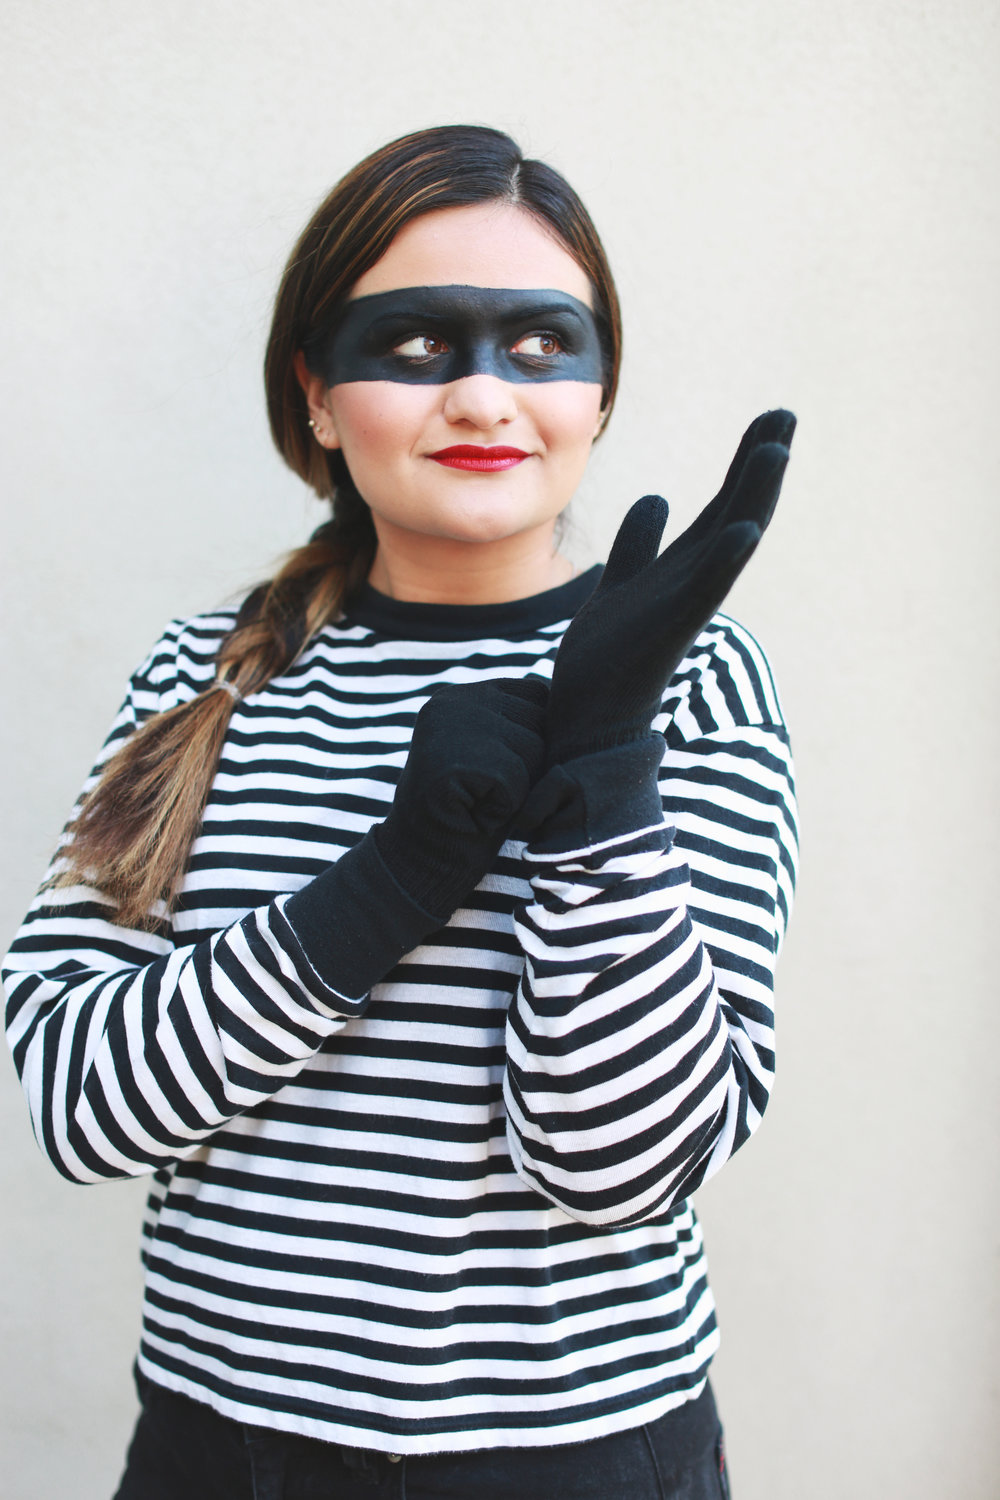
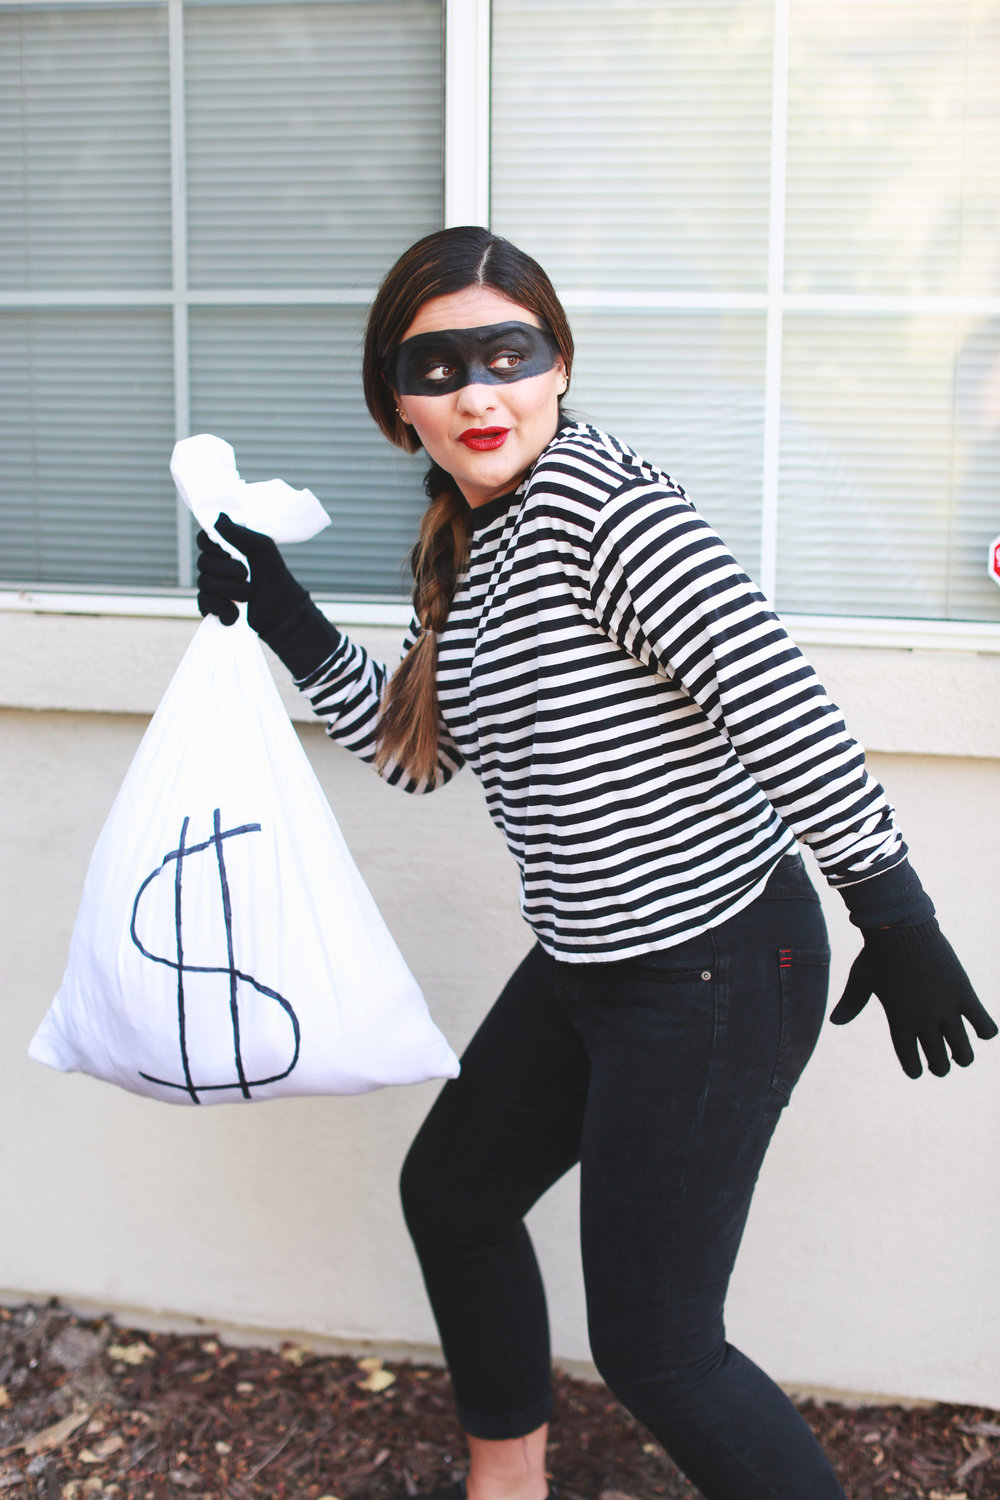
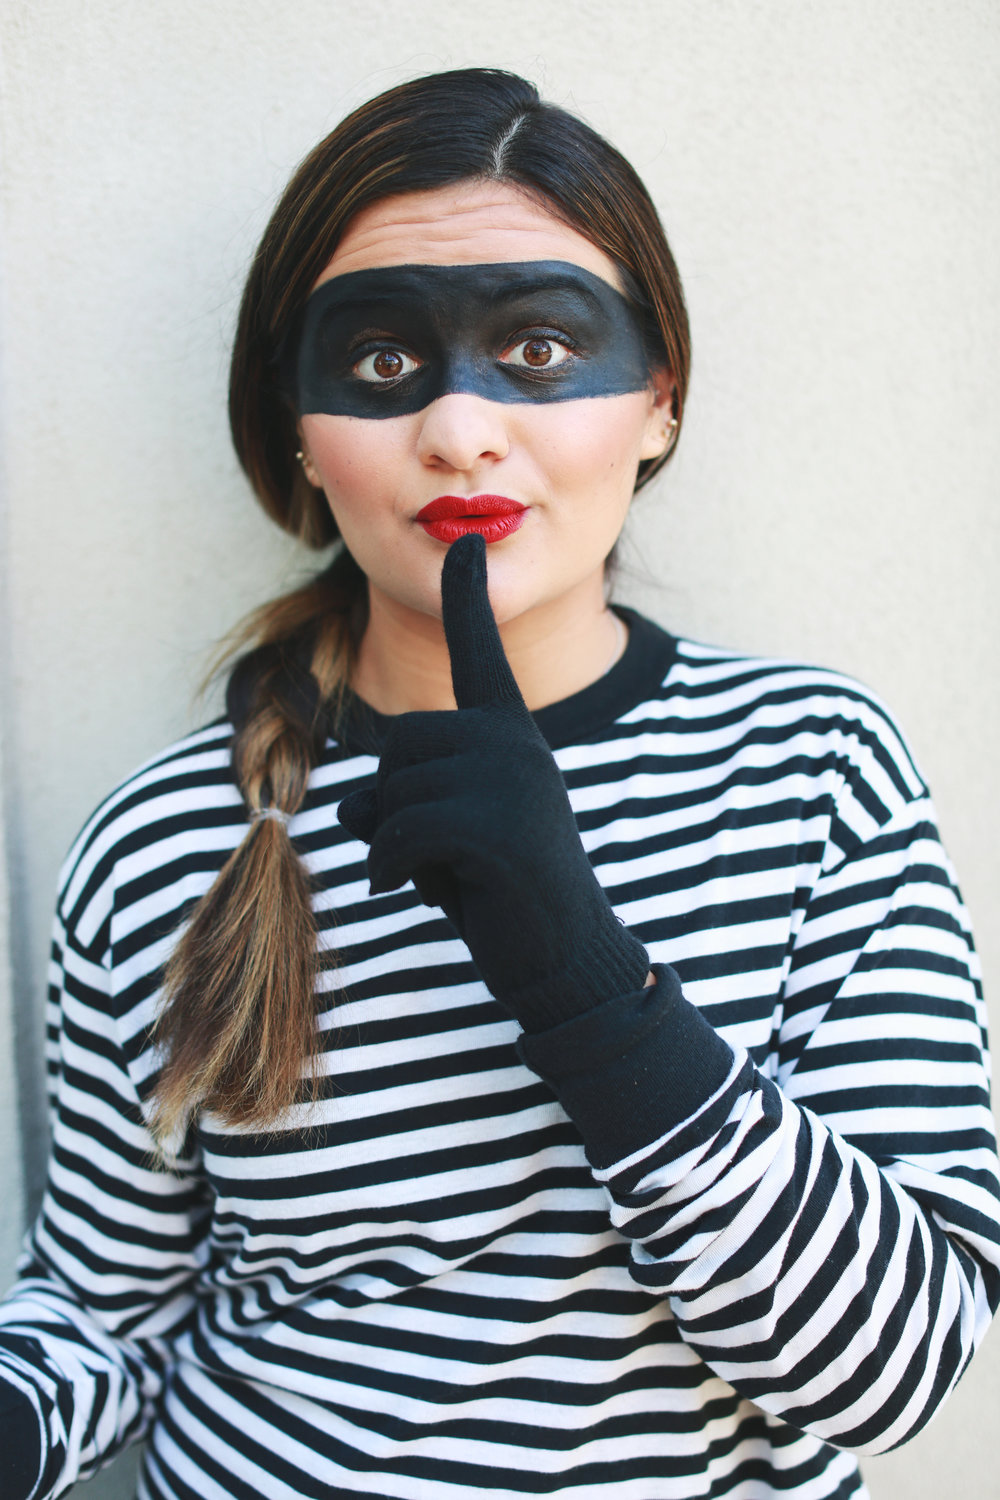
First up, an old timey bank robber!
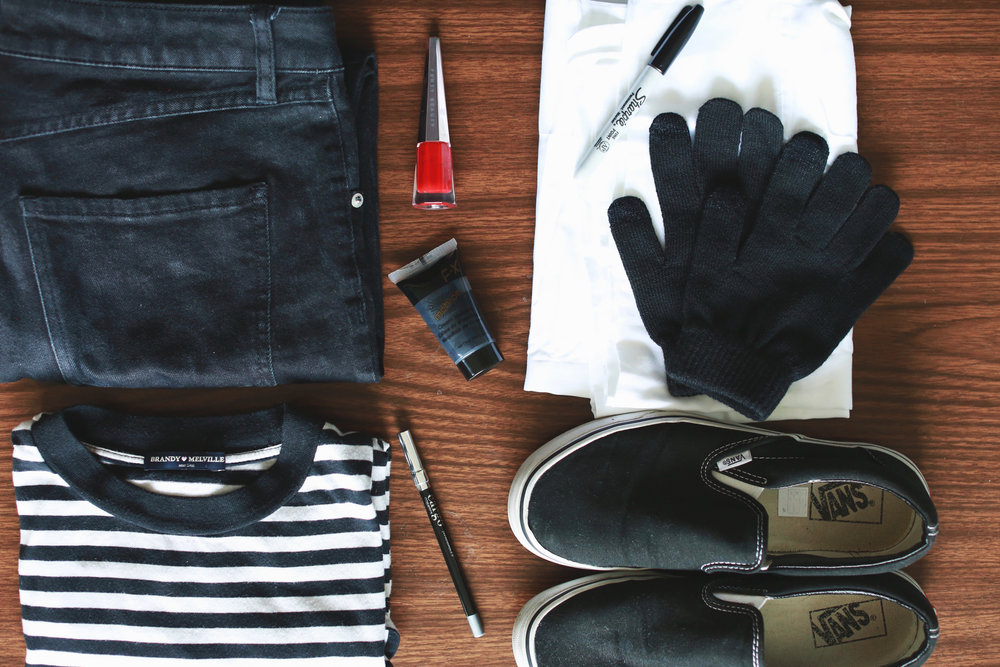
Here’s what you’ll need: For your outfit opt for black pants and shoes, a black and white striped top (go for all black if you don’t own stripes), black gloves.

You’ll also need a bag for all your stolen loot! An old white or cream pillow case will do the trick! Use a black sharpie to draw a big dollar sign $ on it…because otherwise how will you remember what’s inside?! 😉
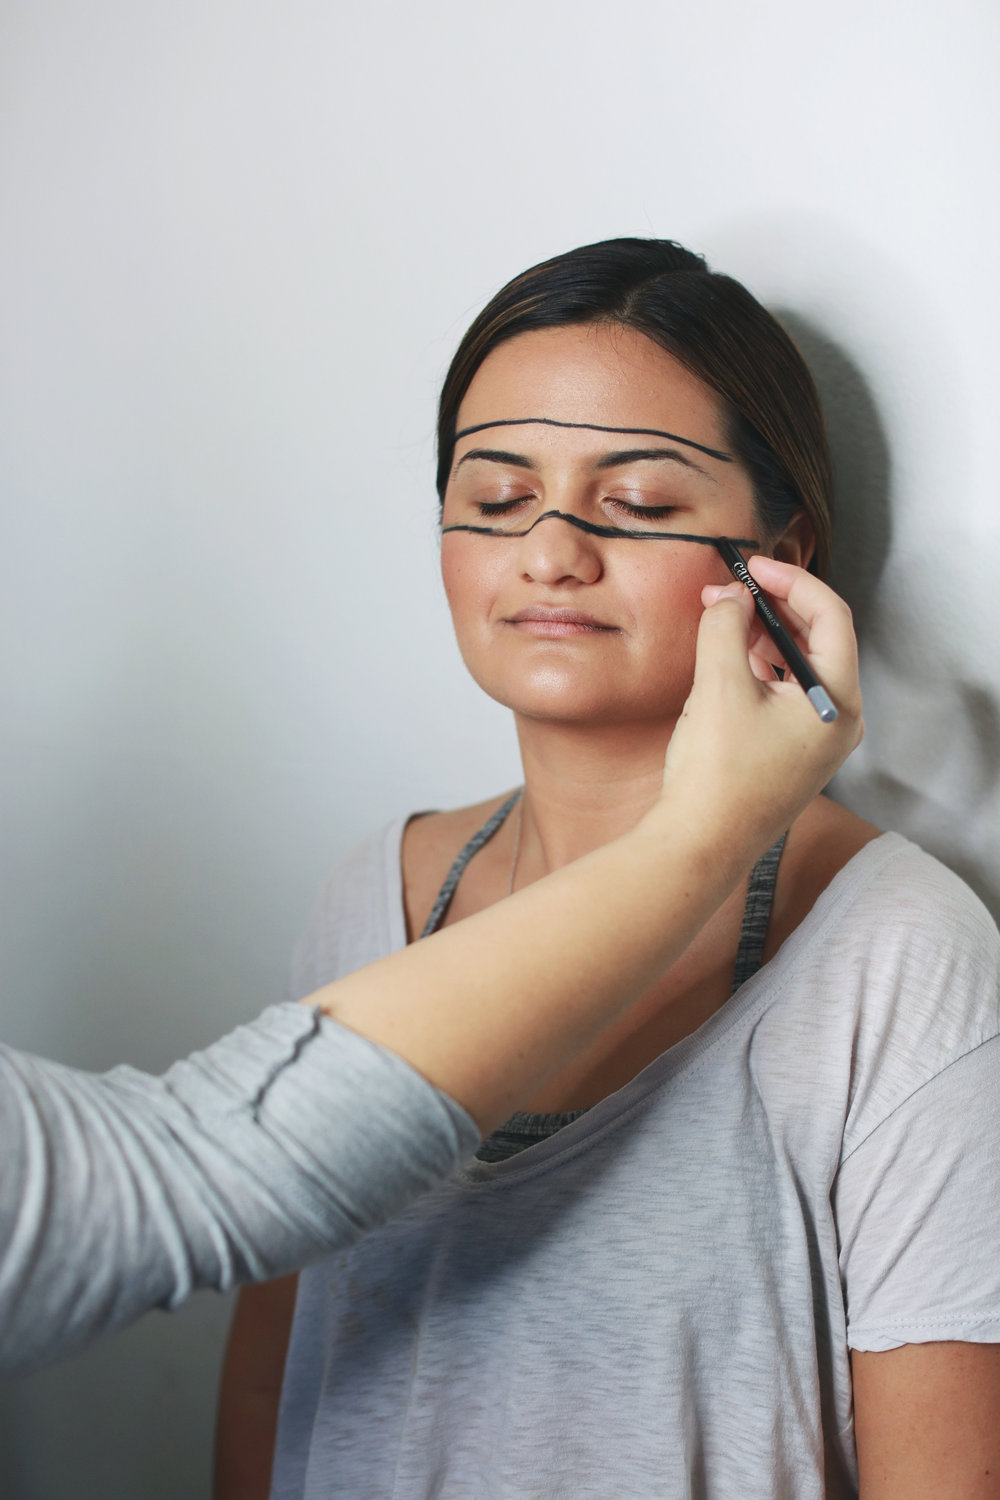
Ok now for your makeup. Start out from whatever point you’re most comfortable. Maybe that means a bare face or maybe that means your current routine, it’s whatever you want! On Izzy, we used foundation, powder, blush, bronzer, and highlight. So her basic complexion was on point before we drew the mask! Ok now grab a black eyeliner and sketch your eye mask outline.

Now fill in the mask! We used Mehron black cream makeup, you can snag it on Amazon for a few dollars! Not able to get ahold of black makeup? Fill in mask with your eyeliner or layer on black eyeshadow to fill in the mask.
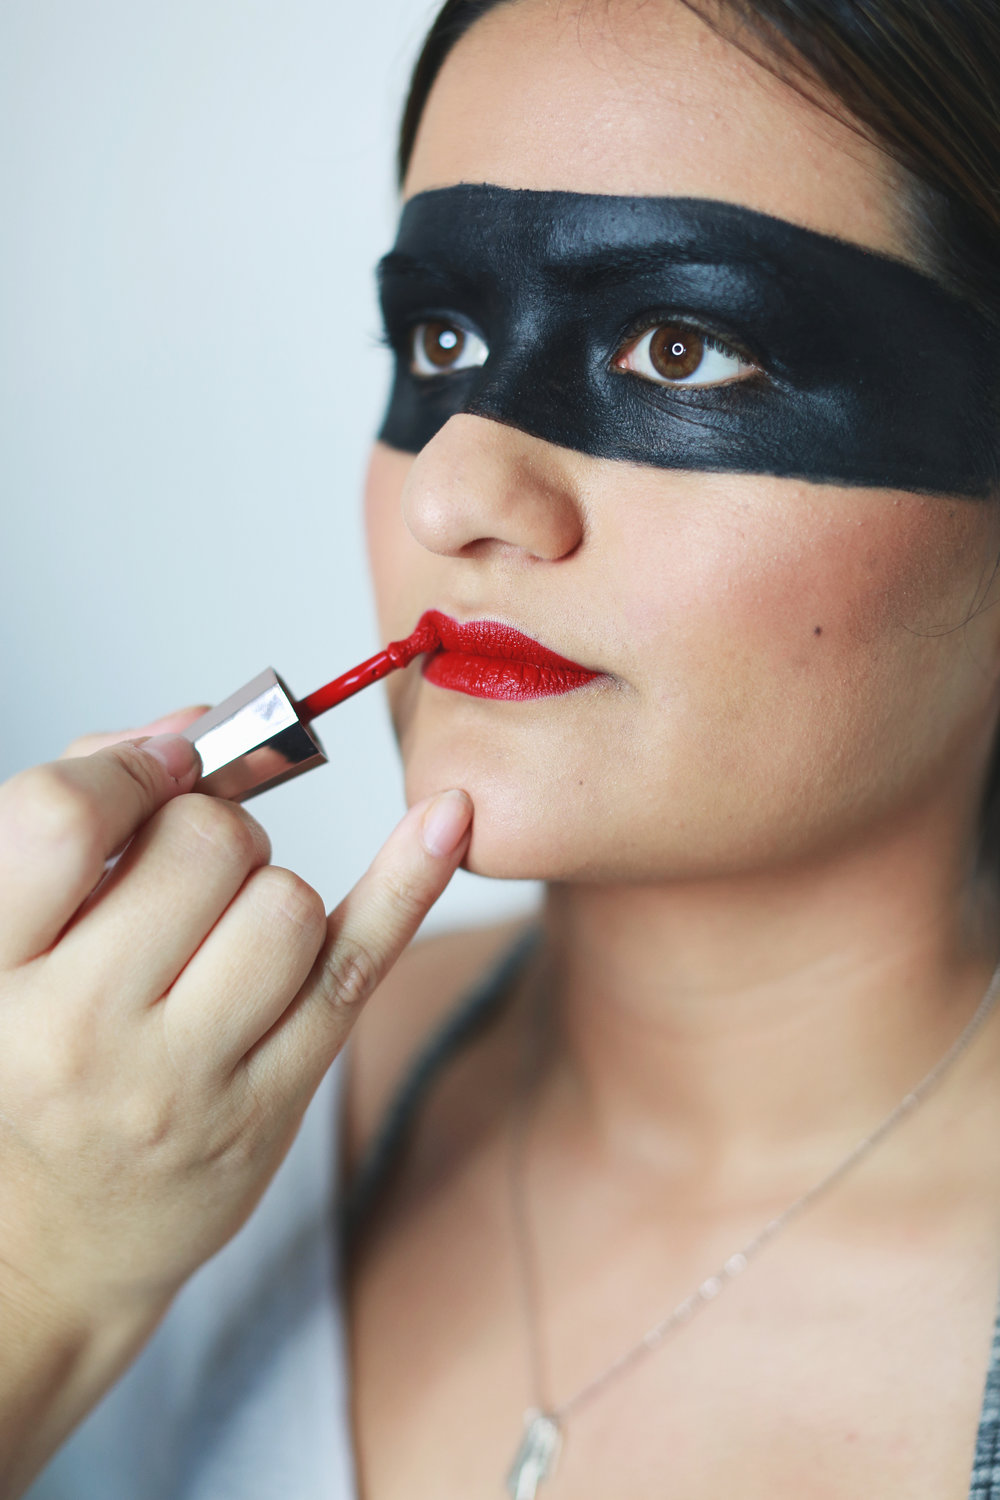
Now the fun pop of color! You really can wear anything lip you want but I just love the contrast of this bold red with the black and white outfit! Bank robbers like to be glam too! This is Fenty’s Stunna Lip Paint in red and it’s so creamy, smooth, vibrant, and ultra long wearing!
Now you’re ready to pull off your master plan!!!
Special thank you to Indulge Beauty Studio for these awesome photos of the lovely Izzy!
Give this a go and be sure to tag @polishandpout in your look on IG so we can see it!! Happy {almost} Halloween!!
October 15, 2018

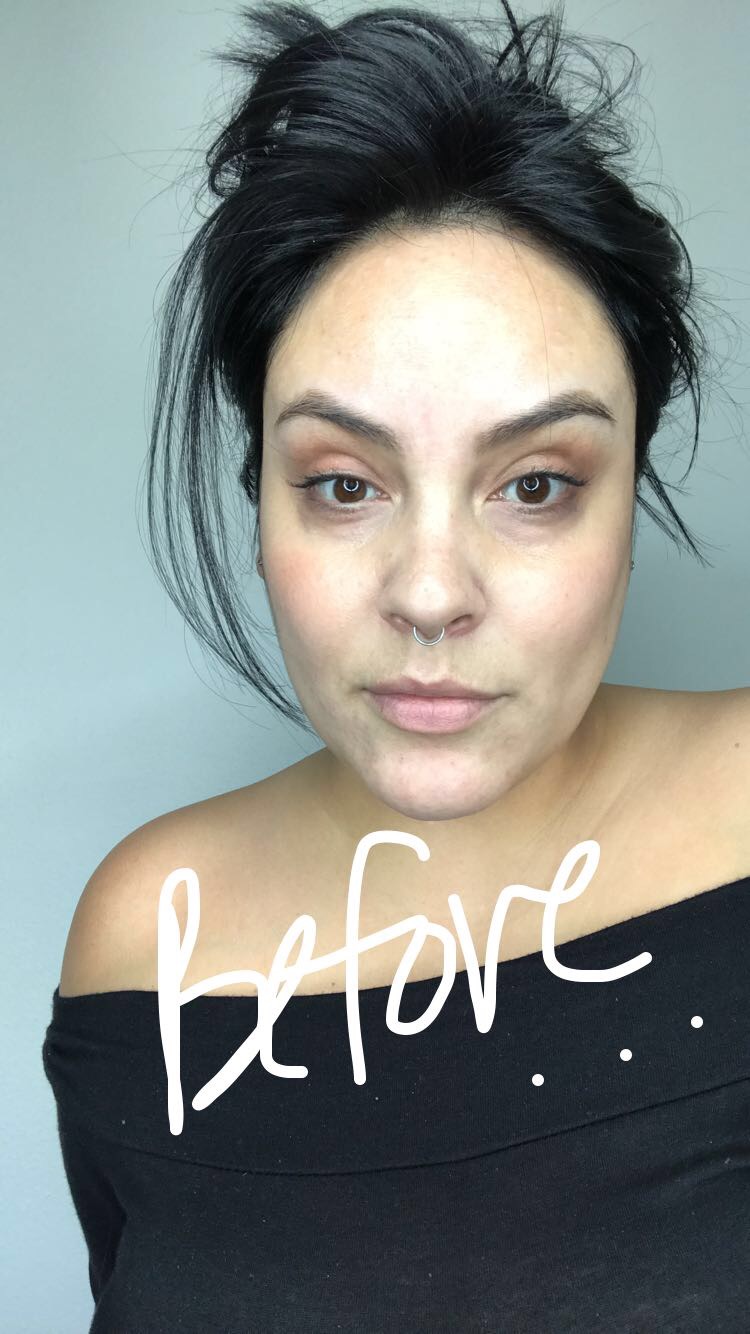
One of the things I love the most about makeup is its ability to impart confidence. The other day I wasn’t feeling the greatest and rather than doing nothing I decided that nothing could make me feel better than turning myself into Wonder Woman!
I remember watching old reruns of the tv show with Lynda Carter as a child and thinking she was so strong and so beautiful…seeing the movie this year with Gal Gadot was so inspiring too!

The latest version of Wonder Woman ditches the classic red lipstick for more of a fresh face. I used Dior Airflash for a flawless finish and NYX Precision Brow Pencil for a strong full Brow.
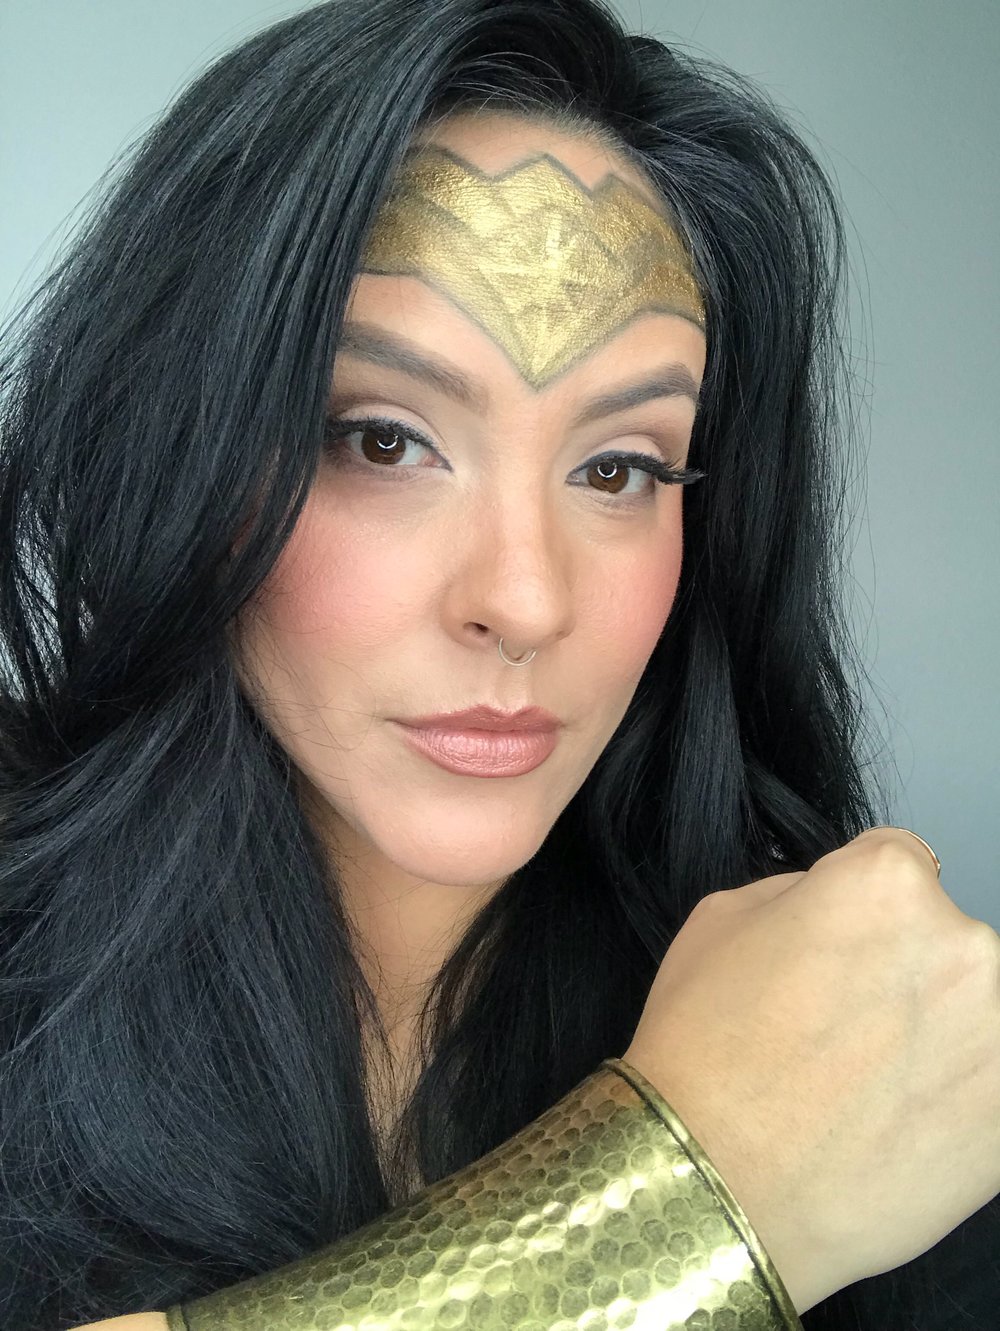
I also used my favorite metallic powder and mixing liquid by Mehron to paint on her signature headband! I had this amazing statement cuff already but you could easily use the same gold pigment to paint them on!
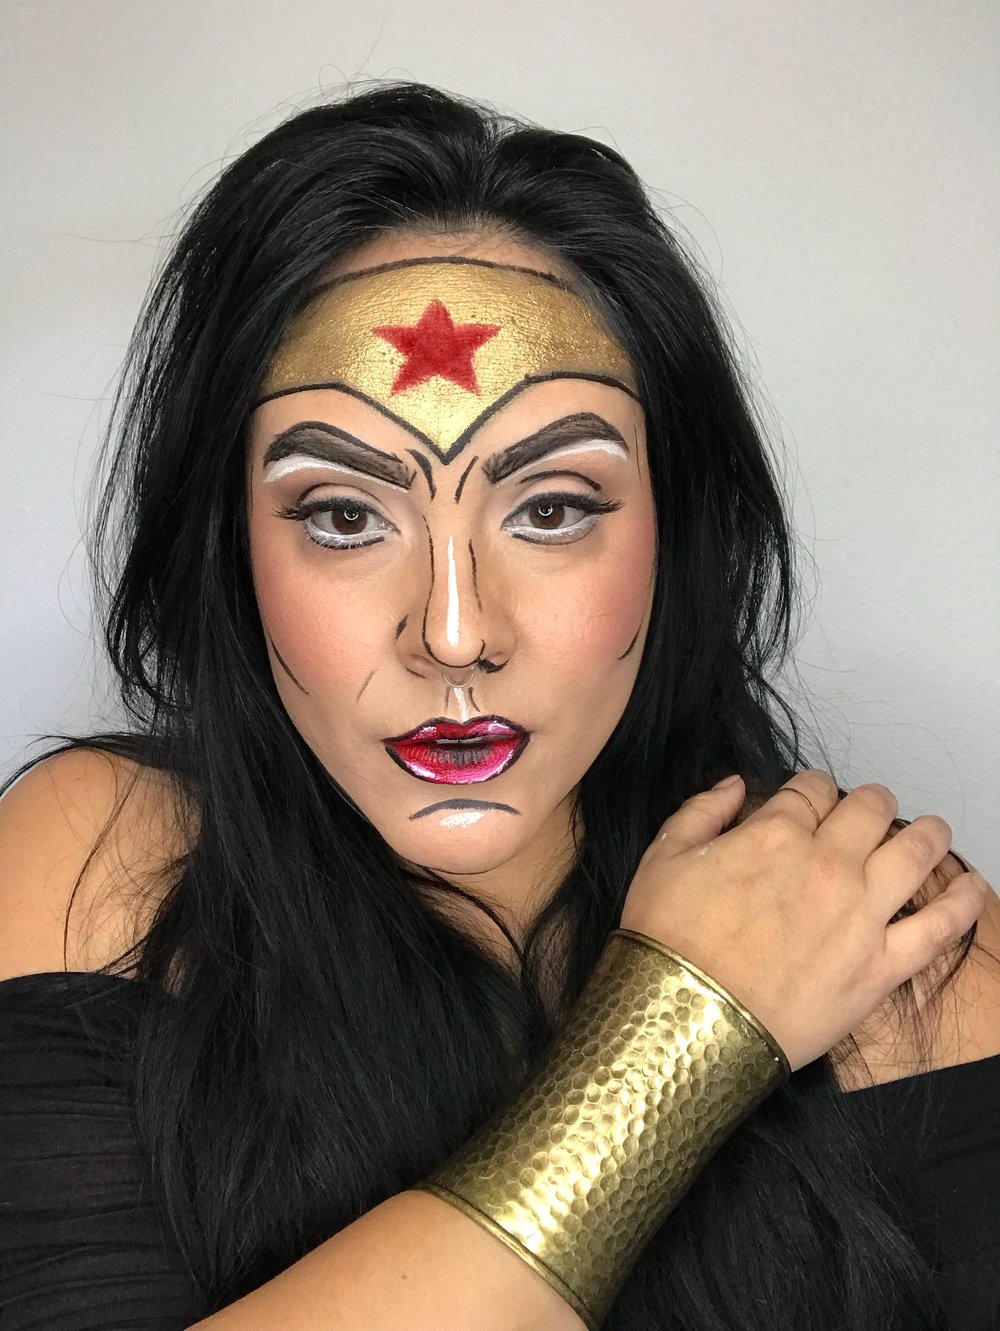
Of course I had to try a comic book version too! I love all the pop art makeup looks floating around right now…simple black and white lines to accentuate facial structure, add red lipstick and there you go!
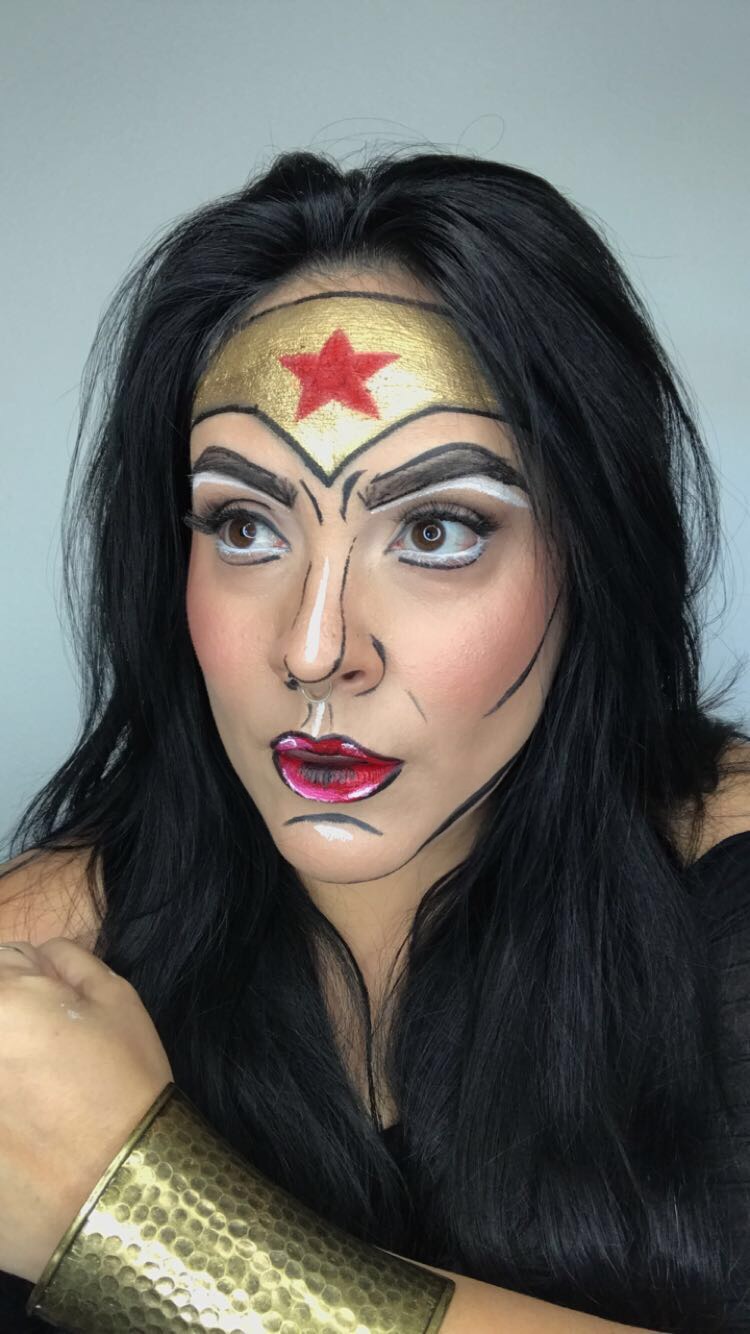
I changed the headband to the more classic shape.
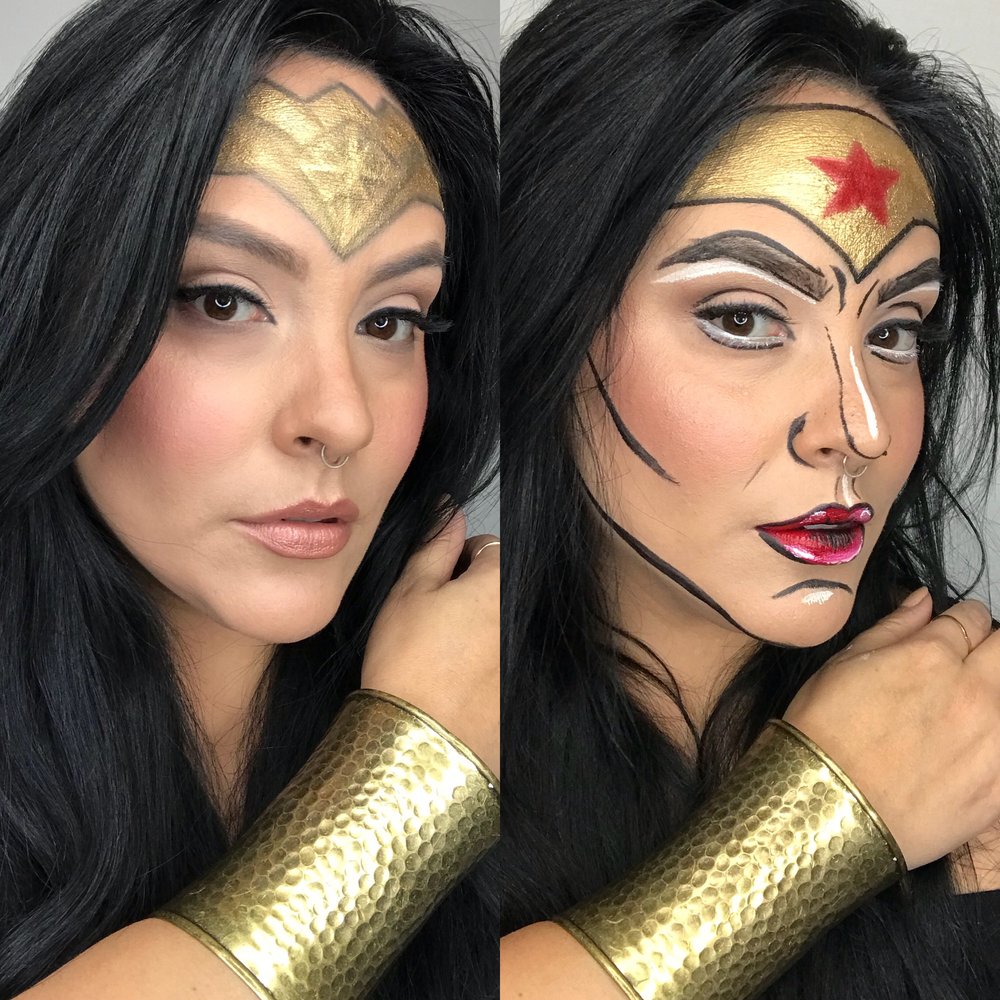
I can’t decide which is my fave! How amazing is it that makeup can show on the outside how we want to feel on the inside? I have to admit, it’s impossible to feel bad when your face is painted like Diana herself!
October 18, 2017

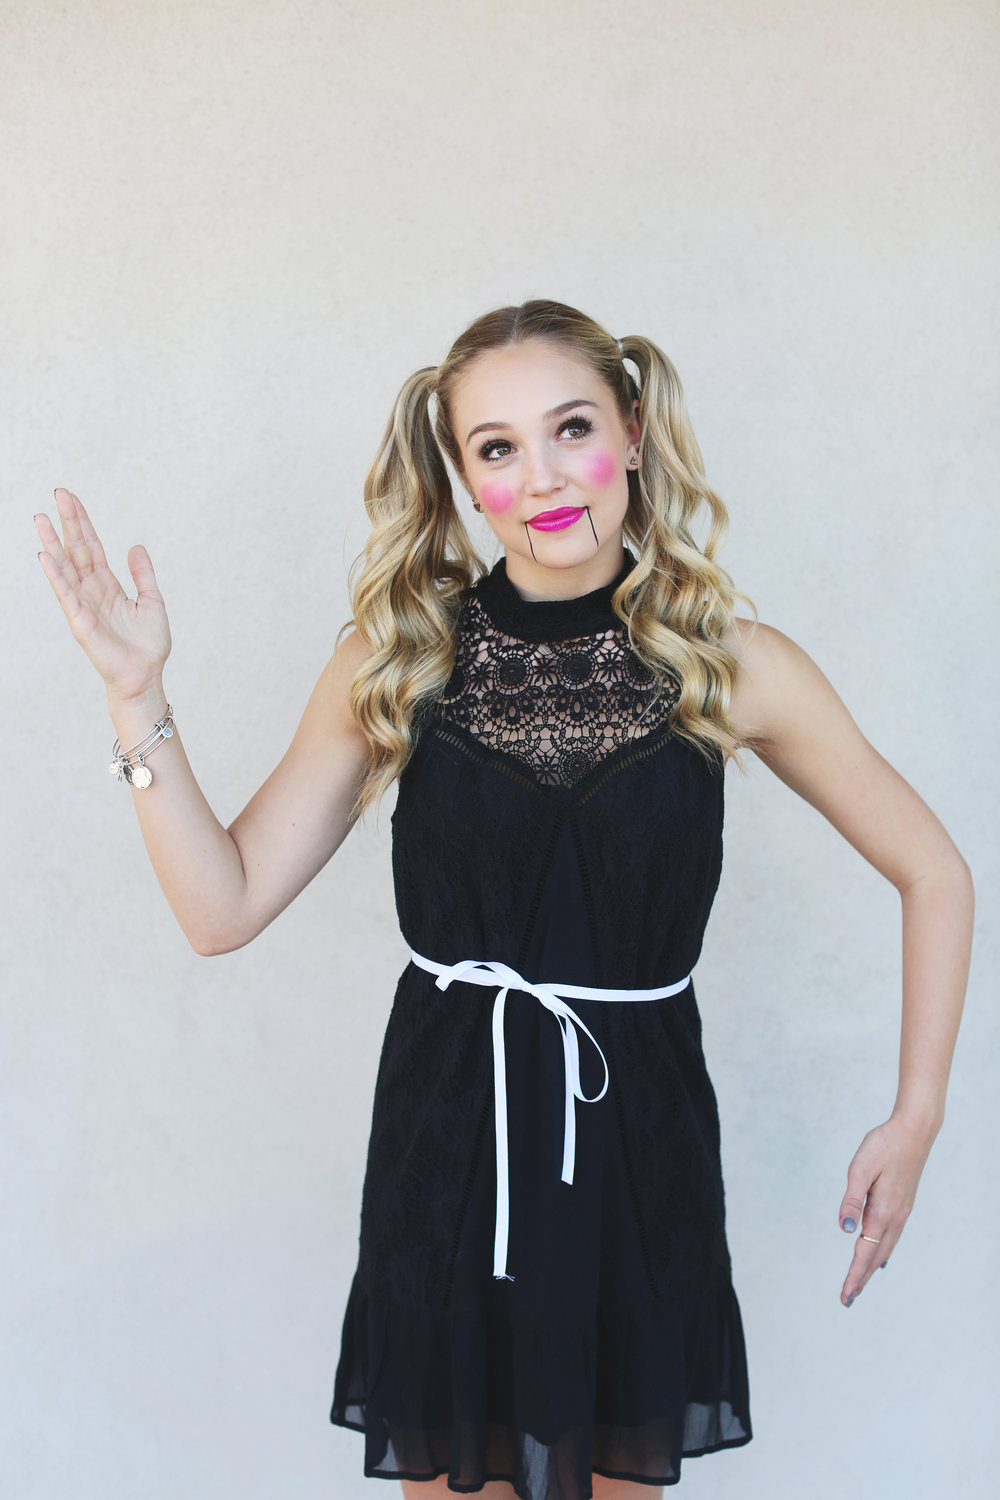
Forget buying a costume! For me, the best part about dressing up for Halloween is making your costume yourself! Here’s a super easy DIY and chances are you have most or all of these things already! Here we go…
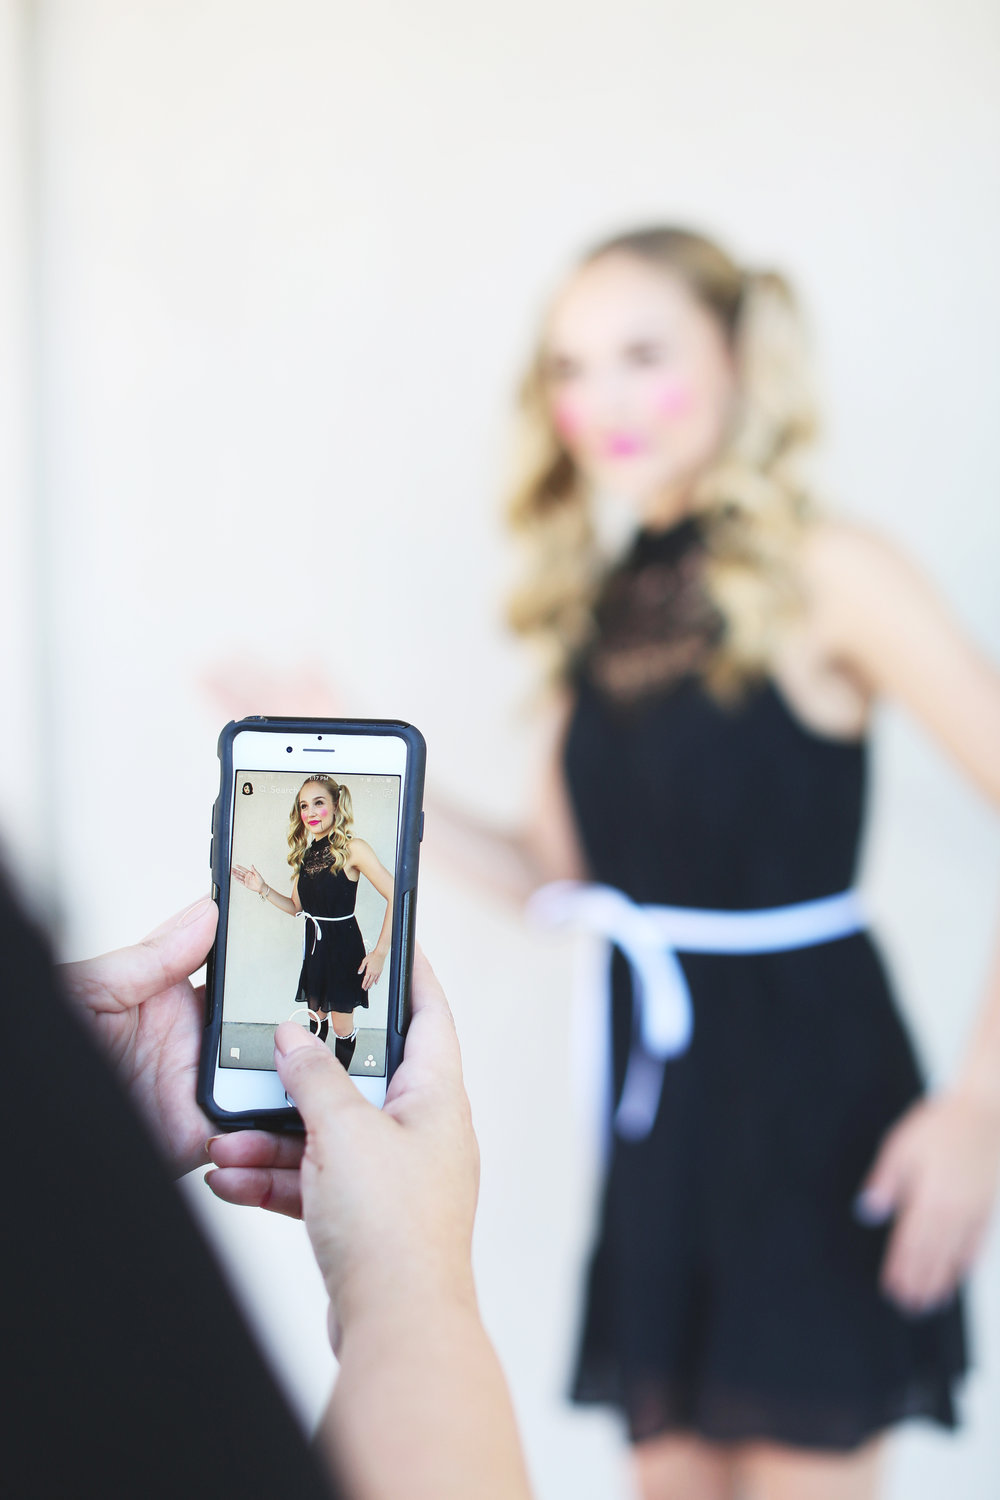
This look is selfie worthy for sure!
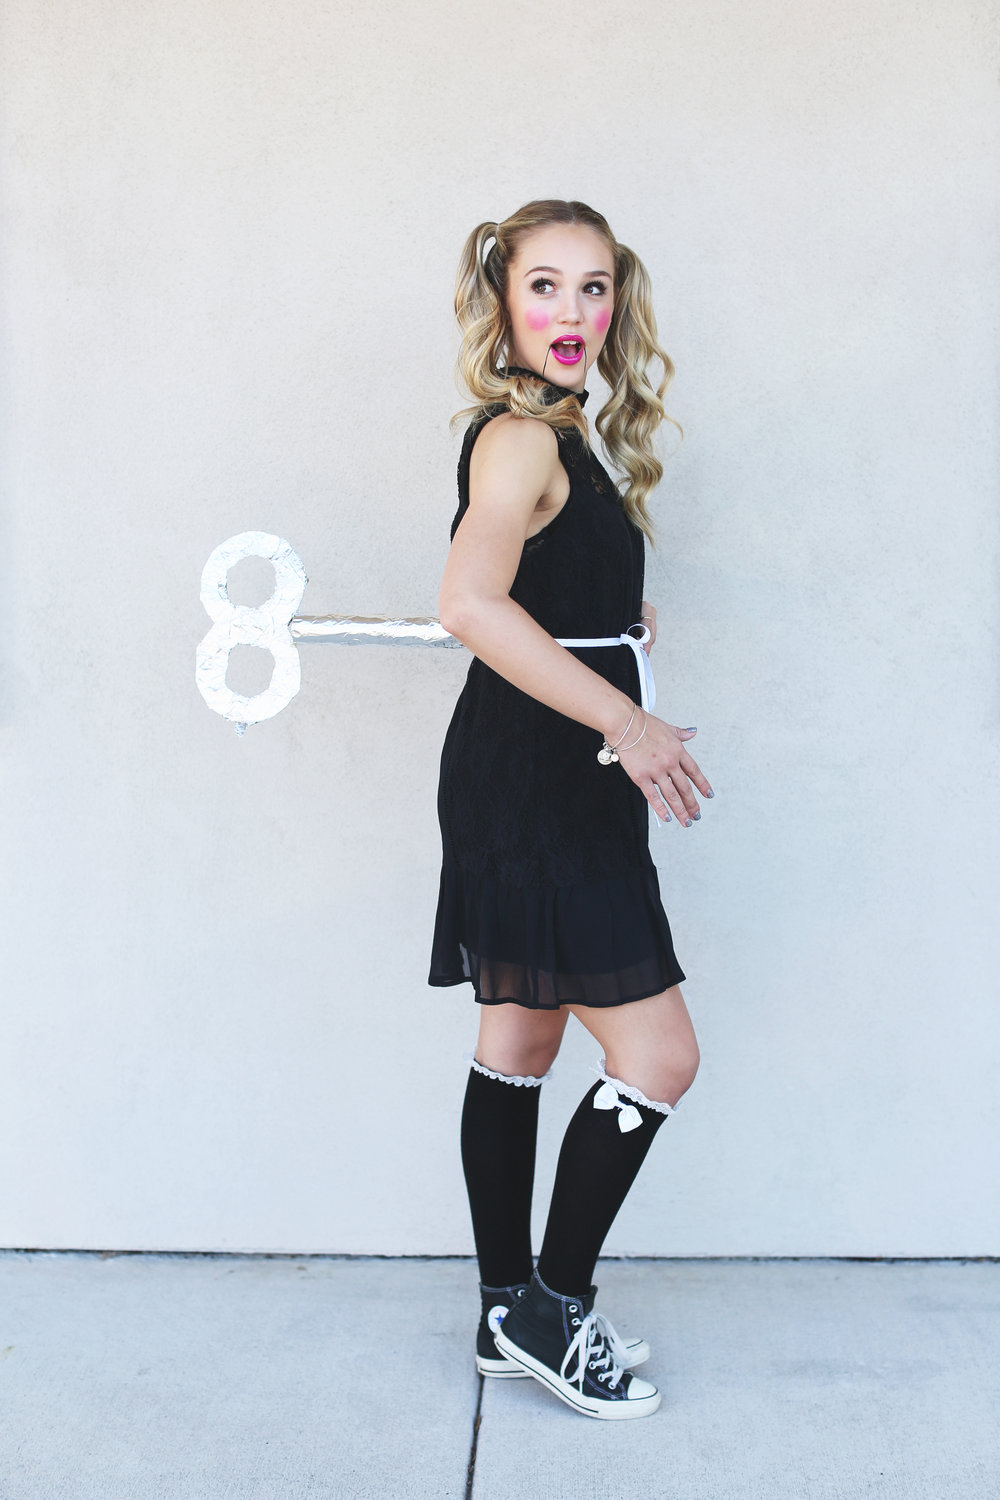
Ok so first things first, you’re going to have to make the wind-up key! It’s fairly simple. You’ll need: an empty paper towel roll, a piece of construction paper or cardboard, ribbon, aluminum foil, and some kind of glue {hot glue is best since it dries instantly!}.
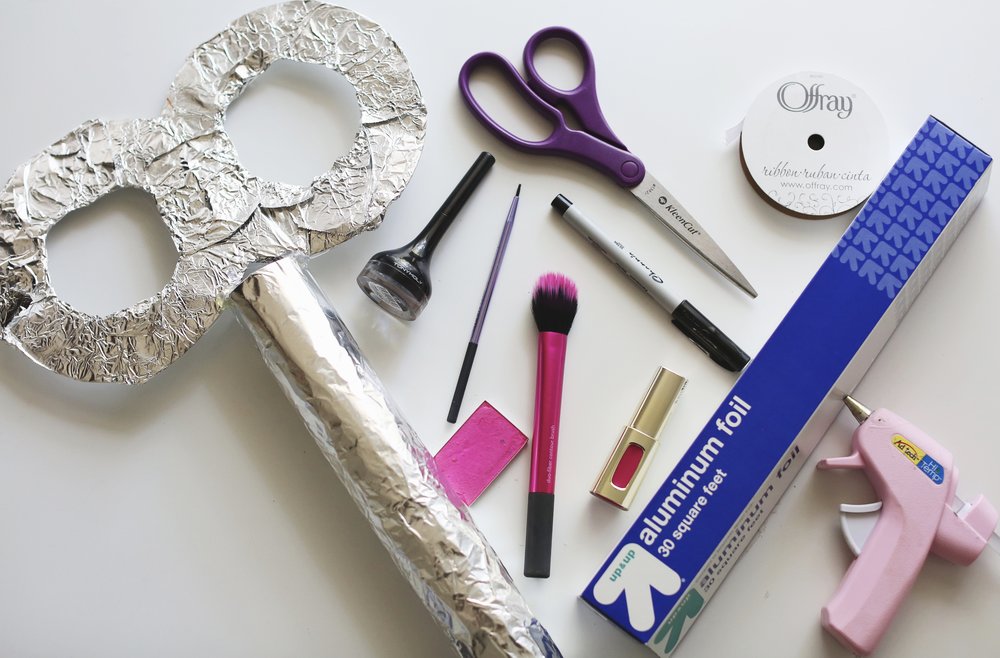
Here’s a little peek at the makeup and supplies you’ll need.
1. Cut a figure 8 out of the paper. Then cut out smaller circles in each end, so it looks like a giant number 8!
2. Cover the 8 and the paper towel roll in foil.
3. Hot glue them together to make the key shape.
4. Punch a hole on each side of the base of the paper towel role and thread the ribbon through.
5. Be sure to cut the ribbon long enough to wrap around your waist and tie a bow!
6. Side note: depending on the materials you use, the key may be heavy and sag after a while. If it does, you can tie ribbon or fishing wire to the key and attach it to your straps or shoulders to distribute the weight.
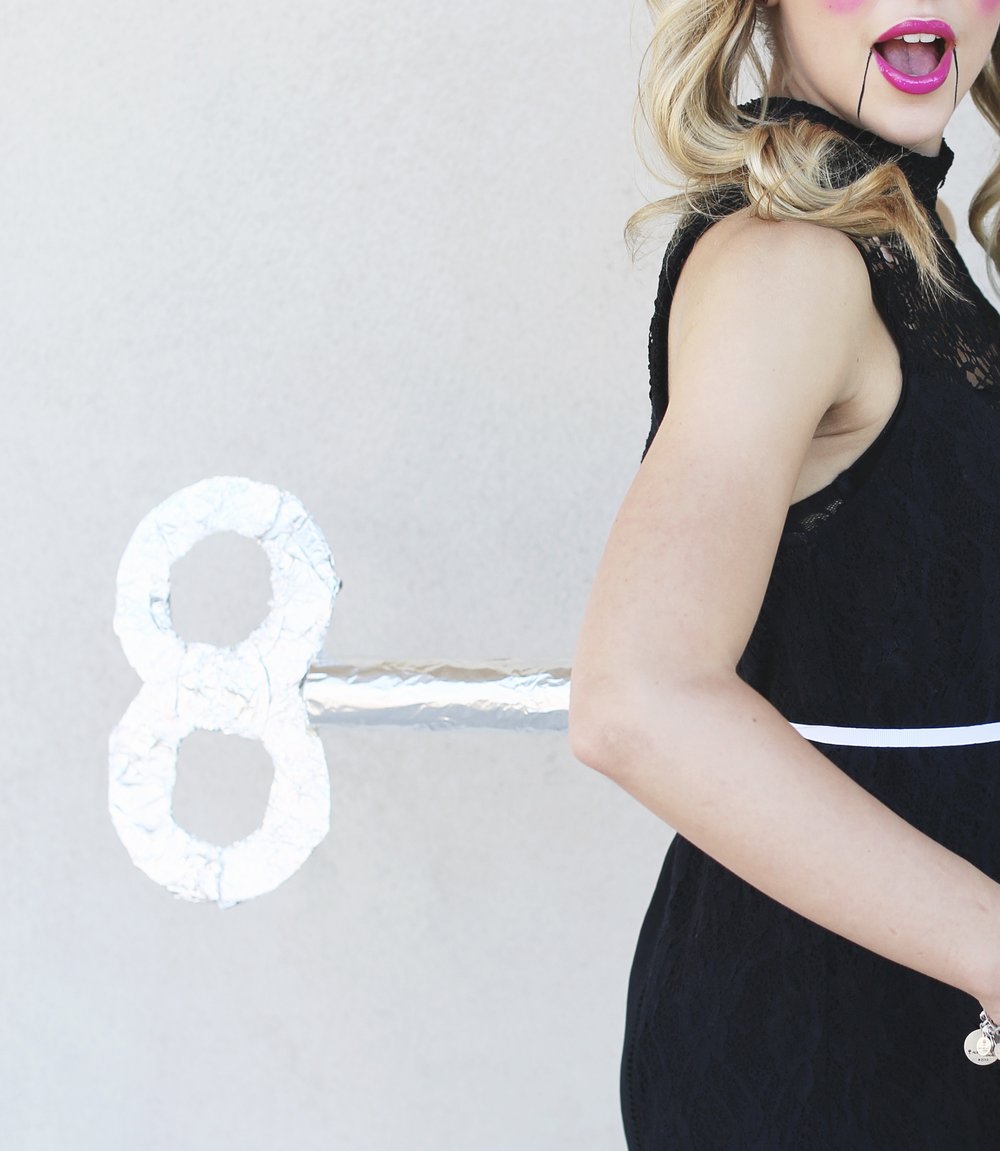
Here’s what the key should look like! Be sure to put on your favorite short length dress! Bonus points if you have knee highs!
Cute hair is a must!
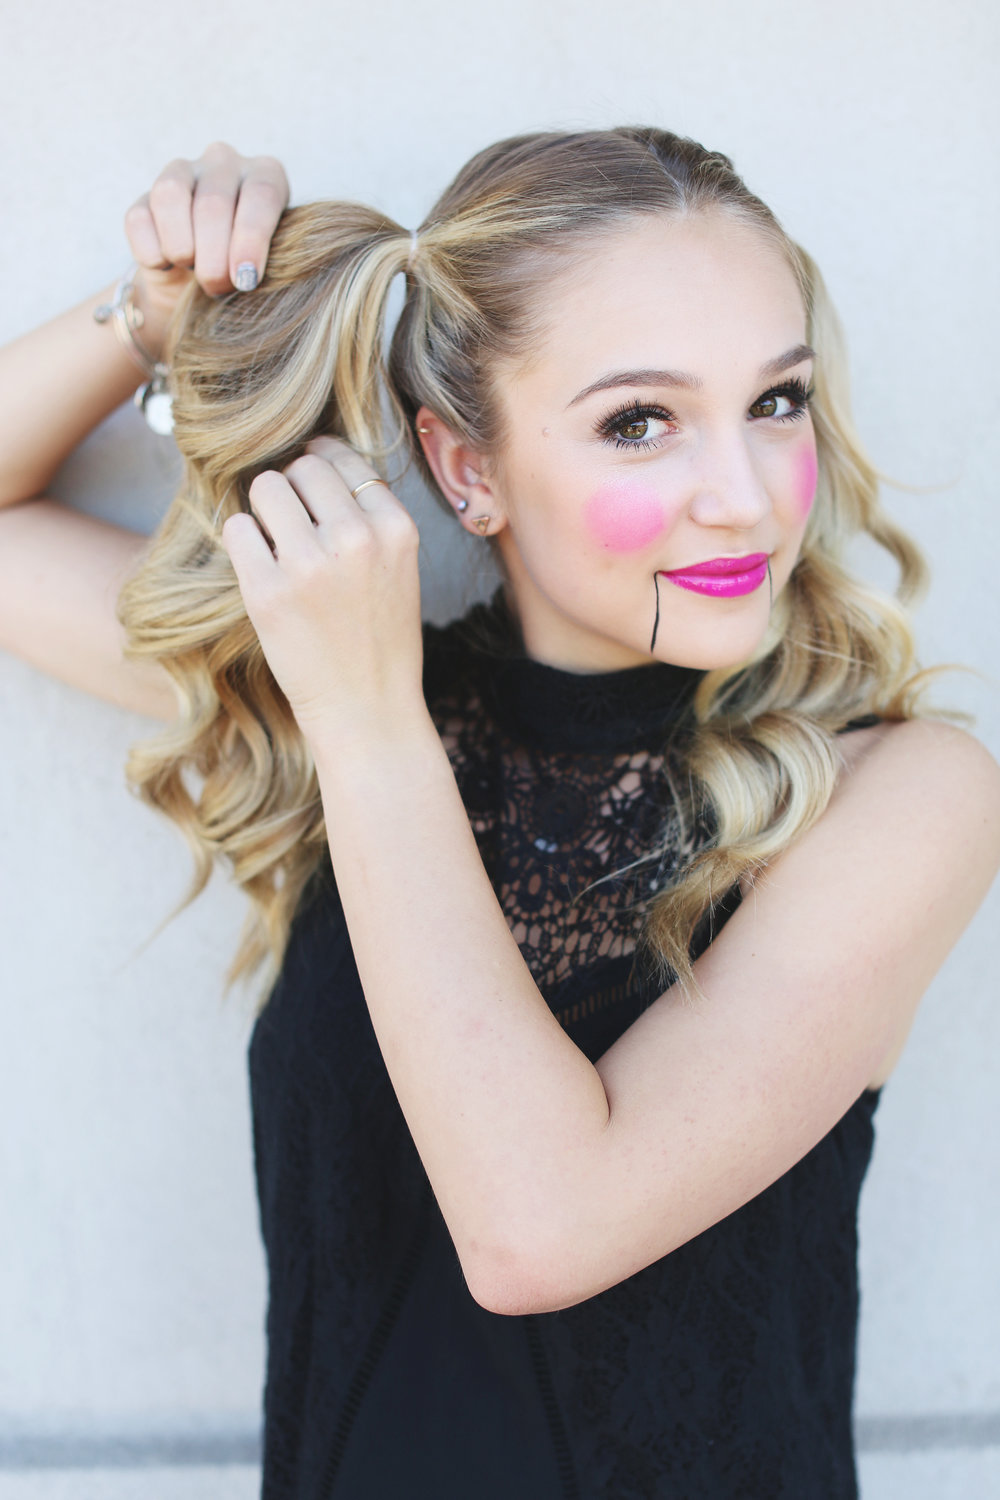
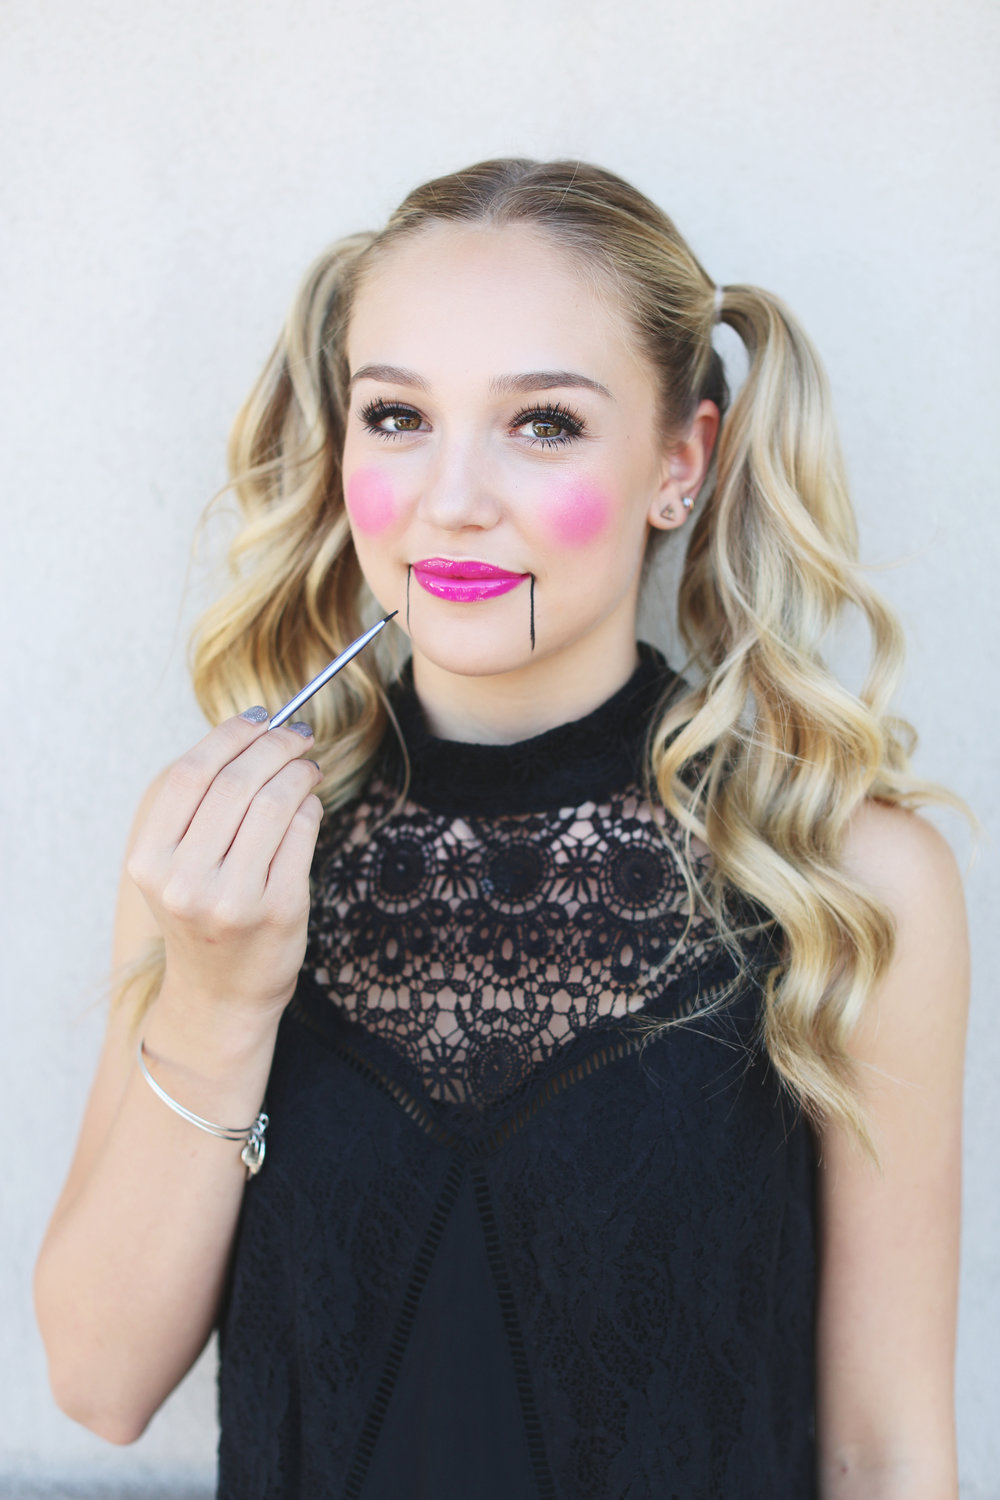
Ok so now for the look…put your hair in pigtails!
Now for the makeup…
Use black eyeliner and draw “marionette” lines around your mouth connecting the corner of your lips to your chin.

Bold bright lips is key! Think pink!

Circular bright blush finishes off the doll vibe! As far as the rest of your makeup goes, just do it the way you’re comfortable doing! Add lashes for extra flutter if you’re feeling bold!
Here’s the final look! So fun right?! Easy peasy DIY.
Special thanks to the lovely Taylor and to Indulge Beauty Studio for the awesomely rad photos of this look!
Try it out and tag us {@polishandpout} on IG so we can see your version of this fun look!
October 12, 2017
P&P Stylist Ashley Aspenlind shows us your not so average pony tail…taking it from girlie to glam…rockstar worthy for sure!

Start by gently teasing down the center of your head in three sections, setting with hairspray as you go. We are going for mega volume and texture.
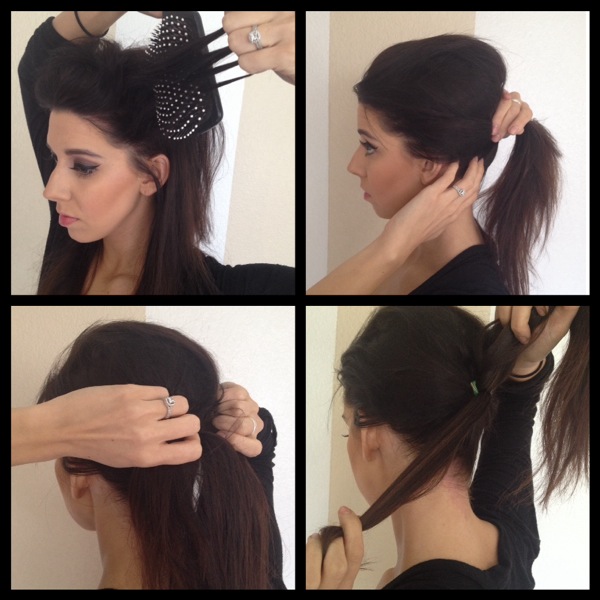
Tease the sides now in a backwards motion.
Then gather your hair into a pony tail, gently smoothing the hair back. Make sure you secure the ponytail tightly so you don’t loose the volume you created.
Grab a small section of the pony tail and smooth it.
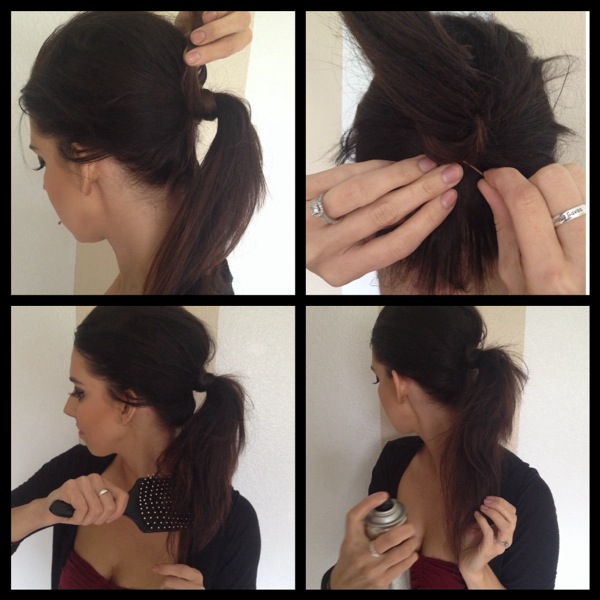
Take the separated piece and wrap it around the ponytail. Secure the end with a bobby pin. Push the bobby pin from the underside of the pony directly up and into the hair…it’s essentially hidden in the ponytail behind the hair band!
Tease the ponytail for extra drama and set with hairspray.
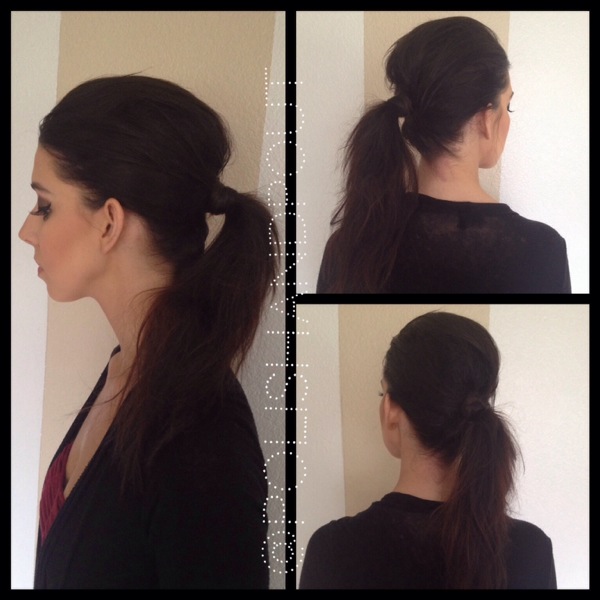
There you have it! It’s girly with an edge…and I love the mega volume!
Cheers to Being Girlie, Glam, and Anything But Average,

February 17, 2014
Not washing your makeup brushes regularly: this is a super common mistake that even I am guilty of! This is so bad for a number of reasons…oils and bacteria from your face attach to the brushes you use and can affect the quality of your skin!

Many times when I break out I look at the area of my breakout and ask myself what brushes do I use on that area? When was the last time I deeply cleaned my brushes? More times than I care to admit poor brush care is to blame! Also, the better you treat your brushes, the longer they’ll last. And the cleaner your brushes are, the less likely the oils and bacteria from your face will break down the products you use. 
Washing your brushes every other week at least with something antibacterial will have a huge payoff! Make sure you lay them flat to dry so the water does not creep up the handle and split or damage the brush!

Want to know what to wash your brushes with? Watch the tutorial below for a DIY brush cleanser recipe! Want to expand your brush collection? Me and fellow artist Lindsey will give you the low down on where to splurge and where to save when it comes to brushes…
Cheers to Brushes, Brush Cleanser, and Breaking those Bad Beauty habits,

January 8, 2012

