

Winged liner is one of my favorite looks! It’s a super quick way to look done up without having to bother with tons of eyeshadow. Whether its a subtle wing or a dramatic bold line…the list of occasions to rock this look at is endless!
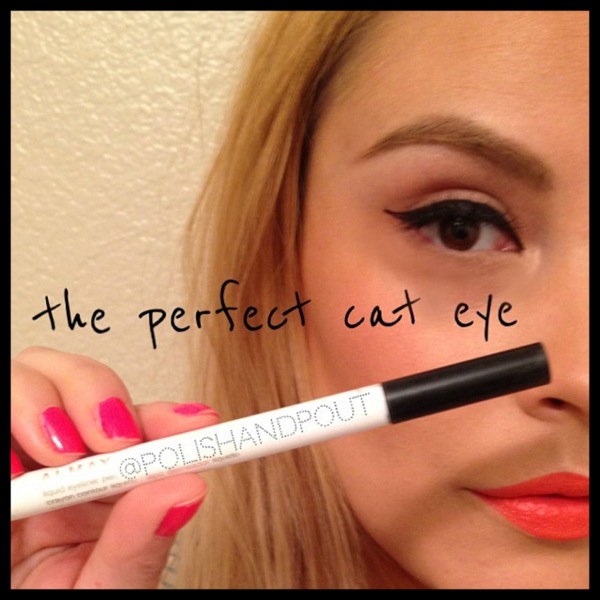
Liner can be tricky…and the old saying “practice makes perfect” definitely applies in this instance as well. But here are a couple of simple tricks that will make your cat-eye so much easier to achieve!

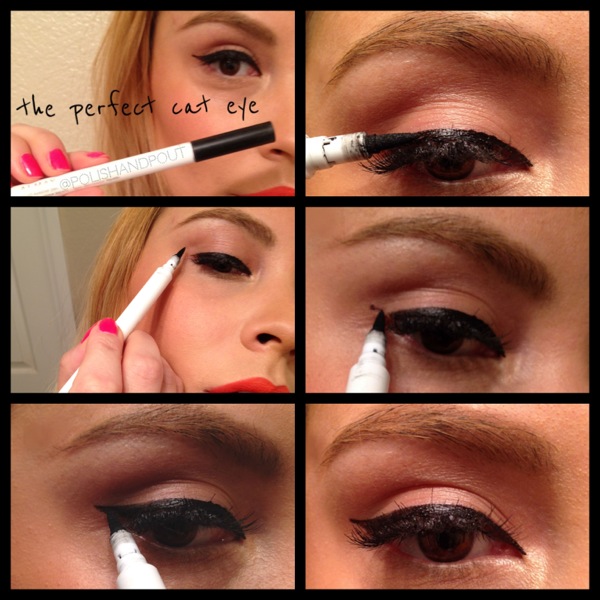
The biggest tip is to do your normal liner first, then TILT YOUR HEAD BACK to do the wing! If you close your eye or pull at your lid it will end up being in the wrong spot or at the wrong angle…not to mention it will be almost impossible to get your eyes to look even.
Find the spot you want your liner to end at draw your wing towards your eye. It may be instinctive to flick your liner out, but it will be so much easier drawing your wing in reverse. Then just connect the edge and fill in as necessary.
There you have it! Such a great technique to add to your repertoire for Fall!
Cheers to Practice making Perfect, Eyeliner, and Fall (it’s almost here!),

August 28, 2013
Ombré everything has been a big trend for a few years now and I am loving the look as nail art too! Here’s an easy way to get an ombré mani…it’s very simple, the bulk of the work really is in the clean up.

A couple of tips:
– Don’t rub the sponge on the nail, that will remove the polish. Just press in an up and down motion.
– When you load the sponge, if you apply it a similar width as your nail bed, the clean up will be minimal.
– Reapply polish to the sponge as necessary
– Repeat application until you reach the desired opacity. But wait a minute in between coats so you don’t remove the previous layer with your sponge.
– Your clear coat will smooth out any texture, so don’t wait for your ombré to dry before applying the clear coat.
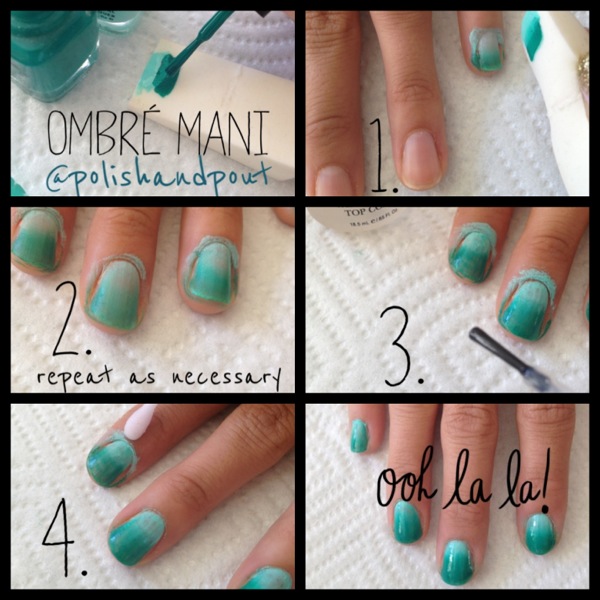
Give this a shot and let me know how it turns out! The color possibilities are endless!
Cheers to Mani’s, Ombré, and Trendy Tips,

August 26, 2013
If you follow me on Instagram(@polishandpout) you know that my 3 great loves are lashes, lipstick, and nail polish. As I was painting my nails last night I marveled at the fact that for about 7 years straight I painted my nails the same color! I also recalled that 3 years ago I decided to change that because of something that happened to me at work (when I worked at a makeup counter). I posted the story on Facebook (I wasn’t blogging at the time). So I thought I’d share it with you along with P&P’s favorite nail looks lately…perhaps it will inspire you to branch out from your usual mani too!
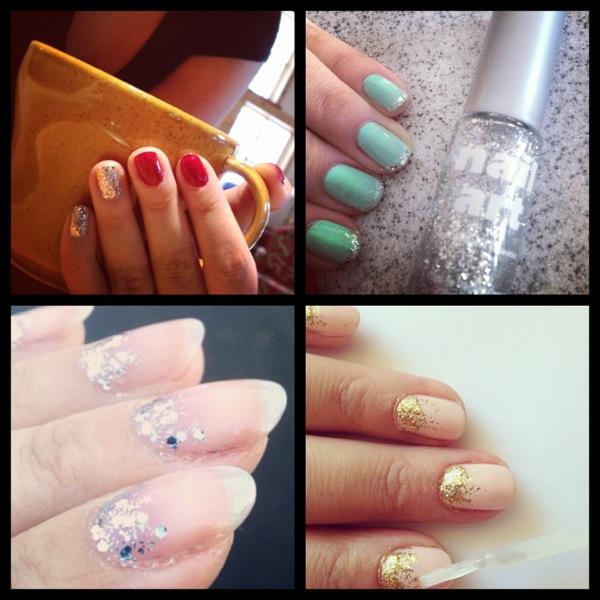
Glitter, glitter, and more glitter. All over, as an accent, tips, fade, outline…you name it!

Neon and colors so bright you can practically see your nails in the dark!
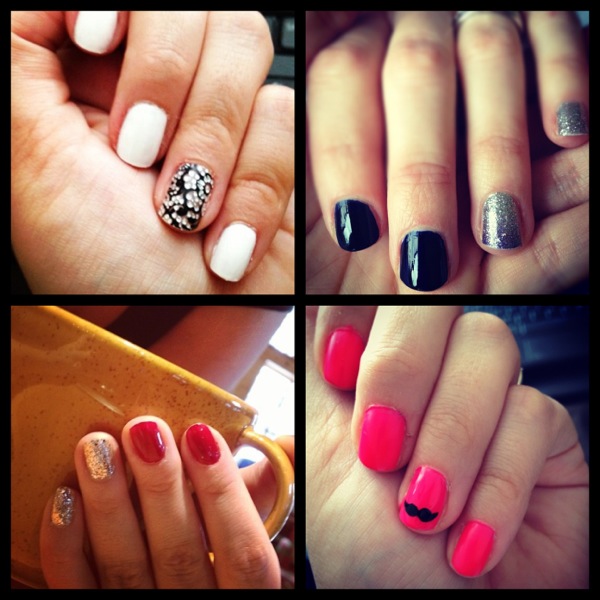
The accent nail is still alive and well…if you’re like me and the big bulky nail gems and plastic flowers et cetera seem cumbersome then opt for decal or paint accents!
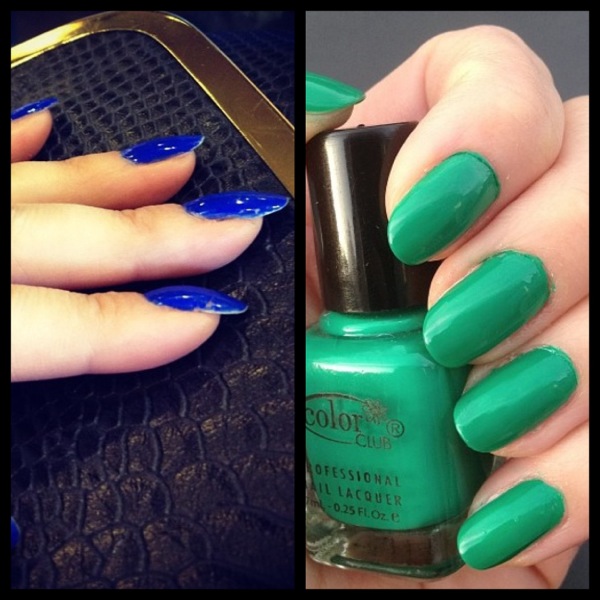
Bold colors and bold lengths! Sporty and square nails are WAY OUT and have been for a LONG TIME. As in, do not touch square with a ten foot pole. Almond, rounded, and stiletto nails are dominating trend and will continue to do so for a long time I’d wager! Don’t let the length scare you, you can rock the current shape short too!
If almond nails are still uncomfortable for you, start with a rounded edge. Think natural in shape. Baby steps. And do yourself a favor and watch a Marilyn Monroe movie or something from that era, pay attention to all of the lovely starlets nails…you’ll be on board with rounded nails after I guarantee it!
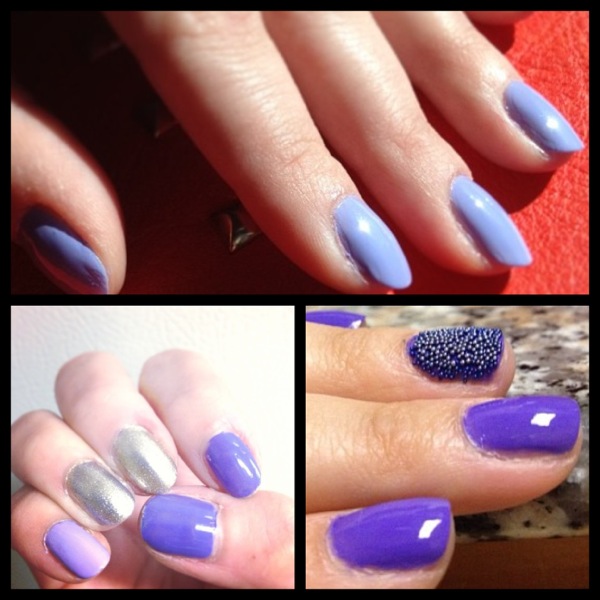
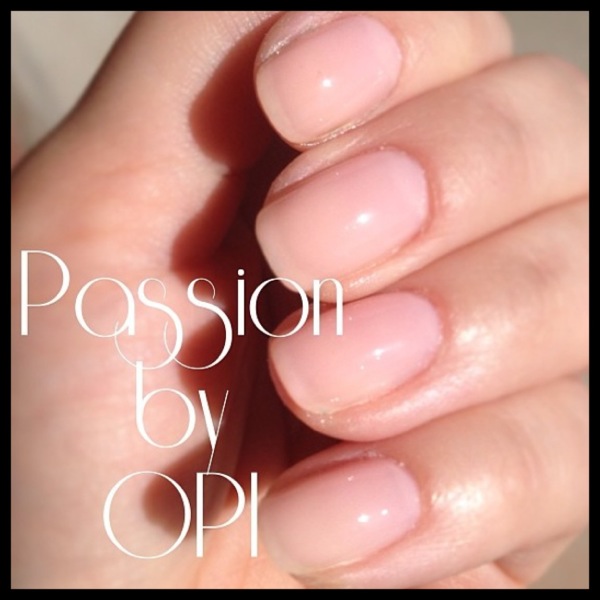
I’ve been crushing hard on pastels and lavender especially…light purples too!
Maybe you’re stuck in a beauty rut like I was: “The other day I complimented a coworkers nail polish…it was a gorgeous shade of teal. She responded by offering to loan it to me so I could paint my nails the same color. “Oh no thank you, I usually paint my nails black,” I said. She asked how long I’ve kept my nails black for, so I told her about 6 years or so. She looked at me like I was nuts and said, “You HAVE to get out of that rut!” I brushed off her comment at first, but then later that day I had an epiphany. I saw someone who had apparently stepped out of a time machine. You know the type: mullet-like hair with big bangs, hot pink lipstick, blue eye shadow, a skirt that is older than her children and shorter than it should be. She looked like she was an extra in an 80’s teen flick, but worse because while she had continued to age, her appearance screamed “It’s still 1984, right?!” Was this to be my fate? I looked down at my nails and suddenly they were mocking me. I do need to get out of my rut! So the next chance I had I picked up a bottle of white nail polish. It seemed the natural choice since it’s the exact opposite of what I normally wear. I must admit, it looks pretty chic. I highly recommend white polish for spring and summer. And while I most likely will return to my black polish in the nearby future, this week I changed my beauty destiny and proved to myself that I will not be stuck in the past! Now I just need to figure out what to do with my mullet…”–April 22, 2010
Cheers to Mullets, Manicures, and Changing your Beauty Destiny,

August 13, 2013
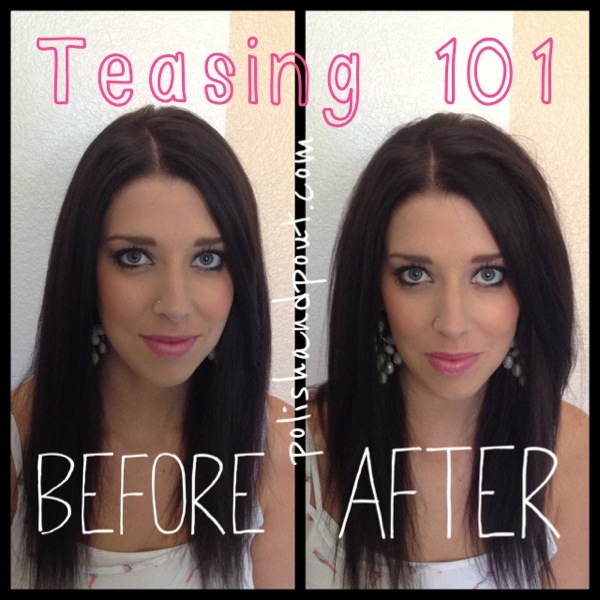
Whether you wear your hair up or down, curled or straight, one thing that’s for sure is no one wants flat-stuck-to your-head hair. Volume is key! Some simple teasing can take your hair from flat to amazing in a couple minutes. P&P hair stylist Ashley shows us how.
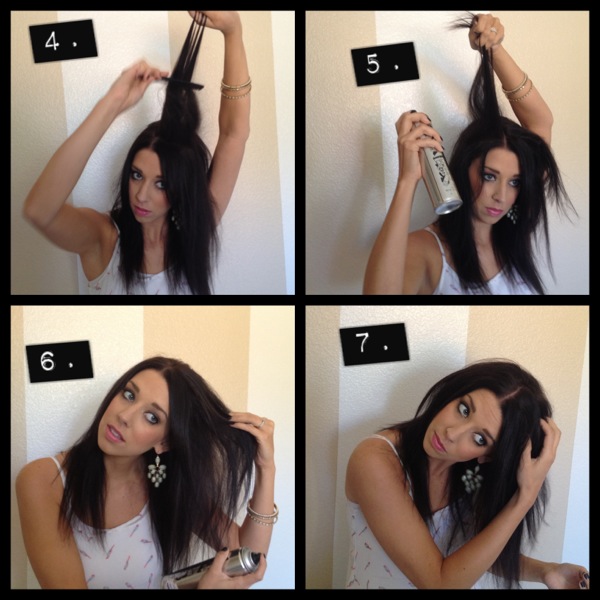
Tools: Grab a comb and some hair spray. You’re going to tease your hair in 3 sections, 2 layers each. On the back half of the crown of your head and on either side of your temples.
1. Lightly spray your first layer on the back section.
2. GENTLY, comb your hair down towards the root. Don’t be super aggressive.
3. Move up the section of hair as you comb down. Repeat in 2 layers in that first section.

4. Repeat in two layers on either side of your head. Sometimes only teasing one layer in each section makes the hair look flat and table like. 2 layers in each section will give the right amount of lift.
5. Remember to spray as you go…but lightly.
6. Fluff the ends of your hair a little so your volume isn’t isolated to your roots.
7. Smooth out your hair with your fingers or a comb…be careful, you want to smooth it but not get rid of the volume you created.
You know what they say, the higher the hair the closer to God!
So Cheers to Hairspray, Height, and Hair to the Heavens,

August 6, 2013
Allow me to introduce you Jenn: world traveler, professional horticulturist, and the genius behind Garden Apothecary.

Awhile back Jenn sent me the loveliest package of treats. P&P artist Maya was with me when it arrived and we both were over the moon about how everything looked and smelled! What is so great about Garden Apothecary is that all of the amazing products are organic and hand-made in Half Moon Bay, CA.
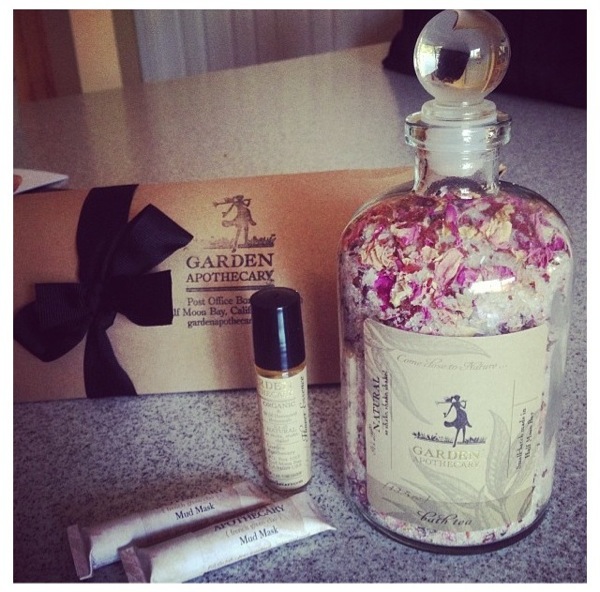
That evening I rolled on the flower essence oil…smelled so lovely!
The French Green Clay Mud Mask made my skin feel squeaky clean. It comes in powder form, so you just add water. What? You don’t make this face when you do a mud mask?! The hubby said I looked ridiculous…perhaps, but my face was baby-butt smooth after so who cares!

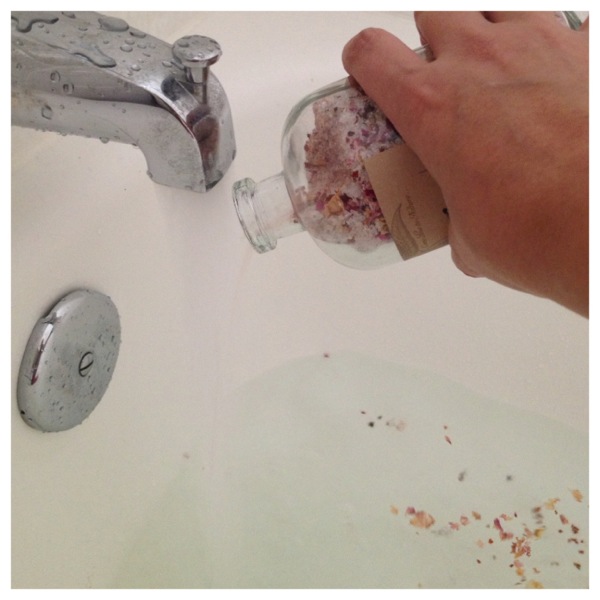
The product I was most enchanted with was the Bath Tea…the bottle looks so good on my counter (I’m such a sucker for packaging!). When I drew myself a bath the aroma of rose was intoxicating!
Jenn is so inspiring! Whether its seeing her craft her beautiful products, taking a peek into her garden, or hearing about her far off adventures…you won’t wanna miss a beat on her blog or Instagram (@gardenapothecary)!
Garden Apothecary has a treat for P&P readers: From now through August you can get $4 off the 4oz. Lavender Face and Body mist (normally $12.50) by using the code “polishandpout” at checkout! And shipping is free on orders $60 or more! Happy shopping everyone!
Cheers to Gardens, Baths, and Organic Goods,

July 30, 2013
Meet my friend Christi of Christi Reynolds Makeup Artistry! With over 17 years of experience in the beauty industry, she is the definition of a pro! Her skill and expertise have helped me both personally and professionally…in fact, Christi is the makeup artist I hired to do my makeup for my wedding 6 years ago! (See! EVERYONE needs to hire a professional makeup artist for their big day!)
I love Christi’s style of artistry…with a focus on complexion and a fresh aesthetic, her artistry really lets the person shine! I’m so thrilled she is sharing some of her must-have products with all of us! Here we go…

1. Elf eyelid primer: “This sheer formula doesn’t interfere with the color or texture of your shadows…use it and nothing will budge!
2. Benefit’s High Beam and Benetint: “I love to mix them together! Looks good on every skin tone and gives a natural healthy flush. Instant red carpet glow!”
3. MAC Mineralize Skin Finish: “I love this powders beautiful coverage, it’s not too much, and provides subtle luminosity! Great for setting foundation.”
4. Clarins Beauty Flash Balm: “Love it! I reach for this when I know that my skin needs that wide awake, fresh, just had a facial look! Instantly snaps my skin back from looking dehydrated.”
5. Lingering MAC brow pencil: “This is super precise so you can mimic the natural shape of the brow hairs.”
Christi sums up her beauty philosophy well,”I like to make-up, not make over. I like to correct, define, and enhance…enhance…not create! There’s a difference.”
So Cheers to Correcting, Defining, and Enhancing,

Beauty, Beauty Spotlight, Health, industry professional, Makeup, Product review, Products, Shopping, Skincare
July 1, 2013
Happy Makeup Monday everyone! I thought today would be the perfect day to blog a quick trick of mine that I use all the time! It’s fast and easy and can be done a few different ways…it’s the easiest way to exfoliate: sugar! So if you’re not sure which exfoliating products to buy, stuck away from home without your face and body scrubs, or like the more natural approach, then this is for you!
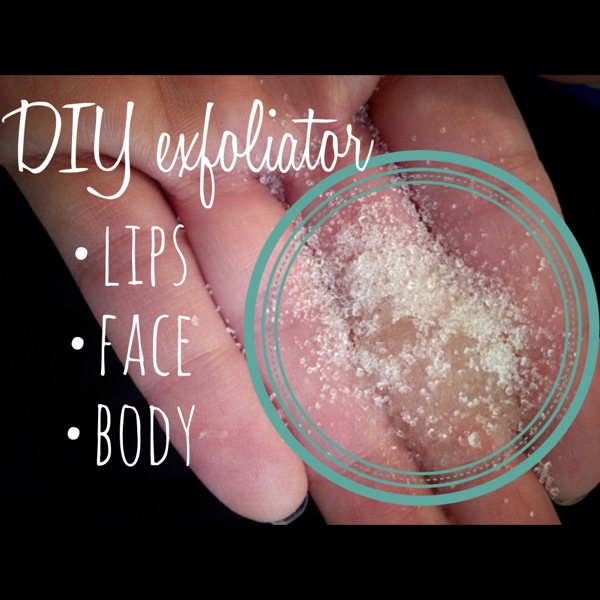
All you need is…sugar! Well, and a little water too. Mix a few pinches of sugar with a small splash of water and create a paste…then scrub onto your face, body, or lips for silky smooth perfection! Sugar is great for exfoliating. Not only is it obviously granular and works fantastic as a manual scrub, but it’s natural properties give you some added benefits! Naturally occurring glycol help with cell turn over…and sugar is also balancing to the skin! Hooray! So easy right?
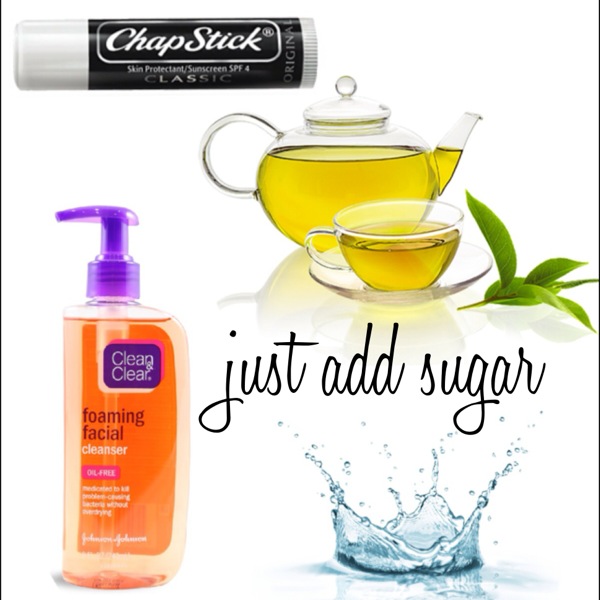
A few variations:
–add a pinch to a pump of your cleanser for a gentle scrub while you clean your face!
–scrape a little lip balm and mix with sugar for a creamy lip scrub!
–brew some green tea and mix with sugar for even more amazing skin benefits while you scrub!
The video below is an oldie but a goodie! Watch it for more info on the benefits for your skin and a bonus easy step for a DIY face toner!
Cheers to Mondays, Makeup, and Skincare!

March 11, 2013
It’s so hard, letting go. I swear I am a bit of a hoarder. I have such a hard time getting rid of things! What if I need it?! And without fail, whenever I get rid of something I find a reason soon after why I should have kept it!
One thing though we just cannot justify holding onto too long is cosmetics: you risk your health in doing so! As time goes on the product warps, breaks down, stops working, doesn’t go on as smooth…and worst of all, collects bacteria. Eye infections, rashes, breakouts? No thank you! So here’s a chart to help you remember when to toss things!

A few more helpful hints:
–Take a small stick on circle and label when you open something if you’re probe to forgetting! Slap it on the bottom and that way you’ll know.
–If you’re unlucky enough to get some sort of infection (like pink eye, a cold sore, et cetera). Do yourself a favor and toss whatever came in contact with it. It’s not worth reinfecting yourself.
–A lot of products have a small symbol showing an “open” jar and a number next to it under the ingredients or somewhere on the box. This number indicates the number of months you should keep it after opening it. Follow that number as products shelf life varies depending on ingredients!
–This chart is just a guideline. Where you keep your products, the temperatures they’re subjected to, et cetera affect their lifespan.
–If something smells funny or off or just wrong, toss it. Just because you haven’t had it too long doesn’t mean it hasn’t gone bad. Often times expired products smell like crayons or playdough or rancid oil. So take a sniff of what you’re using. Any change in texture or smell is not a good sign.
–I really can’t think of anything you should keep more than a couple years, so if you’re past the 24 month mark stop deliberating and toss it!
Hope this was helpful! Remember, when in doubt toss it! Keeping your skin beautiful, and your face infection free is worth it! Just think of it as an excuse to try something new!
Cheers to Trying, Timing, and Tossing,
March 9, 2013
My biggest annoyance on my face is my under-eye area. I’m always puffy and always super dark under there…I can recall in elementary school someone saying I looked like a raccoon because of my eyes (ouch!).
As I’ve gotten older I’ve definitely picked up some tricks to help with this problem. And while I cannot say that these tricks erase them 100% they at least hide them much better and make me feel suitable for public! 😉
Here is my everyday under-eye routine…hopefully it’ll help you if this is a problem area for you too! Now, I’ve included my shades, but every face is different. The steps and types of products will be the same, but the exact shade may vary.

You’ll need:
–A depuffing eye serum (I love Clinique’s All About Eyes! It REALLY helps! Look for something with caffeine in it.)
–A corrector. This essentially neutralizes the colour under your eye. It’s important to neutralize those blueish purple tones/redness etc first instead of just packing on concealer! You’ll be able to use less concealer this way and get a more believable bright natural effect. The general rule of thumb is that peach (or pink) will neutralize. The deeper your skin, the deeper the peach you use. Very fair or pale skin will prefer light pinks. (I’m using Revlon’s Age Defying click pen in #4)
–A concealer. I’m obsessed with Maybellines FitMe concealer. I use #20 Sand. It’s very golden and works perfect for me. Pick something near your skin tone or a shade lighter. Don’t go too light though, that will have the opposite effect and bring bad attention to your under-eye area.
–A brightener. This is optional. If you’re super dark under-eyes like me, this is necessary. Totally up to you. This will help add that pop to your under-eye and cheek bone area and will “distract” and lighten everything up! (I use Flower’s Brightening Concealer in BC2)
–Highlighter. This may be part of your usual routine for eyeshadow already. If not add this step in for an extra pop of light!

1. Yikes! My under-eyes in all their glory! Ha!
2. Apply your peachy (or pinky) corrector

3. After each step of applying more product, use your ring finger (it’s the weakest finger, so it’s more gentle), and gently pat (don’t rub) in the product.
4. Apply concealer in a triangular shape under your eye. You want to bring it a little lower than where your darkness stops.
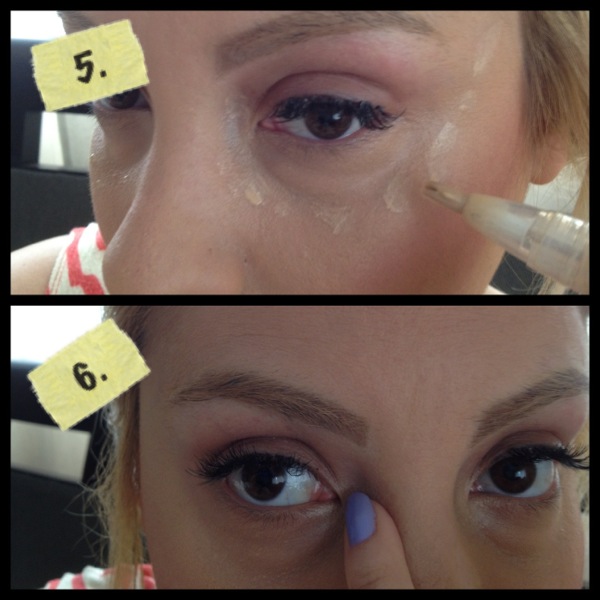
5. Dab brightener along the “seam” of where your under-eye area ends and bring up your cheek bone to your temples.
6. Dab a highlight (anything vanilla colored and shimmery will do!) in the inner socket of your eye.

7. There you have it! So much better, right?
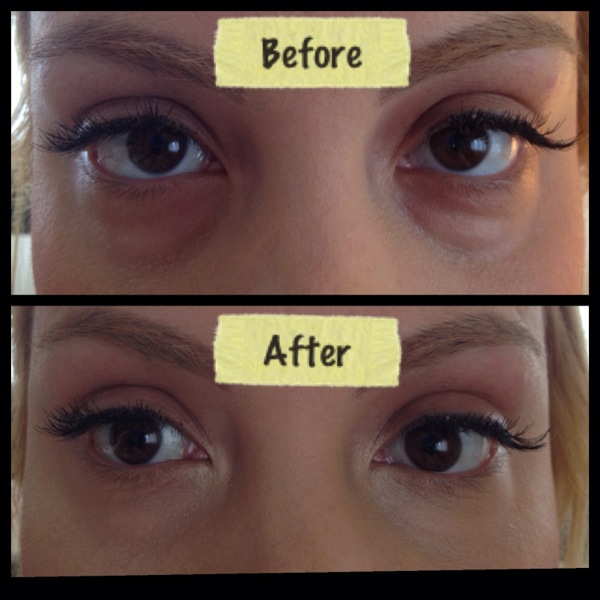
There is the side by side before and after. Hope this helps! Give it a shot and let me know!
Cheers to Correcting, Concealing, and Brightening!

March 7, 2013
Anyone who has had the pleasure the meet Beck Morgan will agree with me on these two things: He is a master at what he does. And he is passionate about what he does. It’s impossible to not catch his enthusiasm when you’re around him!
Beck is specifically an expert on MAC product having been a MAC educator for over five years, training groups of up to 700 people on the latest trends and how to create a flawless look. He loves giving people the skills to get the exact look they want!
As a MAC Cosmetics artist for the past 10 years, he has worked with clients ranging from new brides to celebrities, “Some of my favorites have been Naima Mora and Caridee English of America’s Next Top Model, The Raiderettes, The B52’s and Cyndi Lauper!” Beck is sharing his top 7 must-have MAC products with us today, so grab a pen and add these to your weekend shopping list!
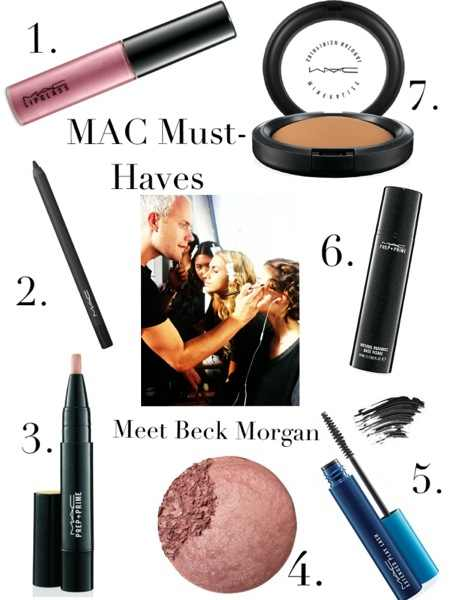
1. Viva Glam VI Lipglass: A beautiful lipgloss with a bronzy base and raspberry shimmer. It looks fab over any lipstick and has enough color when worn alone.
2. Engraved Powerpoint Eyeliner: This liner won’t budge. You can sweat, cry… A bridal must have!
3. Radiant Rose Highlighting Pen: The secret to the Karsashian glow underneath the eyes and to pop the cheekbones that works on everyone.
4. Warm Soul Mineralize Blush: This soft pink and gold blush has the perfect amount of shimmer. Try it, I promise you’ll love it!
5. Extended Play Mascara: This is like Lancome Definicils on steroids. At $16.00 you cant beat it for a department store mascara.
6. Natural Radiance Face Primer: It brightens your complection and makes your foundation glide on like silk. One pump massaged into your skin before foundation, and your skin looks fresh all day!
7. Give Me Sun Mineralize Skinfinish Bronzer: Universal non-shimmery Bronzer that’s gives a golden (not orange) glow any time of year.
“If there is one part of makeup I love most, it has to be beautiful foundation. I always say ‘Skin is who you are, makeup is who you want to be!'”
Well put, Beck!
Cheers to Makeup, MAC, and Beck Morgan,

Beauty, Beauty Spotlight, Bridal, Celebrity, industry professional, Makeup, Musings, Product review, Products, Shopping, Trend
February 21, 2013

