

P&P Stylist Ashley Aspenlind shows us your not so average pony tail…taking it from girlie to glam…rockstar worthy for sure!

Start by gently teasing down the center of your head in three sections, setting with hairspray as you go. We are going for mega volume and texture.
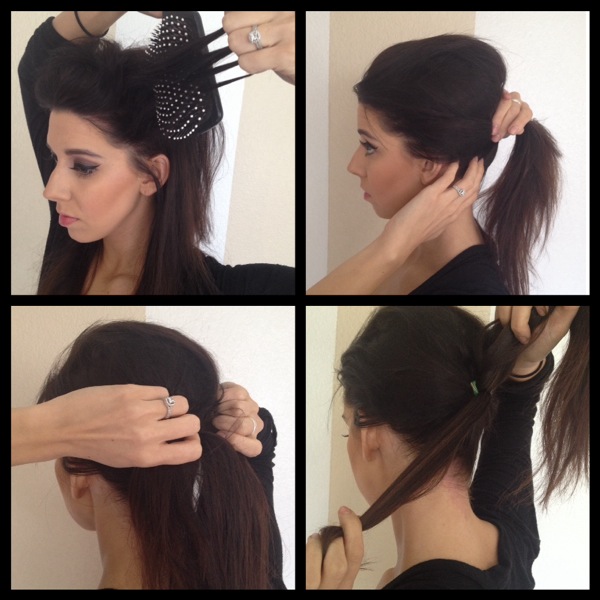
Tease the sides now in a backwards motion.
Then gather your hair into a pony tail, gently smoothing the hair back. Make sure you secure the ponytail tightly so you don’t loose the volume you created.
Grab a small section of the pony tail and smooth it.
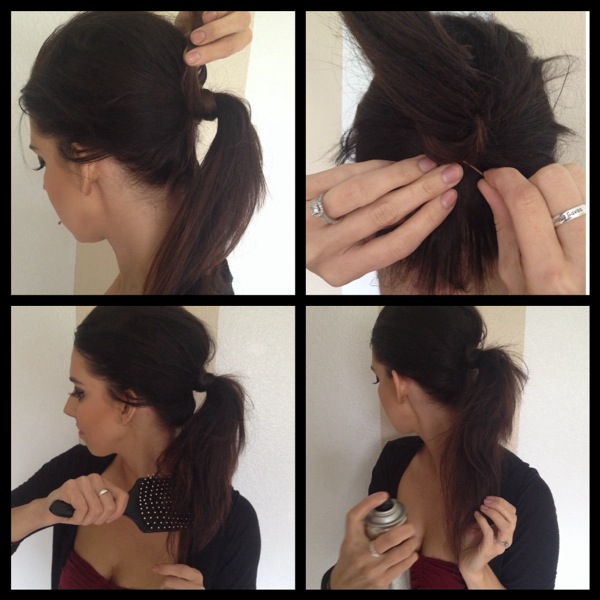
Take the separated piece and wrap it around the ponytail. Secure the end with a bobby pin. Push the bobby pin from the underside of the pony directly up and into the hair…it’s essentially hidden in the ponytail behind the hair band!
Tease the ponytail for extra drama and set with hairspray.
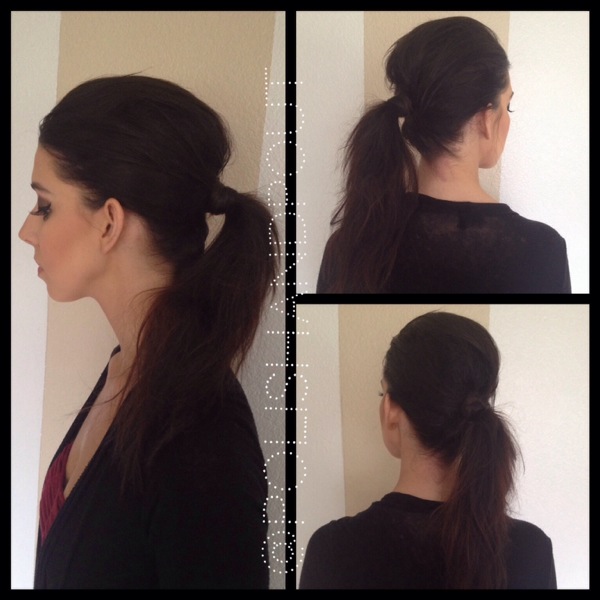
There you have it! It’s girly with an edge…and I love the mega volume!
Cheers to Being Girlie, Glam, and Anything But Average,

February 17, 2014
It’s not Valentine’s Day without kiss-worthy lips…and these 5 lipsticks are the perfect picks this week whether you have a date with someone special, a dear friend, or even just your favorite pj’s!

1. Kate Moss for Rimmel in number 17: the perfect classic pink! Great for a soft daytime look.
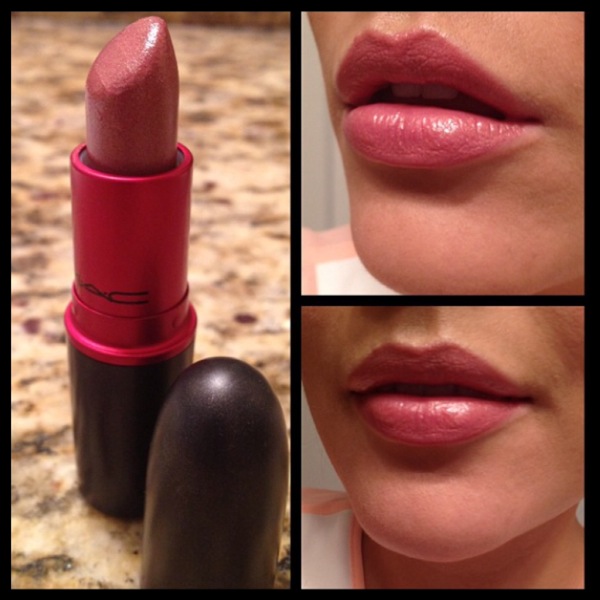
2. MAC Viva Glam V: a shimmery rosy beige, a great compliment to a smokey eye. Added bonus, the full price you pay goes to charity!
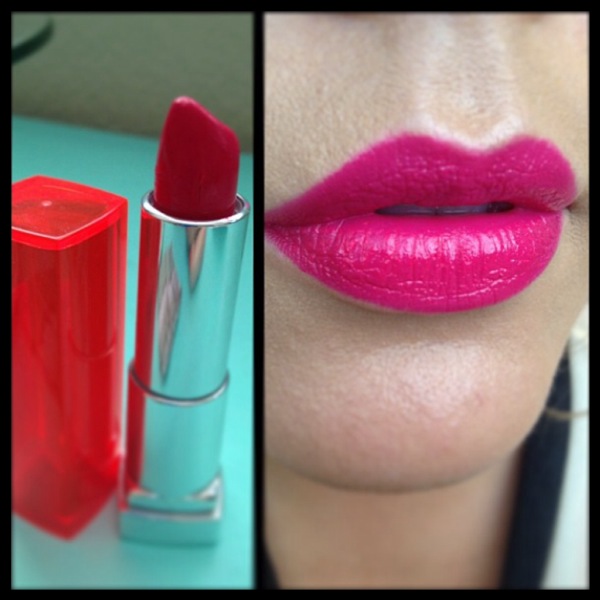
3. Vivid Rose by Maybelline: Ok, so not so much great for a date…but going out with your friends, or feeling sassy? This lippy packs a punch!
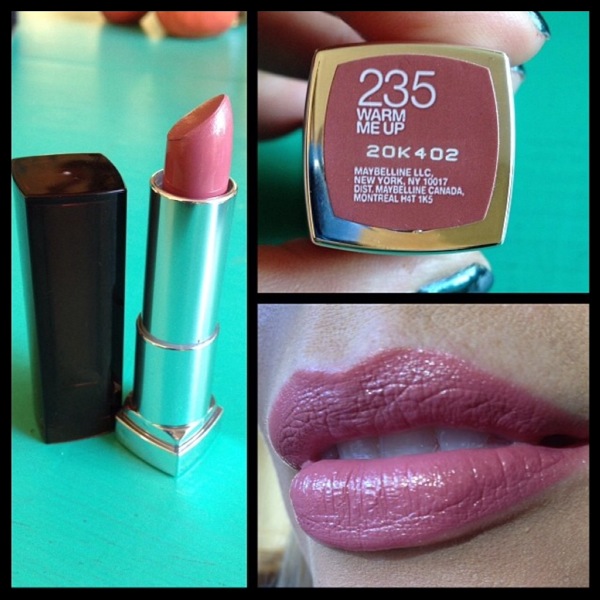
4. Warm Me Up #235 by Maybelline: the name says it all.
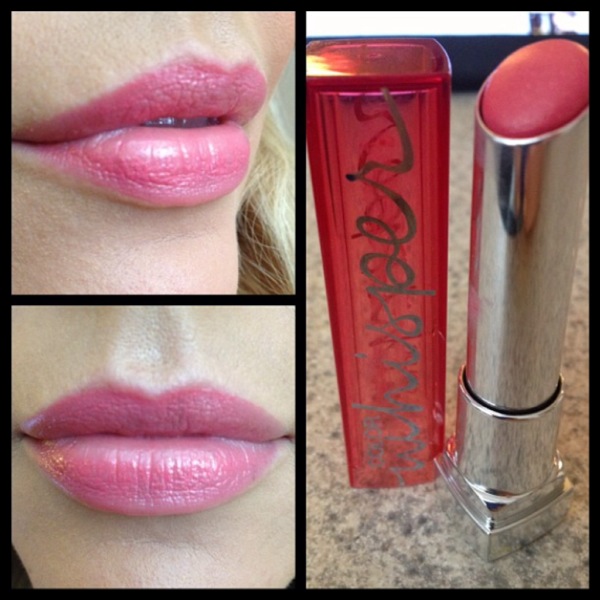
5. Color Whisper by Maybelline in Pin up Peach: a sheer hydrating wash of color for a low maintenance girlie touch.
Happy Valentine’s Day everyone!
Cheers to the Perfect Pinks for your Pout,

February 12, 2014
This month it seems that pinks, berries, and reds are on the brain…along with hearts and glitter. While I may not make homemade Valentine’s cards anymore, I still find a way to flex my Valentine’s Day creative muscles! Here’s a soft girlie look to try this V-day…or any day for that matter!
1. Prep your eyes with a good primer.
2. Sweep a matte vanilla shadow on your brow bone.
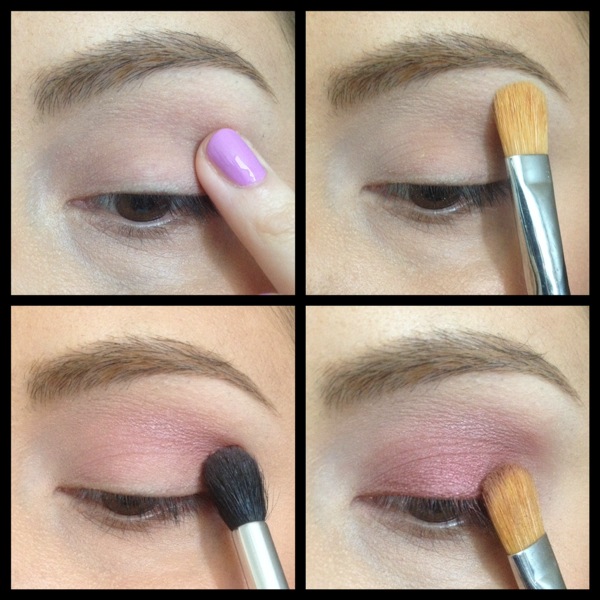
3. Using a windshield wiper motion, apply a soft pink shadow in your crease.
4. Pat a shimmery cranberry shadow all over your eyelid.
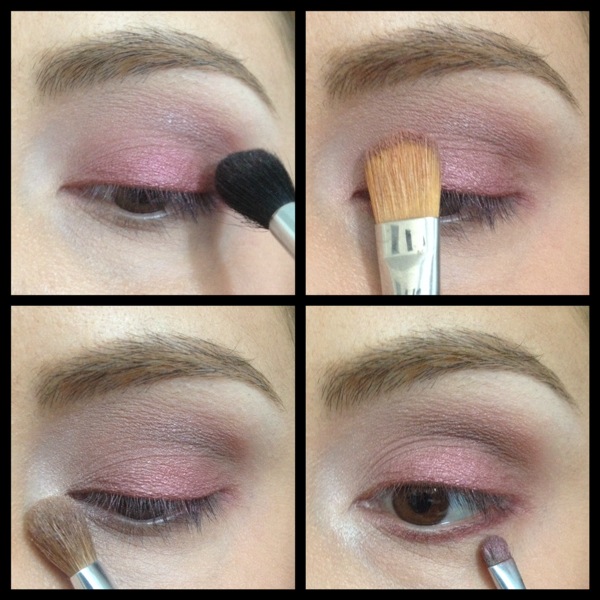
5. Blend a soft brown into your crease so everything is seamless!
6. Pat a shimmery light pink shadow on the inner third of your lid.
7. Add a pop of shimmery vanilla in your inner socket.
8. Line your lower lashline with the same frosty cranberry as before.
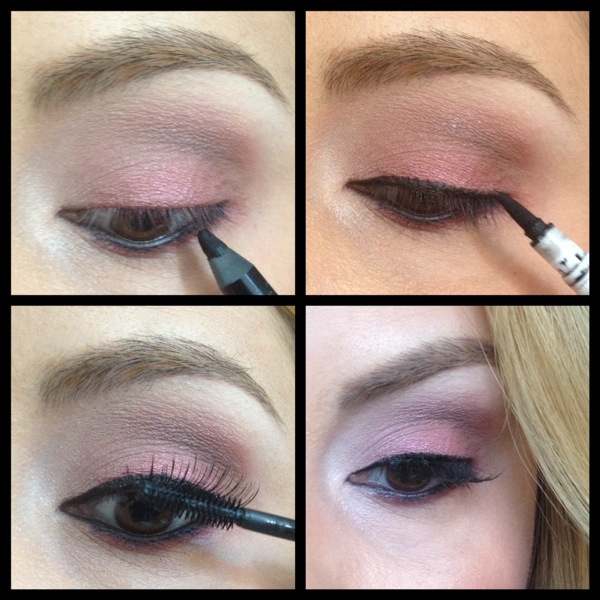
9. Use black pencil to line your waterline.
10. Line your upper lashline too, I opted for a slightly bolder liquid liner.
11. Curl your lashes and finish with mascara (bonus points if you add false lashes!).
Voilá!
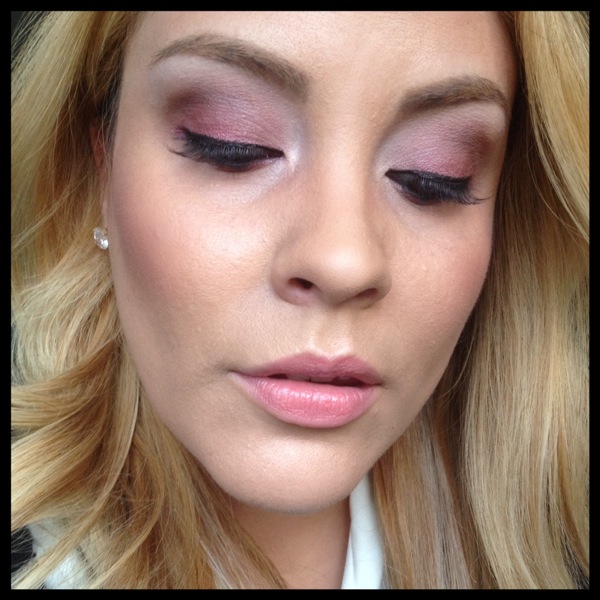
Products used:
Naked Basics palette by UD
MAC shadows in Girlie (pink) and Cranberry
Rimmel Scandaleyes liner in black
Almay liquid liner

Cheers to Pink, Reds, and Valentines,

February 11, 2014
I absolutely love fishtail braids! It is my go to style when I want to look polished in a flash…I typically do them to the side and with volume so I don’t feel like I’m bald…plus I mean what’s the point of an intricate braid unless you get to enjoy seeing it too! I posted this look from a recent shoot on IG (um are you following me? Get on it! @polishandpout) and the consensus was that we needed to post a tutorial.
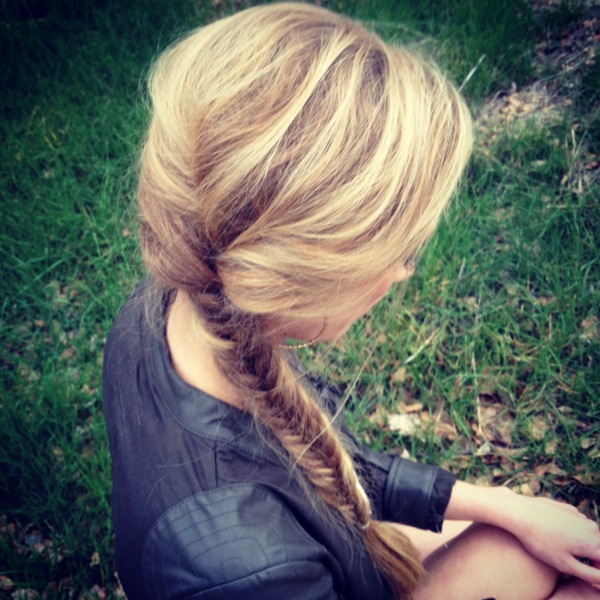
The best part about this hairstyle is that it looks incredibly complicated when it’s actually quite simple! It only involves two sections of hair. A few tips: the smaller of strands you work with while braiding, the more fine, thin boned look you’ll get. But thick pieces work great too! It’s all about preference and how much time you have. Try this look on dirty hair with a little dry shampoo. The perfect way to skip a wash (don’t worry I won’t tell!).I always tease the crown and pin back the front of the hair into some version of some up and some down for added height! After you finish the braid you can rearrange or even sometimes take out the hair pins!

So here’s the video…braids are best learned in live motion I think! It’s an oldie but a goodie! Enjoy!
Cheers to Braids, Beauty, and Dirty Hair,

February 5, 2014
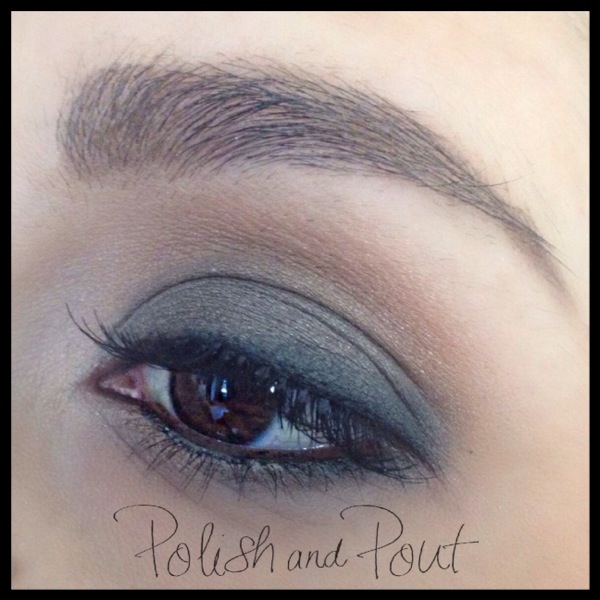
I am so smitten with the look I did for a photoshoot this week with Nicole Cook (umm, by the way she is an AMAZING highschool senior –fashion– photographer in NorCal). Luckily I had the sense to take pics of the look as it developed so I could make this tutorial for you! The funny thing is that it doesn’t actually use any silver shadows in it…the hue is a result of the blending of the liner and shadows. Which I actually prefer because silvers often translate very blue on camera. This way you get the effect in a truer way. If you’re not a fan of silvery shadow, then sub the black pencil for an espresso one and blend out with dark brown shadow instead of black for a more chocolatey neutral look. I worked from my Naked Basics palette and also a few shades from Makeup Geek (creme brulee, shimma shimma, and homecoming).
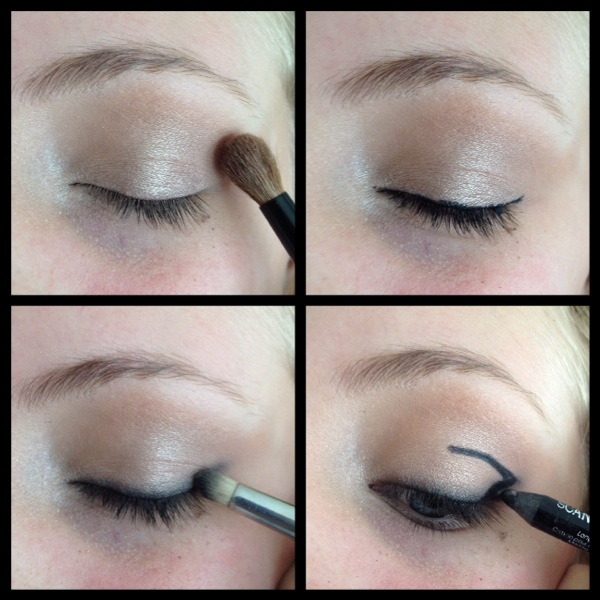
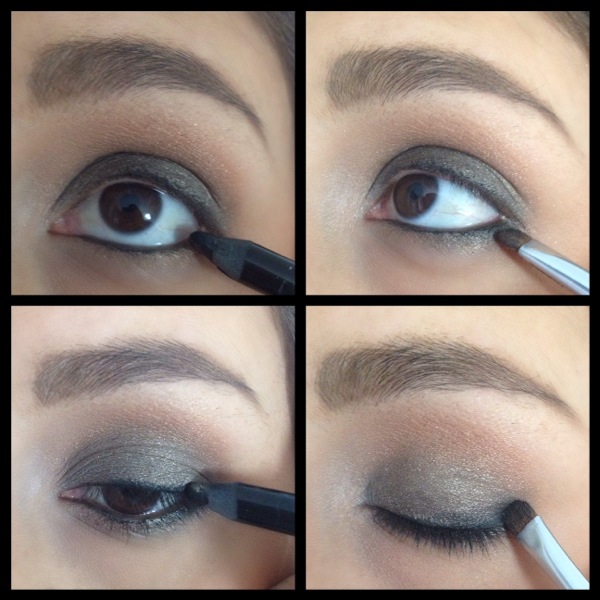
1. Prime your lids and dust on a neutral champagne or vanilla shadow all over your lid, the shimmery base will help when it comes time to blend.
2. Line your eyes, doesnt need to be precise.
3. Use a pencil brush (or your finger even) to blend and soften the liner.
4. Draw a V with your pencil to outline where your smokey cat eye will go. Make sure you open your eye first to determine how high up you want the line in your crease.

5. Use your pencil brush to blend and smudge the V more into the center of your eye, you essentially are focusing on the outer third portion of your eye. Dip your brush into black shadow as necessary to build the depth you are comfortable with. See how messy its getting? Trust the process and don’t get scared! I like to do eyes first and skin second when doing looks like this.
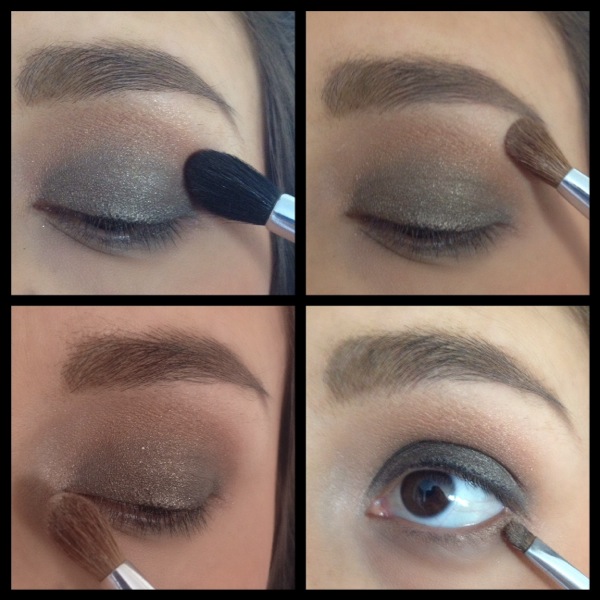
6. Pat a shimmery taupe shadow all over your lid, smoothing out the seams of where the black shadow stops.
7. Dust a soft brown in your crease, bronzer works fab!
8. Highlight under your brow and in your inner socket.
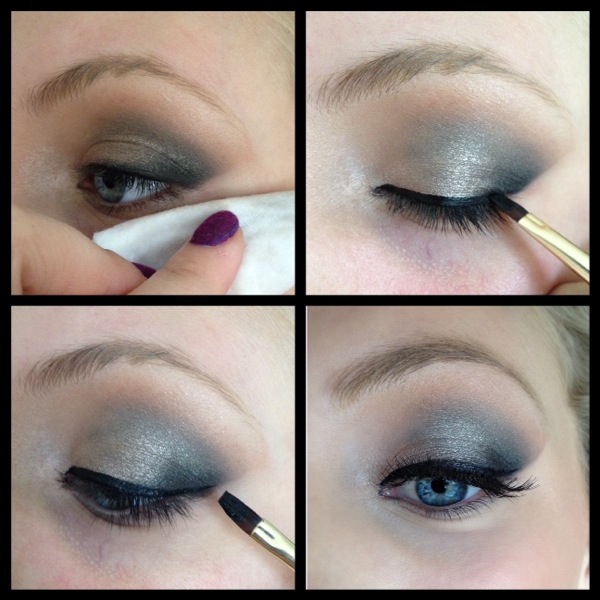
9. Now for the clean up! This step is what adds the sharp angled edge to the look. Take a cotton pad with remover or makeup wipe and fold it so you have a straight edge. Swipe the edge in an upward angled motion.
10. Line your eyes. I love the sharpness of a gel or liquid for this look.
11. Add the flick of liner at the end for your cat eye. The awesome part about this look is that the sharp edge we created is your guideline, so its goof-proof!
12. Load up with mascara…bonus points and more drama if you toss in some lashes too! I used medium length individuals.

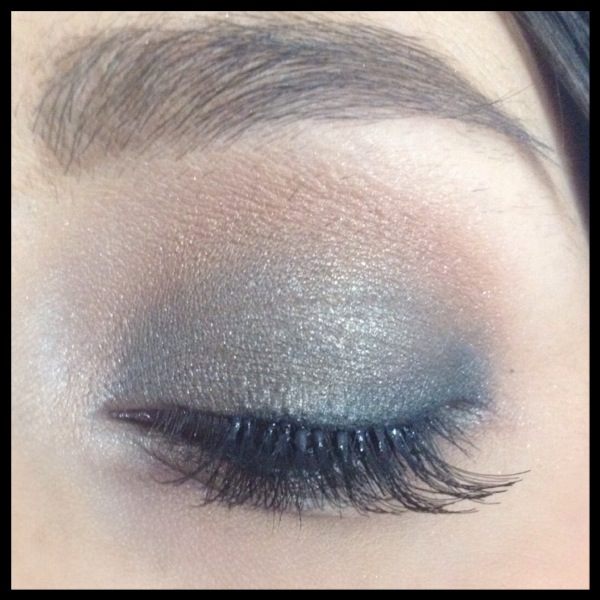
And there you have it! Isn’t our model Lexy so lovely?!
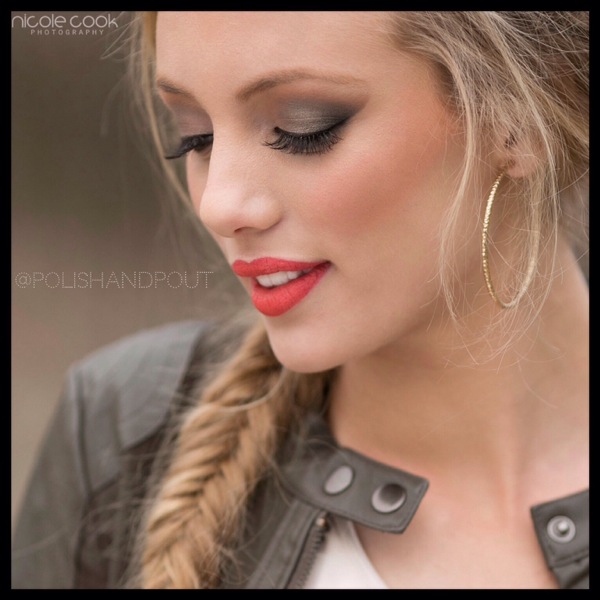
We were going for drama so we paired her look with a bold punchy lip (Rimmel Kate Moss #12)…but a nude lip is a great option for this look!
Cheers to Seniors, Silver, and Smokey Eyes,

January 29, 2014
Who says that the only daytime drama can be the soaps you watch on tv? A smokey eye doesn’t have to be reserved for the evening! The trick to pulling it off during the day and not looking like you’re headed to the club is to be strategic about the placement and using soft neutral shades! Here’s how…

1. Apply your normal primer, and then start by lining your eyes. It doesn’t need to be perfect. I’m using the Rimmel Scandaleyes pencil in black.
2. Use a smudger brush and smudge the liner back and forth to create our smoke.
3. Using the same brush begin to work the smudged liner upwards. Keep it away from the crease…we are smoking out the lid.
4. Pat a shimmery taupe all over your lid. I’m using Homecoming by Makeup Geek.
5. Using a windshield wiper motion, blend a soft brown into the crease. I’m using Creme Brulee by Makeup Geek.
6. Sweep a matte vanilla shade under the brow bone, I’m using Foxy from the Urban Decay Naked Basics palette.
7. Place a pop of shimmery vanilla in your inner socket to give the look a little light. I am using Venus from Naked Basics.
8. Using the same smudge brush as before, dip it into the taupe you used on your lid and blend a thin line under your lashes.
9. Apply your black liner from step one to the inner rim of your lower lashline (waterline).
10. Use your smudger to smear the liner into the outer third of your lower lashline.
11. Line the top of your eyes again to bring the look together.
12. Smudge the liner up slightly on the outer third of your top lashline.
Mascara (and lashes if desired) and there you go!
A touch of intensity that appropriate for just about anywhere!

And a full shot of my lovely model to show you that overall, the shadow really does translate soft and is definately not too harsh for daytime! Plus, I have to show off my gorgeous sister (who is having a baby next month! Woohoo!).
Cheers to Smoke, Shadow, and Daytime Drama,

January 13, 2014
Do you ever smell something and immediately you’re thinking of a certain person, or time in your life? Sometimes the memory even surfaces before you realize what you’re smelling, “What is that, smells like Christmas!” A diesel truck goes by and I’m mentally transported to Santiago, Chile. Coconut Lime Verbena body spray…I think of my sister. Chanel Chance Eua Fraiche and it’s a hot summer night downtown with Andy.
If we naturally link scents with people or events, then why not use that to your advantage and be purposeful about your scent during important times?! Since scent is so closely tied to memory, I encourage my brides to pick a new unique scent for their wedding day (bonus points if you wear it on your honeymoon too!). All of the amazing emotions of the day get intertwined with that scent. And every time you bring it out (on a special event or anniversary) you’ll be reminded of all those feelings of love, friendship, and celebration!
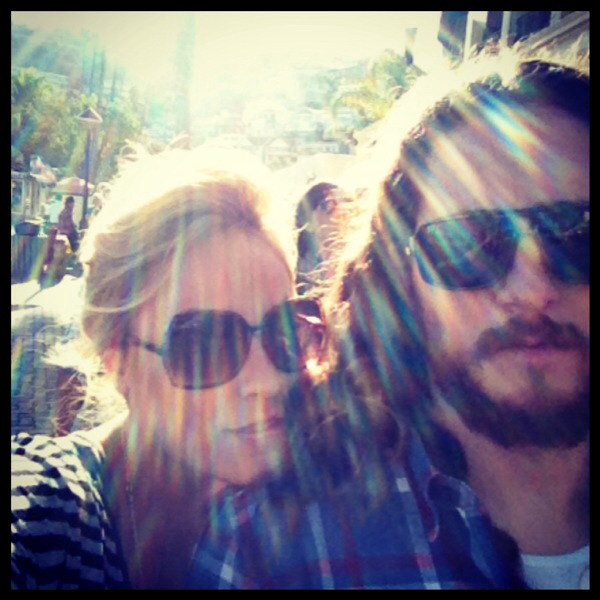
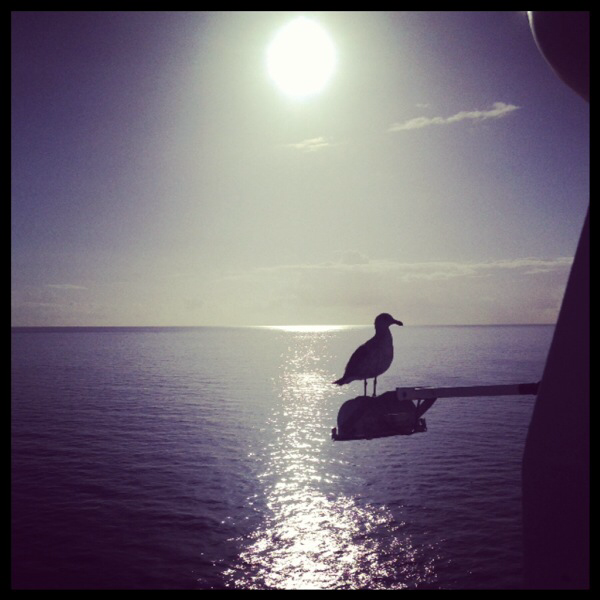
I do this in my own life, not just one my wedding day, but whenever there is something significant I want to remember. I recently had a birthday and we decided to celebrate by going on a cruise to Mexico! The perfect opportunity to make a scent-memory connection!
Jenn from Garden Apothecary was sweet enough to send me some birthday treats from her amazing product line. When I saw the Cacao + Cardamom Flower Essence perfume oil I just knew that would be the perfect scent for my Latina Holiday! Its like sugar and spice with a warmth. I made sure to apply it morning and night…Here is a peek into the memories my scent and I made on vacation:

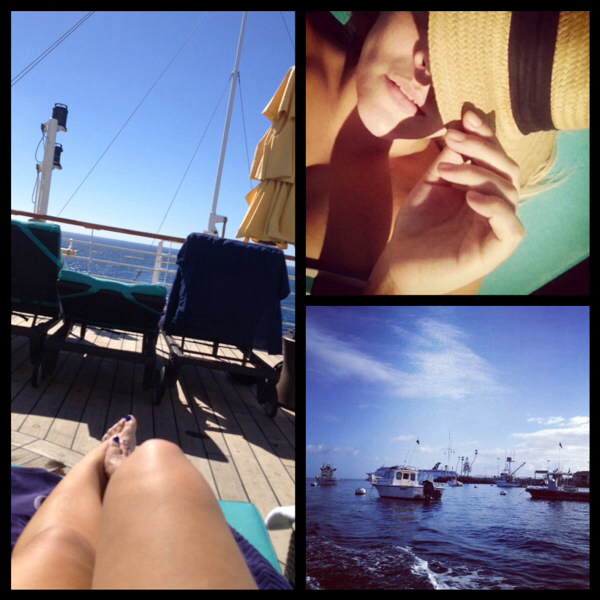
I had never been to Catalina Island before so it was so great to visit a new place. We drove around in golf carts, visited the little shops, and ate ice cream. It reminded me of Sauselito a little!
Mexico was of course great! Full of shopping and delish local food! I even was surprised with a mariachi serenade for my birthday…wow! I felt so spoiled.

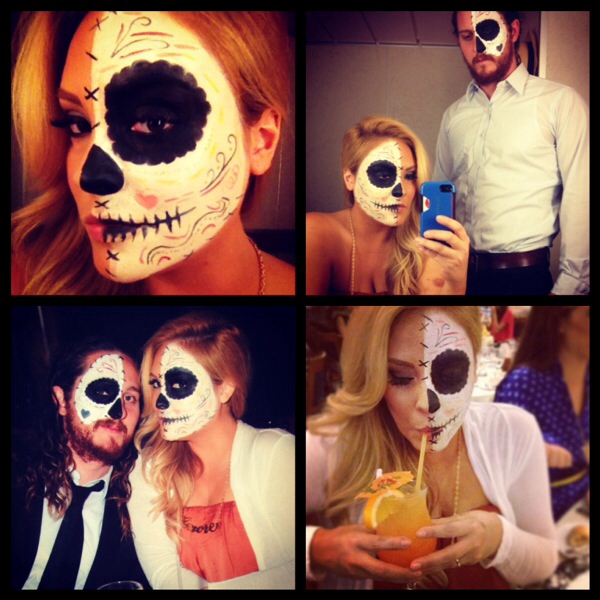
Halloween happened while at sea…and it was so thrilled that Andy let me paint his face! So much fun!
It’s not a vacation in my opinion without some poolside sunshine.
I love getting dolled up and going out with my husband. More formal sit-down dining happens every night on the ship, so every night felt like date night! There was a vanity desk in our cabin, so doing my makeup and hair seemed extra fun and my Cacao roller ball fragrance made me feel vintage and swanky!

Of course, vacation always ends too soon…but I returned to amazing friends and family that wanted to continue celebrating, so I really cannot complain!
I think I’m going to bust out the cacao fragrance again at Christmas and add some more memories to that scent! What about you? What scents remind you of good times?
What if you wore the same scent on every date night…or found the perfect fragrance for your wedding…or graduation…or promotion…and the list goes on and on! You’d literally be able to bottle those memories. So stay tuned next week for my fragrance hall of fame top picks so you can find the perfect one!
And special thanks to Garden Apothecary! Jenn, your special scent helped make my birthday perfect!
Cheers to Memories, Mexico, and Scent,

November 14, 2013
It’s no secret that I love bargains…and the 5 under $5 is tag going around online right now so I thought I’d join in the fun too! I don’t think I could really just narrow the list down to only 5 items under $5…so this may be a re-occurring series. But these 5 I currently use on a very regular basis so I think it’s a good place to start!
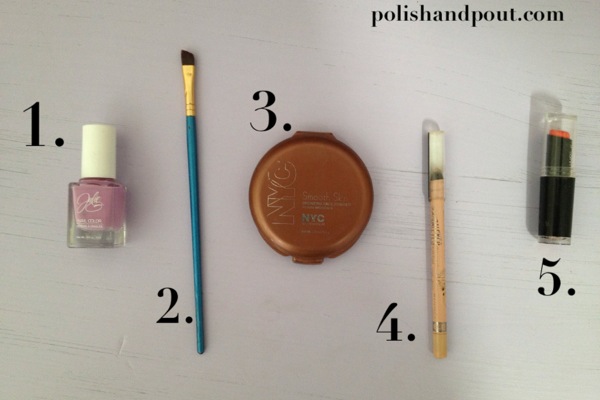
1. Nail Polish by Julie G: I absolutely LOVE these! You can find them at the drugstore for less than $3…they are very opaque (meaning lots of color!) An you can almost get away with one coat! They go on smooth and wear long. Go snag some, you’ll be happy you did!
2. Liner and brow brushes from the craft store: Yep. I’ve mentioned this tip numerous times before and I will keep shouting it from the rooftops! Those liner and brow brushes you’re paying so much for are the same things you find in the detail painting section of the craft store! They work just as well at a fraction of the price…I’ve paid as little as $0.50 but never more than a buck or two.
3. NYC Smooth Skin Bronzer in Sunny: less than $3 at Target and worth far more! This matte bronzer is great for daily basic contour and adds a lovely sun-kissed glow! It’s not packed with red, so you won’t look like an oompa-loompa! I’m on my 4th one at the moment and even keep this in my pro kit now.
4. Rimmel Scandaleyes liners: these guys are around $4 and are so smooth and creamy! They glide on easy and smudge out great, but once they set they’re there to stay! Waterproof creamy liners for under $5?! Yes please! The nude one I love for the water line for a wide-eyed look.
5. WetnWild Megalast lipsticks: Are you tired about hearing about this? Sorry (not sorry)…but these are just worth so much more than the $2 they charge! Pigment packed and super long wearing…and tons of amazing shades!
What about you? Any products you love that are under $5? Let me know, I want to try them! By the way, do you follow me on Instagram and Vine? Follow @polishandpout and see my magic trick that goes with this post 😉
Cheers to Deals, Steals, and 5 Dollar Bills,

September 18, 2013
Life can be tough. Circumstances can be shaky. Here is what we are certain of though…
1. Lipstick can cure just about anything.
2. But how we look on the outside does not define us.
3. Everyday is a fresh chance to be a new you. Is the day half gone and its been terrible so far? You can start your day over anytime you choose! I had a teacher in junior high say that all the time and it stuck with me…I use this pearl of wisdom regularly!
4. Knowing how to do something properly is very powerful! And while an expertly executed smoky eye may or may not land you Ryan Gosling, it will boost your confidence and make the day seem brighter!
5. Everyone deserves to have their moment to shine. You may not be a celebrity, but you can feel like one once in a while! (That’s where we step in!)
6. Others actions can affect us, but ultimately your personal choices will be the rudder that steers the ship of your life!

7. You can always count on being able to tag along with us! Beauty Adventures are best shared with a friend…and sometimes a little pretty is the perfect escape!
Cheers to Circumstance, Certainty, and New Chances,

Beauty, Bridal, Celebrity, DIY, Fashion, Health, industry professional, Makeup, Musings, Personal, Photoshoot, Product review, Shopping, Trend, Tutorial
September 9, 2013
I’ve been feeling inspired when it comes to nail art lately, as evidenced by my recent posts…So here’s another mani to try! It ends up looking like brush strokes on a canvas or a little tie-dyed!
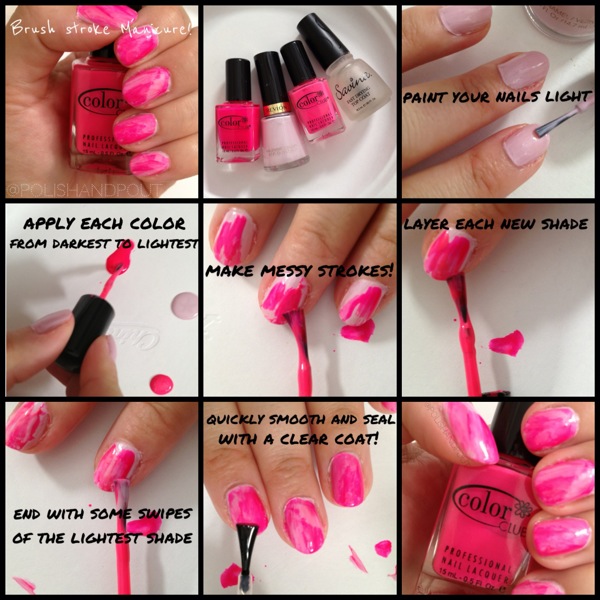
I love this style because you can be messy and not super calculated…so it takes no precision! Its like a messy manicure…but on purpose! A nail novice or nail expert will have fun with this one.
I recommend doing this one hand at a time, as the clear coat is what smoothes out the brush strokes. Too much dry time will change the outcome and may result in a little texture. Try it out and let me know how yours turns out! And no need to use all shades in the same family…mix it up!
Cheers to Tie-Dye, Brush Strokes, and Messy Manicures,

August 30, 2013

